Sewing Machine Tutorials Tips for Beginners

How to Sew a Back Stitch on a Sewing Machine | Sewing Machine Tutorials & Tips for Beginners

This is the you tube tutorial : https://youtu.be/ZDOkHkgRxzI

Cassie Cartmell – Faodail Creation

Time to read

11โ€“17 minutes
Baby Lock Educator
How to Sew a Back Stitch on a Sewing Machine

If you’re learning How to Sew a Back Stitch on a Sewing Machine, you’re already taking an important step toward creating stronger, longer-lasting sewing projects. This simple but essential technique is often overlooked by beginners but mastering it can instantly improve the quality of everything you sew.

In this detailed guide, youโ€™ll learn How to Sew a Back Stitch on a Sewing Machine step by step, why it matters, and how to use it correctly every time. Whether you’re brand new to sewing or just want to refine your skills, this guide will help you build confidence and create more professional results.

As a Baby Lock educator, Iโ€™ve seen first-hand how many beginners skip this step without realizing how important it is. Back stitching is one of those small techniques that makes a huge difference in the durability and finish of your projects. When you consistently apply it, your seams stay secure, your stitches look cleaner, and your overall sewing improves dramatically.

Learning How to Sew a Back Stitch on a Sewing Machine also helps you develop good sewing habits early on. Instead of dealing with unraveling seams or weak stitching later, youโ€™re setting yourself up for success right from the start. It becomes second nature the more you practice, and soon you wonโ€™t even have to think about it.

As a Baby Lock educator, I always encourage sewers to slow down and focus on these foundational skills. Taking the time to properly back stitch at the beginning and end of your seams ensures your projects not only look beautiful but also stand the test of time.

How to Sew a Back Stitch on a Sewing Machine (Complete Beginner Guide)

Understanding How to Sew a Back Stitch on a Sewing Machine is one of the first foundational skills every sewer should learn. Back stitching is what keeps your stitches secure and prevents your seams from coming undone.

Without it, even the most beautiful sewing project can unravel quickly.

When you first begin learning How to Sew a Back Stitch on a Sewing Machine, it might feel like just an extra step but itโ€™s actually one of the most important habits you can develop. Every seam you sew relies on proper reinforcement at the start and finish. Without that reinforcement, your stitches can loosen over time, especially after washing, wearing, or regular use.

Think of back stitching as the anchor for your sewing. It locks your thread in place so your hard work doesnโ€™t come undone. Whether you’re sewing garments, quilting, or creating small projects like pouches or bags, this simple technique ensures your seams stay strong and reliable.

Another reason How to Sew a Back Stitch on a Sewing Machine is so important is that it improves the overall look of your work. Secure seams lie flatter, look neater, and give your projects a more polished, professional finish. Itโ€™s a small detail that makes a big difference.

Baby Lock Educator Tip

As a Baby Lock educator, I always recommend practicing your back stitching on scrap fabric before starting a project. Focus on keeping your stitches straight and consistent as you move forward and reverse. This helps you build muscle memory so that How to Sew a Back Stitch on a Sewing Machine becomes second nature every time you sit down to sew.


What Is Back Stitching and Why Is It Important?

How to Sew a Back Stitch on a Sewing Machine

Before diving into How to Sew a Back Stitch on a Sewing Machine, itโ€™s important to understand what back stitching actually does.

Back stitching is the process of sewing a few stitches forward, then reversing over them using your sewing machineโ€™s reverse button. This reinforces the thread and locks your stitches in place.

Why Back Stitching Matters

  • Prevents seams from unraveling
  • Strengthens the beginning and end of stitches
  • Creates durable, long-lasting projects
  • Gives your work a more professional finish

When learning How to Sew a Back Stitch on a Sewing Machine, think of it as securing a knotโ€”but using your machine instead of tying by hand.


Where to Find the Reverse Button on Your Sewing Machine

To master How to Sew a Back Stitch on a Sewing Machine, you need to locate the reverse button.

Most sewing machines have:

  • A reverse lever or button
  • Positioned at the front of the machine
  • Clearly marked with a backward arrow

When pressed, your machine will sew in reverse allowing you to go back over your stitches.


How to Sew a Back Stitch on a Sewing Machine Step-by-Step

How to Sew a Back Stitch on a Sewing Machine

Letโ€™s break down exactly How to Sew a Back Stitch on a Sewing Machine so you can follow along easily.

Step 1: Start Sewing Forward

Begin by sewing forward as you normally would for about 3โ€“4 stitches.

Step 2: Press the Reverse Button

Hold down the reverse button and sew backward over those same stitches.

Step 3: Sew Forward Again

Release the reverse button and continue sewing forward along your seam.

This simple sequence is the foundation of How to Sew a Back Stitch on a Sewing Machine.


How to Back Stitch at the End of a Seam

Knowing How to Sew a Back Stitch on a Sewing Machine also means finishing your seams properly.

At the end of your stitching:

  1. Sew to the edge of your fabric
  2. Press the reverse button
  3. Sew backward 3โ€“4 stitches
  4. Go forward again to finish

This locks your stitches and prevents them from unraveling.


Advanced Back Stitch Technique (Crisscross Method)

Once youโ€™re comfortable with How to Sew a Back Stitch on a Sewing Machine, you can try a more advanced method.

Some sewers reinforce their stitches even further by:

  • Back stitching as normal
  • Turning the fabric 180 degrees
  • Sewing forward again
  • Reversing once more

Why Use This Method?

This creates a crisscross pattern, making the stitches extremely secure.

Itโ€™s especially useful for:

  • High-stress seams
  • Bags and pouches
  • Frequently used items

Common Mistakes When Learning How to Sew a Back Stitch on a Sewing Machine

How to Sew a Back Stitch on a Sewing Machine

Even though How to Sew a Back Stitch on a Sewing Machine is simple, beginners often make a few common mistakes.

Mistake 1: Forgetting to Back Stitch

Skipping this step can cause seams to unravel quickly. It might not seem like a big deal at first, especially on small projects, but over time your stitches can loosen and come apart. This is especially noticeable after washing or regular use. Developing the habit of back stitching at both the beginning and end of your seam is essential for durability.

Baby Lock Educator Tip: As a Baby Lock educator, I recommend saying โ€œstart and stopโ€ in your head as you sew. This simple reminder helps you remember to back stitch at both ends until it becomes second nature.


Mistake 2: Not Sewing Enough Stitches

You only need about 3โ€“4 stitches too few wonโ€™t secure the seam. If you only reverse one or two stitches, your seam may still come loose. The goal is to properly lock the threads in place without overdoing it.

Practicing consistency will help you get a feel for the right number of stitches every time.

Baby Lock Educator Tip: As a Baby Lock educator, I suggest watching your stitch length markings or counting stitches as you practice. This helps train your eye so you can confidently back stitch the correct amount without guessing.


Mistake 3: Pulling the Fabric

Let the machine do the work. Pulling can distort your stitches, cause uneven tension, and even damage your fabric or needle. Your sewing machine is designed to feed the fabric through evenly using the feed dogs.

When learning How to Sew a Back Stitch on a Sewing Machine, itโ€™s important to guide the fabric gently rather than force it.

Baby Lock Educator Tip: As a Baby Lock educator, I always tell beginners to keep their hands relaxed and lightly resting on the fabric. Focus on guiding, not pulling, and let the machine maintain a steady stitch flow.


Mistake 4: Back Stitching Too Much

Overdoing it can create bulky seams. While itโ€™s important to secure your stitches, too much back stitching can make your seams thick and harder to sew over later especially in projects with multiple layers.

Balance is key when mastering How to Sew a Back Stitch on a Sewing Machine.

Baby Lock Educator Tip: As a Baby Lock educator, I recommend sticking to 3โ€“4 stitches forward and back. This gives you a secure seam without unnecessary bulk, keeping your projects neat and professional.


Tips to Master How to Sew a Back Stitch on a Sewing Machine

To truly master How to Sew a Back Stitch on a Sewing Machine, keep these tips in mind:

  • Practice on scrap fabric first
  • Keep your stitches straight
  • Use consistent stitch length
  • Always back stitch at the beginning AND end
  • Get comfortable using your reverse button

Consistency is key when learning How to Sew a Back Stitch on a Sewing Machine.


When Should You Use Back Stitching?

Understanding How to Sew a Back Stitch on a Sewing Machine also means knowing when to use it.

Always Back Stitch:

  • At the start of seams
  • At the end of seams
  • On stress points

Avoid Back Stitching:

  • On delicate fabrics (use alternative methods)
  • When instructed otherwise in patterns

Back Stitching vs. Lock Stitching

While learning How to Sew a Back Stitch on a Sewing Machine, you might hear about lock stitching.

  • Back Stitching: Uses reverse stitches
  • Lock Stitching: Repeats stitches in place (some machines have this feature)

Both secure seams, but back stitching is the most common and beginner-friendly method.

When understanding How to Sew a Back Stitch on a Sewing Machine, it helps to know when each method is best used. Back stitching is quick, easy, and built into almost every sewing machine, making it ideal for beginners and everyday sewing projects. It works well for garments, quilting, and general crafting because it creates a strong, reliable seam with minimal effort.

Lock stitching, on the other hand, is often found on more advanced machines and is designed to secure stitches in place without reversing. It creates a cleaner finish in some situations, especially on delicate fabrics where visible back stitching might not be desirable.

However, for most everyday sewing, How to Sew a Back Stitch on a Sewing Machine remains the go-to method because it is simple, effective, and universally available. Once you master it, youโ€™ll be able to confidently secure your seams in almost any project you create.


Why Beginners Must Learn How to Sew a Back Stitch on a Sewing Machine

If youโ€™re new to sewing, mastering How to Sew a Back Stitch on a Sewing Machine is essential.

It:

  • Builds strong sewing habits
  • Improves project durability
  • Boosts confidence
  • Prevents frustration later

This small step makes a huge difference in your finished work.

When you first start learning How to Sew a Back Stitch on a Sewing Machine, it might feel like just another step to remember but it quickly becomes a natural part of your sewing routine. The more you practice, the more automatic it becomes, and before long, you wonโ€™t even think twice about securing your stitches at the beginning and end of every seam.

One of the biggest benefits of learning How to Sew a Back Stitch on a Sewing Machine early is that it helps you avoid common beginner frustrations. Thereโ€™s nothing more discouraging than finishing a project only to have the seams start coming apart. By taking a few extra seconds to back stitch, you ensure your hard work stays intact.

It also sets the foundation for more advanced sewing techniques. Strong, secure seams are essential whether you’re quilting, garment sewing, or creating home dรฉcor projects. This simple habit carries through every type of sewing you do.

Baby Lock Educator Tip

As a Baby Lock educator, I always remind beginners to slow down at the start and end of each seam. Take your time when back stitching instead of rushing through it. This ensures your stitches are neat, secure, and evenly placed helping you master How to Sew a Back Stitch on a Sewing Machine with confidence and consistency.


Baby Lock Educator

Final Thoughts on How to Sew a Back Stitch on a Sewing Machine

Now that you understand How to Sew a Back Stitch on a Sewing Machine, you can start applying this technique to all your sewing projects with confidence.

Remember:

  • Always back stitch at the beginning and end
  • Use 3โ€“4 stitches for best results
  • Practice until it becomes second nature

Mastering How to Sew a Back Stitch on a Sewing Machine is one of the simplest ways to instantly improve your sewing and itโ€™s a habit every sewer should develop from day one.

As you continue practicing How to Sew a Back Stitch on a Sewing Machine, youโ€™ll notice how much more secure and professional your projects begin to look. Seams will stay intact, your stitching will appear cleaner, and youโ€™ll feel more confident tackling new and more advanced projects. Itโ€™s these small foundational skills that truly set apart beginner sewing from polished, high-quality work.

Another benefit of mastering How to Sew a Back Stitch on a Sewing Machine is the time it saves you in the long run. You wonโ€™t need to go back and fix unraveling seams or redo sections of your project. Instead, youโ€™ll have the confidence that your stitches are secure from the very beginning.

Baby Lock Educator Tip

As a Baby Lock educator, I always encourage sewers to make back stitching part of their sewing routine, just like threading the machine or checking your seam allowance. The more consistent you are, the more natural it becomes and mastering How to Sew a Back Stitch on a Sewing Machine will quickly turn into a habit you never skip.


Join my FACEBOOK GROUP

Faodail Creation Facebook Group Link where I have all my free patterns

READ NEXT

How to Sew a Back Stitch on a Sewing Machine | Sewing Machine Tutorials & Tips for Beginners

How to Sew a Back Stitch on a Sewing Machine | Sewing Machine Tutorials & Tips for Beginners is a fun way to explore sewing.

How to Sew a Back Stitch on a Sewing Machine | Sewing Machine Tutorials & Tips for Beginners, you might also like How to Use a Sewing Machine you can also try Attending Quilt Con to learn more sewing.

The above links lead to Faodail Creation You Tube Channel

SUBSCRIBE! So you don’t miss my next post

Use the search below so you can find your next sewing project

Latest Posts

This Blog Post

Categories List

More Blog Posts

How to Sew a Snap Closure Cord Keeper : A Simple Step-by-Step Tutorial
This tutorial by Cassie Cartmell from Faodail Creation guides beginners on sewing …
How to Make a Fabric Garland
This content provides a step-by-step guide on creating a fabric garland using …

Blog Tags

Sewing Machine Tutorials Tips for Beginners

How to use a Seam Ripper | Sewing Machine Tutorials & Tips for Beginners

Cassie Cartmell – Faodail Creation

Here is the link you the You Tube Tutorial : https://youtu.be/Ai-kM-mPS78?si=GrRVvxa0AUh63OOx

Baby Lock Educator
11โ€“17 minutes

Seam Ripper : The Ultimate Guide to Using It the Right Way

Seam Ripper

If you’re struggling to remove stitches, you may be using your seam ripper incorrectly. Many beginners (and even experienced sewists) have been using their seam ripper the slow, frustrating way. They often donโ€™t realize thereโ€™s a much faster and cleaner technique.

In this complete guide, youโ€™ll learn how to use a seam ripper that will transform how you remove stitches. Whether you’re fixing mistakes, altering garments, or learning sewing basics, mastering this tool will save you time and protect your fabric. Using a seam ripper correctly is one of the most important basic skills in sewing. It can change your workflow once you understand the right motion and technique.

Most people donโ€™t realize that the issue isnโ€™t the tool itself; itโ€™s how itโ€™s being used. A seam ripper is designed to work with the fabric, not against it. When used properly, it glides through stitches smoothly instead of forcing you to pick them apart one by one. This improves efficiency and helps maintain the integrity of your fabric, especially when working with delicate materials.

Knowing how to use a seam ripper properly also helps you understand when to use gentle pressure versus when to let the tool do the work for you. Instead of focusing on every single stitch, you begin to see the seam as a whole line that can be removed more efficiently.

Another important factor is confidence. Many sewists hesitate when removing stitches, worried about damaging their project. However, once you understand the correct method, using a seam ripper becomes a quick and stress-free part of the sewing process. With practice, youโ€™ll find that removing seams is no longer a chore but a simple step toward achieving a polished, professional finish.

Learning seam ripper for individual stitches can also help when precision is needed, especially in tight or detailed areas where control matters most. In these cases, you may still need to remove stitches how to use techniques carefully, focusing on control rather than speed.

As a Baby Lock educator, I always emphasize proper tool handling because it builds long-term sewing confidence and accuracy. Being a Baby Lock educator means teaching sewists not just how to complete a project, but how to truly understand their tools and improve their technique. A Baby Lock educator focuses on helping students work smarter, not harder, so they can enjoy sewing more and struggle less.


Why Seam Ripper Techniques Matter

Seam Ripper

Using this sewing tool correctly is essential for efficient sewing. If you’re still picking out stitches one by one, you’re wasting valuable time and risking fabric damage.

Hereโ€™s why learning seam ripper techniques is a game-changer:

  • Speeds up seam removal dramatically
  • Prevents fabric tears and damage
  • Improves sewing workflow
  • Reduces frustration during corrections

Once you understand using this sewing tool, youโ€™ll never go back to the old way.

As a Baby Lock educator, one key tip I always share is this: donโ€™t force the seam ripper through the fabric let the ball tip guide your motion. When you start with just 1โ€“2 stitches and then glide the tool along the seam, the stitches release cleanly and evenly. This small adjustment makes a huge difference in both speed and accuracy, especially when working on detailed sewing projects where precision really matters.


Seam Ripper Basics – Understanding the Tool

Seam Ripper

Before diving into seam ripper methods, letโ€™s break down the tool itself.

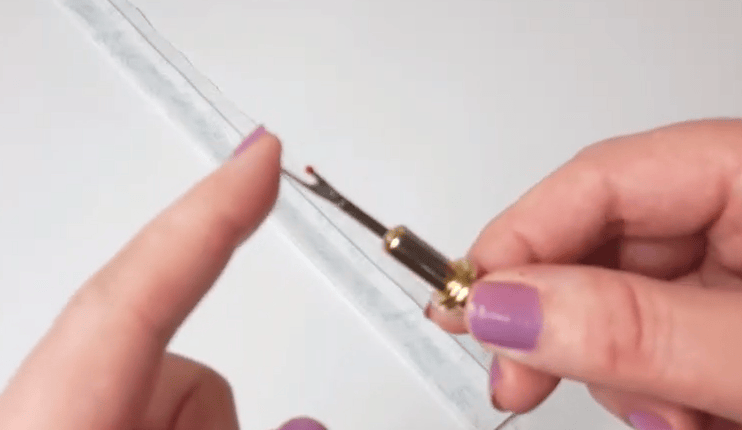
A seam ripper has two ends:

  • A sharp pointed tip for cutting stitches
  • A rounded ball tip designed to glide along fabric

Most people ignore the ball tip but, this is the most important part of this sewing tool.


The Common Mistake

Seam Ripper

The Slow and Inefficient Method

Many people use a this sewing tool incorrectly by:

  • Inserting the sharp tip under each stitch
  • Cutting stitches one at a time
  • Repeating the process across the seam

This method works but itโ€™s painfully slow.

If youโ€™ve been doing this, donโ€™t worry. Nearly everyone starts this way before learning better techniques.

The real issue is not your skill level but your understanding of how the tool is designed to work. A seam ripper is meant to glide through stitches in a controlled motion, not attack each stitch individually. Working stitch by stitch interrupts your flow and increases the chances of pulling or distorting the fabric, especially noticeable when working on longer seams or delicate materials.

Another aspect beginners often overlook is rhythm. Once you find a steady motion, seam removal becomes more efficient and less stressful. Instead of stopping and starting repeatedly, you develop a smooth technique that carries through the entire seam. This builds confidence, as you can see progress happening quickly and cleanly. With practice, your sewing projects will feel more manageable.

With practice, your sewing projects will feel more manageable, and fixing mistakes will no longer feel like a frustrating task.


The Correct Method (Fast & Efficient)

Baby Lock Educator

Step-by-Step Technique

Hereโ€™s the smarter way to use :

Step 1 โ€“ Start the Seam

Begin by using the sharp tip to cut 1โ€“2 stitches only.
This opens the seam slightly and prepares it for the next step.

Step 2 โ€“ Use the Ball Tip

This is where this technique changes everything.

Insert the rounded ball tip into the seam. The ball prevents snagging and helps guide the tool smoothly.

By integrating these techniques into your sewing practice, you’ll find that fixing mistakes no longer feels frustrating.

Step 3 โ€“ Glide Through the Stitches

Now gently push the tool along the seam.

With proper usage, the blade will cut multiple stitches at once quickly and cleanly.

Step 4 โ€“ Watch the Magic Happen

Youโ€™ll notice the stitches come apart effortlessly.

This is the core of seam ripper efficiency minimal effort, maximum results.


Seam Ripper Demonstration Explained

Seam Ripper

When applying these techniques, the difference is immediately noticeable:

  • Instead of stopping repeatedly, you move continuously
  • Instead of frustration, you gain control
  • Instead of slow progress, you finish quickly

Practicing these methods just a few times will make this your default technique.

As a Baby Lock educator, one important tip I always highlight is this: the seam ripper should never be pushed aggressively through the fabric. Instead, start with a small opening of 1โ€“2 stitches, then guide the tool along the seam using a smooth, controlled motion. This allows the blade and ball tip to do the work for you, reducing strain on the fabric and giving you a much cleaner finish. Mastering this simple adjustment can completely transform your sewing accuracy and speed.


Tips for Better Results

Seam Ripper

Keep Your Fabric Flat

For best results with the tool, lay your fabric on a flat surface. This improves control and prevents accidental cuts.

Use Gentle Pressure

Donโ€™t force the tool. Proper usage relies on smooth gliding, not pressure.

Work in Sections

Even with efficient techniques, itโ€™s helpful to work in manageable sections for precision.

Check for Loose Threads

After using your seam ripper, remove leftover threads to keep your project clean.


Seam Ripper : When Should You Use It?

Seam Ripper

Youโ€™ll rely on this tool in many sewing situations:

  • Fixing stitching mistakes
  • Removing hems
  • Altering clothing
  • Undoing seams for adjustments
  • Correcting misaligned fabric

Mastering seam ripper ensures you can confidently fix any sewing error.


Seam Ripper Incorrect way vs Proper way

Old Way vs New Way

Incorrect way Proper way
SlowFast
Stitch-by-stitchMultiple stitches at once
Higher riskSafer with ball tip
FrustratingSmooth and easy

Clearly, the seam ripper offers a superior approach.


Baby Lock Educator

Seam Ripper Mistakes to Avoid

Even when using a seam ripper, avoid these common mistakes:

Even when using a seam ripper, avoid common mistakes. Always begin with 1โ€“2 stitches, as this step is essential in ripping seams. The ball tip is key to proper usage, so donโ€™t ignore it.

Always begin with 1โ€“2 stitches. This step is essential in ripping seams

Ignoring the Ball Tip

The ball tip is key to proper seam ripper usage. Donโ€™t overlook it.

Applying Too Much Force

Let the tool do the work. Overpressure can damage fabric.

When improving your results, patience is just as important as technique. Many beginners rush through seam removal, especially when eager to continue their sewing project. This often leads to small fabric snags or uneven edges. Taking an extra moment at the start of each seam ensures cleaner results and reduces mistakes that need fixing later.

Itโ€™s also helpful to regularly check your progress as you work. Pausing briefly allows you to adjust your grip, realign your fabric, and make sure everything is still smooth and controlled. These small habits can dramatically improve your accuracy over time. In sewing, consistency matters more than speed, especially when you are learning new techniques or refining your skills.

When you practice regularly, you begin to understand how fabric reacts, how threads release, and safe pressure to apply. This hands-on learning is essential in sewing as it helps develop control and accuracy over time.

Build Confidence and Sewing Skills Fast

If you’re new to sewing, learning seam ripper techniques early will save you hours of frustration.

Start by:

  • Practicing on scrap fabric
  • Testing both methods to feel the difference
  • Building muscle memory

Soon, using a seam ripper will feel natural.

One of the best things you can do at the beginning of your sewing journey is give yourself permission to make mistakes. Every experienced sewist has spent time undoing stitches, and this is where confidence is actually built. When you practice regularly, you begin to understand how fabric reacts, how threads release, and how much pressure is safe to apply. This kind of hands-on learning is essential in sewing because it helps you develop control and accuracy over time.

It also helps to slow down during practice sessions. Instead of rushing through your project, focus on how the tool moves through the fabric. Notice how the stitches separate cleanly when the technique is correct. Repeating this process builds strong habits that will carry over into every future project. With consistent practice, your coordination improves, and youโ€™ll find that both sewing and fixing mistakes become much easier and less stressful.


Seam Ripper Pro Tips

Use Good Lighting

Clear visibility helps you apply seam ripper techniques accurately.

Choose a Sharp Seam Ripper

A dull tool reduces the effectiveness of the seam ripper

Another helpful tip is to keep your workspace organized. A clutter-free sewing area allows better focus and helps avoid mistakes. Over time, these small improvements lead to better accuracy and smoother sessions.

If your seam ripper isnโ€™t cutting cleanly, itโ€™s time for a new one.

To improve your sewing experience even further, itโ€™s also important to develop good habits while working with your tools. Always take your time when starting a new section of stitching removal so you donโ€™t accidentally damage the fabric underneath. A steady hand makes a big difference in how clean your results will be. In sewing, precision matters more than speed at the beginning, but once you build confidence, speed will naturally follow.

Another helpful tip is to keep your workspace organised. When your sewing area is clutter-free, you can focus better and avoid mistakes. Many sewists underestimate how much environment affects performance, but a tidy space often leads to better accuracy and smoother sewing sessions. Over time, these small improvements add up and make every project more enjoyable and efficient.


Seam Ripper and Sewing Efficiency

Baby Lock Educator

Mastering these techniques donโ€™t just improve seam removal it boosts your entire sewing workflow.

Youโ€™ll:

  • Spend less time fixing mistakes
  • Work more confidently
  • Finish projects faster

This is why these skills are essential for every sewist.

This is why mastering these skills is essential for every sewist. When applying these techniques consistently, your workflow becomes much smoother and more enjoyable. Instead of getting stuck on small errors, you can quickly correct them and move forward, allowing more time for actual enjoyment in sewing.


These techniques are simple, powerful, and incredibly effective. Switching from the slow, stitch-by-stitch method to the glide technique using the ball tip can transform your sewing experience. If youโ€™ve been using your seam ripper the old way, now is the time to upgrade your skills.

These techniques are simple, powerful, and incredibly effective. By switching from the slow, stitch-by-stitch method to the glide technique using the ball tip, you can completely transform your sewing experience.

If youโ€™ve been using your seam ripper the old way, now is the perfect time to upgrade your skills. Once you start applying these methods consistently in your sewing projects, youโ€™ll notice smoother results, less fabric damage, and a big improvement in your overall workflow. It also builds confidence, especially when tackling more advanced sewing projects where precision really matters. Over time, even small improvements like this can make a huge difference in your sewing journey.


Seam Ripper : What Will You Do Next?

Now that youโ€™ve learned these techniques, you have a better, faster, and smarter method that changes how you approach sewing. Instead of struggling with each stitch, you can move through your projects with confidence and ease.

Now that youโ€™ve learned these techniques, you have a better, faster, and smarter method that will completely change the way you approach sewing. Instead of struggling with each stitch, you can now move through your sewing projects with confidence and ease.

Start practicing today, and youโ€™ll immediately notice the difference. The more you use this method in your sewing routine, the more natural it will feel. Over time, your sewing speed will improve, your results will look more professional, and youโ€™ll spend far less time fixing mistakes. Good sewing habits like this build real skill, and they make every future sewing project smoother, quicker, and far more enjoyable.

As a Baby Lock educator, I always encourage sewists to focus on technique over speed in the beginning, because speed naturally develops once the foundation is correct. As a Baby Lock educator teaching students to understand that small improvements like how you handle a seam ripper can dramatically improve your overall sewing results and confidence.

Join my FACEBOOK GROUP

Faodail Creation Facebook Group Link where I have all my free patterns

READ NEXT

How to use a Seam Ripper | Sewing Machine Tutorials & Tips for Beginners

How to use a Seam Ripper | Sewing Machine Tutorials & Tips for Beginners is a fun way to explore sewing techniques.

If you enjoyed How to use a Seam Ripper | Sewing Machine Tutorials & Tips for Beginners, you might also like How to Sew a Tote Bag you can also try How to Sew a Fabric Basket to learn more sewing tips for beginners

The above links lead to Faodail Creation You Tube Channel

SUBSCRIBE! So you don’t miss my next blog post

Use search so you can find your next sewing tutorial

Latest Blog Posts

This Blogs Category

Categories List

More Blog Posts

How to Sew a Snap Closure Cord Keeper : A Simple Step-by-Step Tutorial
This tutorial by Cassie Cartmell from Faodail Creation guides beginners on sewing …
How to Make a Fabric Garland
This content provides a step-by-step guide on creating a fabric garland using …

Blog Tags

Sewing Machine Tutorials Tips for Beginners

How to Thread a Sewing Machine Needle : Sewing Machine Tutorials & Tips for Beginners

Cassie Cartmell – Faodail Creation

This is the Link to the You Tube Tutorial : https://youtu.be/nycSYJP0mbM

How to Thread a Sewing Machine Needle

How to Thread a Sewing Machine Needle (Beginner-Friendly Guide)

How to Thread a Sewing Machine Needle

If youโ€™ve ever struggled with threading a needle, youโ€™re definitely not alone. One of the most common frustrations for beginners is learning How to Thread a Sewing Machine Needle quickly and easily. Whether youโ€™re just starting your sewing journey or youโ€™ve been sewing for a while, this simple step can sometimes feel more difficult than it should be.

The good news? Thereโ€™s a simple little tool that can make this process effortless a needle threader with a built-in needle inserter. This clever tool is designed to take the stress out of sewing, helping you focus more on your creativity and less on the fiddly parts that can slow you down.

In this guide, Iโ€™m going to walk you step-by-step through How to Thread a Sewing Machine Needle, using this incredibly handy sewing notion that can save you time, frustration, and even eye strain.

When it comes to sewing, even the smallest tools can make a big difference. Threading a needle might seem like a basic skill, but itโ€™s one of those things that can interrupt your flow, especially if the thread keeps missing the eye of the needle. Thatโ€™s why learning How to Thread a Sewing Machine Needle properly is such an important part of building confidence in sewing.

This is especially true for beginners who are just getting comfortable with their sewing machine. Instead of feeling discouraged, using the right tool can make sewing feel smooth and enjoyable right from the start. The needle threader not only simplifies the process but also helps you build better habits in sewing as you go.

Another reason this tool is so helpful is that it reduces strain on your eyes and hands. Sewing should be a relaxing and creative activity, not something that causes frustration. By mastering How to Thread a Sewing Machine Needle with a tool like this, you can make your sewing sessions more enjoyable and less stressful.

Youโ€™ll also find that once you get the hang of it, your sewing projects move along much faster. Instead of stopping and starting every time you need to rethread your needle, youโ€™ll be able to do it quickly and get back to what you love sewing beautiful projects.

For anyone who enjoys sewing regularly, this small improvement can make a big impact over time. Itโ€™s one of those little upgrades in your sewing routine that adds up, making each project smoother from start to finish. Learning How to Thread a Sewing Machine Needle efficiently is a skill that supports every type of sewing you do, from quick repairs to detailed quilting.

If youโ€™ve ever felt frustrated or even avoided sewing because of threading issues, this method can completely change your experience. With just a bit of practice, youโ€™ll feel more confident and in control of your sewing machine.

So whether youโ€™re brand new to sewing or simply looking for an easier way to manage your tools, this guide will help you master How to Thread a Sewing Machine Needle in a way that feels simple, practical, and beginner-friendly.


What Is a Needle Threader and Why It Helps

How to Thread a Sewing Machine Needle

Below is the Amazon Affiliate Link to purchase a needle threader, If you decide to purchase from this link I may receive a small commission at no extra cost to you:

2 Packs Sewing Machine Needle Threader https://amzn.to/4tjNHjf

This is the Link to my main Amazon Store : https://www.amazon.com/shop/faodailcreation

Before we dive into How to Thread a Sewing Machine Needle, letโ€™s quickly talk about what this tool actually is.

A needle threader is a small sewing tool designed to help guide your thread through the eye of a sewing needle. Some versions, like the one shown here, also include a needle inserter, which helps you safely place your sewing needle into your sewing machine without struggling or dropping it.

At first glance, this tool might seem simple, but it plays a very important role in making sewing easier and more enjoyable. Threading a sewing needle can be tricky, especially when youโ€™re working with fine thread or a very small needle eye. This is where the needle threader really shines it takes a delicate task and makes it quick and manageable.

Why This Tool Is So Useful – How to Thread a Sewing Machine Needle

  • Makes learning How to Thread a Sewing Machine Needle much easier
  • Saves time and reduces frustration
  • Perfect for beginners
  • Great for people with poor eyesight
  • Helps avoid bending or dropping needles

Not every sewing machine comes with a built-in threader, so having this tool is a game changer for anyone who works with a sewing needle regularly.

When youโ€™re working on a project, the last thing you want is to struggle just to thread your sewing needle. This tool removes that barrier and allows you to focus on the creative side of sewing. Whether youโ€™re quilting, making garments, or doing simple repairs, being able to quickly thread a sewing needle keeps your workflow smooth and uninterrupted.

Another great benefit is how this tool helps protect your sewing needle. Trying to force thread through the eye manually can sometimes bend or damage the needle. Using a threader ensures that your sewing needle stays in good condition, which is important for maintaining even stitches and avoiding machine issues.

This tool is also incredibly helpful if you frequently change threads. Each time you switch colors or rethread your machine, youโ€™ll need to thread your sewing needle again. With a needle threader, this process becomes fast and effortless, saving you time over the course of your sewing projects.

For beginners, learning how to handle a sewing needle properly is an important part of building confidence. A needle threader removes the intimidation factor and makes it easier to practice and improve your skills. Instead of feeling frustrated, you can enjoy the process and focus on learning new techniques.

Even experienced sewists appreciate the convenience of this tool. No matter your skill level, working with a sewing needle becomes much simpler when you have the right tools on hand.

Overall, this small but powerful tool transforms the way you handle a sewing needle, making your sewing experience smoother, faster, and far more enjoyable.


Understanding the Parts of the Needle Threader Tool – How to Thread a Sewing Machine Needle

How to Thread a Sewing Machine Needle

To master How to Thread a Sewing Machine Needle, itโ€™s important to understand the tool itself.

Two Main Parts

1. Threading Section

This part is used to guide the thread through the needle.

2. Needle Inserter Section

This bottom section holds the needle steady so you can safely insert it into your sewing machine.

This dual-purpose design makes learning How to Thread a Sewing Machine Needle much simpler and more efficient.


How to Thread a Sewing Machine Needle

How to Thread a Sewing Machine Needle Step-by-Step

Now letโ€™s walk through exactly How to Thread a Sewing Machine Needle using this tool.

Step 1: Look for the Arrow

On the needle threader, youโ€™ll notice a small arrow. This arrow shows the correct direction for threading.

Make sure the arrow is facing upward before you begin. This is an important step when learning How to Thread a Sewing Machine Needle correctly.


Step 2: Insert the Thread

Place your thread between the two small sections of the threader.

Gently guide the thread into the slot. At this point, you should clearly see that the thread is sitting securely in place.

This is a key step in mastering How to Thread a Sewing Machine Needle without frustration.


Step 3: Push the Threader Through the Needle

Now, slowly bring the needle threader down toward the needle.

Carefully push the tool through the eye of the needle. Take your time thereโ€™s no need to rush this step.

When learning How to Thread a Sewing Machine Needle, patience is key.


Step 4: Use the Hook to Grab the Thread

Once the tool passes through the needle eye, youโ€™ll notice a small hook at the end.

This hook is designed to catch the thread.

Gently pull the threader back out, and the thread will come through the needle with it.


Step 5: Pull the Thread Through

Finally, pull the thread all the way through the needle.

And just like that youโ€™ve successfully learned How to Thread a Sewing Machine Needle using a needle threader tool!


How to Thread a Sewing Machine Needle

How to Insert a Needle Using the Same Tool – How to Thread a Sewing Machine Needle

One of the best features of this tool is that it also helps with inserting needles.

Step-by-Step Needle Insertion

Step 1: Place the Needle in the Tool

Insert your sewing machine needle into the holder section of the tool.

Step 2: Hold It Steady

The tool grips the needle securely, so you donโ€™t have to worry about dropping it.

Step 3: Insert Into the Machine

Guide the needle into its position in your sewing machine.

Step 4: Release the Needle

Once itโ€™s in place, simply release it from the tool.

This makes How to Thread a Sewing Machine Needle even easier, because youโ€™re starting with a properly inserted needle every time.


Using This Tool for a Serger

This needle threader isnโ€™t just for sewing machines itโ€™s also incredibly helpful for sergers.

Threading serger needles can be even more challenging, so using this tool can simplify How to Thread a Sewing Machine Needle (and serger needles too).


How to Thread a Sewing Machine Needle

Common Mistakes When Learning How to Thread a Sewing Machine Needle

Even with a tool, beginners can make a few small mistakes.

1. Ignoring the Arrow Direction

Always make sure the arrow is facing the correct way.

2. Rushing the Process

Take your time when pushing the threader through the needle.

3. Not Using the Hook Properly

Make sure the hook grabs the thread before pulling back.

Avoiding these mistakes will help you master How to Thread a Sewing Machine Needle much faster.


How to Thread a Sewing Machine Needle

Tips to Make Threading Even Easier

Use Good Lighting

Proper lighting makes it easier to see what youโ€™re doing.

Trim Your Thread

A clean-cut thread goes through the tool more easily.

Practice Regularly

The more you practice How to Thread a Sewing Machine Needle, the faster and easier it becomes.


Who Should Use This Tool?

This tool is perfect for:

  • Beginners learning How to Thread a Sewing Machine Needle
  • Quilters and sewists
  • Anyone with vision challenges
  • People who sew frequently
  • Anyone who finds threading frustrating

How to Thread a Sewing Machine Needle

Why This Is a Must-Have Sewing Tool

This needle threader and inserter combo is one of those tools that may seem small, but it has a huge impact.

It simplifies How to Thread a Sewing Machine Needle, saves time, and makes sewing much more enjoyable.

Even though this isnโ€™t a sponsored recommendation, itโ€™s genuinely one of the most useful tools you can add to your sewing kit.

When you think about how often you work with a sewing needle, it makes sense to have something that makes the process easier. Threading a sewing needle is one of the most repeated steps in sewing, whether youโ€™re starting a new project, changing thread colors, or fixing a mistake. Having a reliable tool to help with your sewing needle can make a noticeable difference in how smoothly your projects go.

One of the biggest advantages of this tool is consistency. Every time you need to thread a sewing needle, you can rely on the same simple method. This removes the guesswork and frustration, especially when dealing with fine threads or small needle eyes. Instead of struggling, you can confidently handle your sewing needle with ease.

Another reason this tool stands out is how it helps prevent damage. A sewing needle is a delicate part of your sewing machine, and bending or mishandling it can affect your stitching quality. By using a threader and inserter, you reduce the risk of damaging your sewing needle, helping your machine perform better and last longer.

This tool also supports better sewing habits. When threading your sewing needle becomes quick and simple, youโ€™re more likely to take your time setting things up properly. This leads to cleaner stitches, fewer mistakes, and a more enjoyable sewing experience overall.

For those who sew frequently, the time savings really add up. Instead of pausing your project to carefully thread a sewing needle by hand, you can do it in seconds and keep your momentum going. Over time, this makes sewing feel more efficient and far less frustrating.

Itโ€™s also a great tool to keep on hand for different types of projects. Whether youโ€™re quilting, sewing garments, or doing quick repairs, youโ€™ll always be working with a sewing needle. Having a tool that simplifies this step means you can focus more on your creativity and less on the setup.

Another benefit is accessibility. If you find it difficult to see the eye of a sewing needle, this tool can make sewing much more comfortable. It reduces eye strain and allows you to work with confidence, even on detailed projects.

In the end, this simple tool enhances every part of your sewing routine. From protecting your sewing needle to speeding up your workflow, itโ€™s one of those small investments that delivers big results. Once you start using it, youโ€™ll wonder how you ever managed without it.


Final Thoughts: How to Thread a Sewing Machine Needle the Easy Way

Learning How to Thread a Sewing Machine Needle doesnโ€™t have to be difficult or frustrating.

With the help of a simple needle threader tool, you can:

  • Thread needles quickly
  • Reduce eye strain
  • Avoid frustration
  • Enjoy sewing more

Whether youโ€™re a complete beginner or an experienced sewist, this tool makes a big difference.

So if youโ€™ve been struggling with How to Thread a Sewing Machine Needle, give this method a try youโ€™ll be amazed at how easy it becomes.

Join my FACEBOOK GROUP

Faodail Creation Facebook Group where I have all my free patterns

SUBSCRIBE! So you don’t miss my next blog post

READ NEXT

How to Thread a Sewing Machine Needle : Sewing Machine Tutorials & Tips for Beginners

How to Thread a Sewing Machine Needle : Sewing Machine Tutorials & Tips for Beginners is a fun way to explore new sewing skills.

If you enjoyed How to Thread a Sewing Machine Needle : Sewing Machine Tutorials & Tips for Beginners, you might also like How to Use a Sewing Machine you can also try How to Use Angelina Fibers to learn more sewing skills.

The above links lead to Faodail Creation You Tube Channel

Latest Blog Posts

This Blogs Category

Categories List

More Blog Posts

How to Sew a Snap Closure Cord Keeper : A Simple Step-by-Step Tutorial
This tutorial by Cassie Cartmell from Faodail Creation guides beginners on sewing …
How to Make a Fabric Garland
This content provides a step-by-step guide on creating a fabric garland using …

Blog Tags

Sewing Machine Tutorials Tips for Beginners

Sewing Room Tour | Sewing Machine Tutorials & Tips for Beginners

Here is the you tube tutorial link : https://youtu.be/XwCCVsIcm5o

Cassie Cartmell – Faodail Creation

Cassie Cartmell Baby Lock Educator

Sewing Room Tour: How I Organize My Small Sewing Room for Maximum Creativity

Sewing Room

Creating a Sewing Room that truly works for you isnโ€™t about having a massive space or perfectly matching furniture itโ€™s about smart sewing organization and making intentional choices that suit your workflow.

When I first started setting up my Sewing Room, I thought I needed all the latest storage solutions and expensive systems. But over time, I realized that good sewing organization is more about function than perfection. Itโ€™s about knowing where everything is, being able to access it quickly, and creating a space that supports your creativity instead of slowing you down.

One of the biggest lessons Iโ€™ve learned in my Sewing Room journey is that clutter builds up fast if you donโ€™t have a system. Fabric, thread, tools, and notions can easily take over. Thatโ€™s why having a clear sewing organization strategy is essential. Even simple habits like putting tools back in the same place or grouping similar items together can make a huge difference in how your space feels and functions.

Another important part of designing your Sewing Room is understanding how you work. Do you like everything visible, or do you prefer a cleaner, hidden look? For me, I need a balance. I like my most-used tools out in the open, but I also rely heavily on sewing organization solutions like labeled drawers and bins to keep the rest under control. This combination helps me stay efficient without feeling overwhelmed by visual clutter.

Itโ€™s also worth mentioning that your

Room doesnโ€™t have to be perfect to be productive. In fact, some level of mess is completely normal especially when youโ€™re in the middle of a project. The goal of good sewing organization isnโ€™t to eliminate mess entirely, but to make it manageable and easy to reset when youโ€™re finished.

As your skills grow, your needs will change, and your Room will naturally evolve with you. Thatโ€™s why flexible sewing organization systems are so valuable. Things like adjustable shelves, movable bins, and multi-purpose storage can adapt as your projects and tools change over time.

Ultimately, your Room should feel like a place where you want to spend time. Whether that means adding color, personal touches, or meaningful items that inspire you, donโ€™t be afraid to make the space your own. When your environment supports your creativity and your sewing organization keeps everything running smoothly, sewing becomes not just easier but far more enjoyable.


Sewing Room

Why Creating a Functional Sewing Room Matters

A thoughtfully arranged Sewing Room doesnโ€™t just look good it actively improves how you sew every single day. When your space is designed with purpose, even a small Sewing Room can feel efficient, comfortable, and enjoyable to work in.

One of the biggest benefits of a well-planned Sewing Room is how much smoother your workflow becomes. Instead of stopping mid-project to search for tools, thread, or fabric, everything is right where you need it. This is where strong sewing organization really makes a difference. By assigning a place for each item, you reduce wasted time and keep your creative momentum going.

Good sewing organization also helps you stay focused. Clutter can be distracting, especially when youโ€™re working on detailed projects like quilting or garment sewing. When your surfaces are clear and your supplies are neatly stored, your mind feels clearer too. Thatโ€™s one of the hidden advantages of maintaining a functional Sewing Room it supports both your creativity and your concentration.

Another important aspect of sewing organization is making your tools accessible. Frequently used items like scissors, rulers, pins, and rotary cutters should always be within armโ€™s reach. In my own Sewing Room, Iโ€™ve noticed a huge improvement in productivity just by keeping my essentials close by. It may seem like a small change, but it has a big impact over time.

Comfort is another key factor. A well-designed Sewing Room should support how you move and work. Whether itโ€™s having the right table height for cutting fabric or enough space to spread out your projects, these details matter. Pairing comfort with smart sewing organization ensures that your space works with you, not against you.

Finally, maintaining your Room doesnโ€™t have to be overwhelming. Simple habits like tidying up after each project or doing a quick reset at the end of the day can keep your space under control. With consistent sewing organization, your room stays ready for your next project, making it easier to sit down and start sewing whenever inspiration strikes.ll, but with the right setup, it works efficiently for everything from quilting to bag making.


Sewing Room

My Sewing Room Layout (12×12 Space)

My Room is a 12×12 foot space. Some people might think thatโ€™s small, while others may feel itโ€™s large but for me, itโ€™s all about how you use it.

I designed my Room with calming teal tones because color plays a huge role in creativity. Adding a rug and matching accents instantly made the space feel more cohesive and relaxing.

One simple change that made a big difference in my Room was creating matching machine covers. Before, everything looked cluttered. Now, the consistency makes the room feel much more organized.


Sewing Room Pegboard Organization Ideas

Sewing Room

How I Transformed My Sewing Room Pegboard

What really made the difference in my Room pegboard transformation was thinking about how I actually work, rather than just how things look. Before, I had items hanging randomly, which didnโ€™t support good sewing organization at all. Now, everything has a purpose and a place, which makes using my Room so much more efficient.

One of the best upgrades I made was grouping similar items together. This simple sewing organization method means Iโ€™m no longer searching for tools mid-project. For example, all cutting tools are in one area, while marking tools and pins are stored close together. This layout works with my workflow and keeps my Room running smoothly.

Another tip for improving your pegboard is to use vertical space wisely. In a smaller Room, every inch counts, so stacking storage with hooks, bins, and clips can dramatically increase your storage capacity. This kind of sewing organization helps keep your main work surfaces clear, giving you more room to actually sew and create.

Flexibility is also key. One thing I love about having a pegboard in my Room is that I can easily change it as my needs evolve. If I start a new type of project or get new tools, I can quickly rearrange everything. This adaptable approach to sewing organization ensures that my space continues to work for me over time.

If youโ€™re setting up your own pegboard, donโ€™t be afraid to experiment. It might take a few tries to find the perfect layout for your Room, but once you do, it becomes one of the most valuable and functional areas in your entire space.

Hereโ€™s how I use it now:

Zipper Storage

I organize zippers by size and hang them using bulldog clips. This makes them easy to grab and keeps my Sewing Room visually tidy.

Buckets for Small Tools

Dollar store bins hold:

  • Safety pins
  • Sewing needles
  • Chalk
  • Small tools

This grab-and-go system is perfect when working on quilts in my Sewing Room.

Essential Tools on Display

My pegboard also holds:

  • Scissors
  • Rotary cutter
  • Pincushion
  • Lint roller

Everything is visible and accessible exactly what every Sewing Room needs.


Sewing Room Storage Solutions That Work

Sewing Room

IKEA Cabinets and Custom Furniture

One of the biggest advantages of using IKEA cabinets and custom furniture in my Room is the flexibility they provide. Not every space is the same, so being able to mix ready-made storage with custom-built solutions allows you to create a layout that truly fits your needs. This balance has made a huge difference in my overall sewing organization.

The IKEA Alex drawers are especially useful in my Sewing Room because they offer multiple shallow drawers, which are perfect for separating smaller items. Instead of piling everything into one space, I can dedicate each drawer to a specific category. This kind of sewing organization makes it much easier to find what I need quickly, without interrupting my workflow.

Custom shelving, on the other hand, allows me to maximize every inch of my Room. My husband designed the shelves to fit perfectly under the countertops, giving me extra storage without taking up additional floor space. This is especially important in a smaller Sewing Room, where smart design choices can make the space feel much larger and more functional.

Another key benefit of this setup is how it supports better sewing organization for different types of supplies. Larger items like glue bottles, thread collections, and bulk materials can be stored underneath, while everyday tools stay on top within easy reach. This layered approach keeps everything organized without cluttering the main workspace.

Finally, having countertops at the correct height has completely improved how I use my Room. Cutting fabric is more comfortable, and I can work for longer periods without strain. When your furniture supports both comfort and sewing organization, your entire sewing experience becomes more enjoyable and efficient.

  • IKEA Alex drawers
  • Custom-built shelving (thanks to my husband)
  • Kitchen countertops as work surfaces

These countertops are set at waist height, making them perfect for cutting fabric comfortably in my Sewing Room.


Keep Tools Within Reach

One of my biggest tips for any Room is accessibility.

At my main workstation, I keep:

  • Rulers
  • Rotary cutters
  • Scissors
  • Pins

Having everything within armโ€™s reach makes sewing faster and more enjoyable in my Sewing Room.


Use Magnetic Bowls for Pins

A mechanic-style magnetic bowl is one of the best tools in my Room.

Itโ€™s:

  • Affordable
  • Easy to use
  • Great for holding pins and clips

Sometimes the best Sewing Room tools come from unexpected places!


Sewing Room Fabric Storage Ideas

Sewing Room

Fabric storage is one of the biggest challenges in any Room.

Color-Coordinated Fabric Bins

I store fabric in color-coordinated bins so I can:

  • Quickly find what I need
  • Stay visually organized
  • Plan projects easily

However, Iโ€™ll be honest this is still the messiest part of my Sewing Room!


Sorting Fabric by Project Type

In my Sewing Room, fabric is divided into:

  • Quilting cottons
  • Bag-making materials
  • Clothing fabrics

This system helps, but Iโ€™m considering adding storage boxes to make my Room look even neater.


Sewing Room Thread and Notions Organization

Sewing Room

Thread Storage

All my polyester thread is stored on a thread rack.

While functional, it doesnโ€™t match my Sewing Room aesthetic so repainting it is definitely on my to-do list!


Sewing Room

Drawer Organization with Labels

Labeling drawers has been a total game-changer in my Sewing Room.

Each drawer is clearly labeled so I can quickly find:

  • Hardware
  • Tools
  • Sewing notions

It may not look perfect, but it saves so much time in my Sewing Room workflow.


Small Item Storage Solutions

Inside drawers, I use:

  • Plastic containers
  • Pencil cases for rulers
  • Tea caddies for buttons

These simple solutions keep my Room functional, even if itโ€™s not always perfectly tidy.


Sewing Room Tips for Efficiency and Workflow

Sewing Room

Create a Stitch Reference Guide

One of the best things Iโ€™ve done in my Room is stitch out every stitch on my sewing machine.

This gives me:

  • A visual reference
  • Faster decision-making
  • Less interruption while sewing

It takes time, but itโ€™s worth it for any Room setup.


Pre-Organize Labels and Embellishments

I keep my handmade labels sorted by project type.

This small step saves a huge amount of time when working in my Room.


Hide Visual Clutter

To reduce clutter in my Room, I added a simple curtain to hide shelves.

Itโ€™s:

  • Affordable
  • Easy to install
  • Instantly cleaner-looking

Sewing Room

Sewing Room Closet Organization Ideas

Closets can quickly become overwhelming in any Room.

Hereโ€™s how I manage mine:

Categorized Patterns

Patterns are sorted into:

  • Dresses
  • Tops
  • Skirts
  • Crafts

Storage Bins

I use bins for:

  • Elastic
  • Felt
  • Ribbons

Even though itโ€™s still a bit messy, itโ€™s definitely a โ€œtamedโ€ Sewing Room space.


Sewing Room Must-Have Items

Every Sewing Room should include:

  • Step ladder
  • Ironing board
  • Cleaning tools for your machine
  • Scrap fabric storage
  • Inspiration pieces

I also keep positive quotes and meaningful items in my Sewing Room to stay motivated.


Cassie Cartmell Baby Lock Educator

Final Thoughts on My Sewing Room

Over time, Iโ€™ve come to realize that every Sewing Room is a work in progress. As you take on new projects, learn new techniques, and collect new tools, your needs will naturally change. Thatโ€™s why staying flexible with your sewing organization is so important it allows your space to grow with you instead of holding you back.

There are still areas in my Sewing Room that I want to improve, and thatโ€™s completely okay. Sometimes a system works perfectly for a while, and then suddenly it doesnโ€™t. Thatโ€™s just part of refining your sewing organization and figuring out what truly supports your workflow.

I also think itโ€™s important not to compare your Sewing Room to anyone elseโ€™s. What works for one person might not work for another. The goal is to create a space that feels right for you and supports your creativity. With the right approach to sewing organization, even a simple setup can be incredibly effective.

At the end of the day, your Sewing Room should inspire you to sit down, create, and enjoy the process. Keep adjusting, keep experimenting, and most importantly make your Sewing Room a space that works for you.


What About Your Sewing Room?

One of the best things about being part of the sewing community is learning from each otherโ€™s Sewing Room ideas and experiences. No matter how long youโ€™ve been sewing, thereโ€™s always a new tip, trick, or sewing organization method that can make your space work even better.

If youโ€™ve found a solution that works in your Sewing Room, especially for tricky items like ribbon or fabric, Iโ€™d genuinely love to hear about it. Ribbon storage, in particular, can be such a challenge, and Iโ€™m always looking for new sewing organization ideas that make it easier to keep things tidy and accessible.

Your Sewing Room setup might be completely different from mine, and thatโ€™s exactly why sharing ideas is so valuable. What works in a large space might need to be adapted for a smaller Sewing Room, and your tips could help someone else solve a problem theyโ€™ve been struggling with for ages. Thatโ€™s the beauty of sharing sewing organization strategies we all benefit from each otherโ€™s creativity.

Even small changes can make a big impact. Whether itโ€™s a clever storage hack, a labeling system, or a new way to sort fabric, your sewing organization ideas could inspire others to rethink their own Sewing Room layout.

So donโ€™t be shy drop your tips, ideas, and even your challenges in the comments. Letโ€™s build a space where we can all improve our Sewing Room setups together and make sewing even more enjoyable for everyone.

Join my FACEBOOK GROUP

Faodail Creation Facebook Group Link where I have all my free patterns

READ NEXT

Sewing Room Tour | Sewing Machine Tutorials & Tips for Beginners

Sewing Room Tour | Sewing Machine Tutorials & Tips for Beginners is a fun way to explore organizing a small sewing room

If you enjoyed Sewing Room Tour | Sewing Machine Tutorials & Tips for Beginners, you might also like my How to Sew a Needle Book you can also try How to Use a Zipper Jig one video is a project and the other is a zipper jig to put zipper pulls on with

SUBSCRIBE So you don’t miss my next blog post

Latest Blog Posts

This Blogs Category

Categories Lists

More Blog Posts

How to Sew a Snap Closure Cord Keeper : A Simple Step-by-Step Tutorial
This tutorial by Cassie Cartmell from Faodail Creation guides beginners on sewing …
How to Make a Fabric Garland
This content provides a step-by-step guide on creating a fabric garland using …

Blog Tags

Sewing Machine Tutorials Tips for Beginners

Master the Art of How to Sew a Zipper Pocket | Sewing Machine Tutorials & Tips for Beginners

Cassie Cartmell – Faodail Creation

This is the link to the you tube tutorial : https://youtu.be/TDn66mhwrmg?si=M3aarq92sWCRzvDB

Baby Lock Educator
How to Sew a Zipper Pocket

Learning how to sew a zipper pocket can transform your bags from ordinary to highly functional. As a Certified Baby Lock Educator and sewing enthusiast, I love teaching simple and practical techniques that make sewing accessible and fun for everyone. Whether youโ€™re just starting with your first tote bag or looking for a quick, stress-free way to add a zipper pocket, this tutorial will guide you step by step. Today, Iโ€™m going to show you the laziest, simplest way to attach a zipper pocket to the inside of your tote bag lining.

This method is perfect for beginners and anyone who wants a neat, professional-looking pocket without spending hours fussing over complicated sewing techniques. By following this approach, youโ€™ll learn exactly how to sew a zipper pocket that is not only practical but also durable and beginner-friendly. Even if youโ€™ve struggled with zippers in the past, this method will make the process straightforward, efficient, and enjoyable.

As a Baby Lock Educator, Iโ€™ve worked with countless sewing machines and seen many students get frustrated with traditional zipper pocket techniques. Thatโ€™s why I developed this โ€œlazyโ€ method it simplifies the process while still producing a polished, high-quality result. Youโ€™ll see how small adjustments, like trimming the zipper slightly longer than your pocket pieces and using a piping foot, can make a huge difference in ease and precision.

In this guide, Iโ€™ll explain how to sew a zipper pocket from start to finish, including tips on selecting the right materials, positioning the zipper, and pressing the pocket for a clean, professional finish. By the end of this tutorial, youโ€™ll feel confident adding this functional feature to any bag project. Not only will your bags look more complete, but they will also provide a secure place for essentials like keys, wallets, or small personal items.

Whether youโ€™re making gifts, custom bags, or simply upgrading your sewing skills, knowing how to sew a zipper pocket is a must-have technique in your sewing toolkit. Iโ€™ll also share tricks I use in my Baby Lock classes to make zipper installation easier, so even absolute beginners can follow along. By the time you finish this tutorial, youโ€™ll be able to create neat, durable zipper pockets without stress. This post will show you step by step how to sew a zipper pocket, making it approachable, fun, and completely beginner-friendly.


How to Sew a Zipper Pocket

Why You Should Learn How to Sew a Zipper Pocket

Adding a zipper pocket to a bag instantly elevates its usefulness. Itโ€™s perfect for keeping keys, wallets, or small essentials secure and organized. Many beginners feel intimidated by traditional zipper techniques, thinking they are complicated or require advanced sewing skills. But donโ€™t worry! Iโ€™m going to show you an easy, stress-free method that will make it simple to create a professional-looking pocket without frustration. Learning how to sew a zipper pocket doesnโ€™t have to be overwhelming.

This method is perfect for beginners and anyone who prefers a quick, โ€œlazyโ€ approach to sewing. Once you know how to sew a zipper pocket, you can confidently add it to tote bags, purses, and even backpacks. Not only does this technique save time, but it also produces a polished, functional pocket that looks like it was made by a professional. In fact, once you master how to sew a zipper pocket, youโ€™ll find yourself adding them to almost every bag you make. Even experienced sewers will appreciate how straightforward and efficient this method is, and itโ€™s a great way to teach friends or students how to sew a zipper pocket with confidence.

By the end of this tutorial, youโ€™ll fully understand how to sew a zipper pocket that is secure, neat, and ready for daily use. With a few simple steps and tips, your bags will not only look more complete but also provide real utility for storing essentials safely.


How to Sew a Zipper Pocket

Materials Youโ€™ll Need to Sew a Zipper Pocket

Before you start learning how to sew a zipper pocket, gather the following materials:

  • Fabric for your pocket (two pieces of equal size)
  • A zipper slightly longer than your fabric pieces
  • Sewing machine
  • Piping foot (optional, but helpful for zipper stitching)
  • Scissors or rotary cutter
  • Pins or clips
  • Iron

Once you have these supplies ready, youโ€™re set to create your easy zipper pocket.


How to Sew a Zipper Pocket

Step-by-Step Guide: How to Sew a Zipper Pocket

Step 1: Prepare Your Pocket Pieces

Start with two pocket fabric pieces of equal size. The zipper should be slightly longer than your fabric pieces to make stitching easier. Trim approximately two inches from the top of each fabric piece to create space for the zipper. This section will hold the zipper securely in place.


Step 2: Attach the Zipper

Place the zipper face down on one of your pocket sections with the right side of the fabric facing the zipper. Use a piping foot if you have one it helps guide the fabric neatly along the zipper teeth.

Sew along the edge, ensuring the zipper is attached evenly. Open the stitched section and press it flat with an iron for a neat finish.

Repeat this step for the second pocket piece. Now you should have two fabric sections: one with the zipper attached and one without.


Step 3: Combine the Pocket Pieces

Place the two pocket sections right sides together. Open the zipper slightly so you can easily flip the pocket right side out later. Pin or clip all edges in place. Trim any excess zipper length to reduce bulk.

Sew around the edges of the pocket, about ยผ to ยฝ inch from the edge. When sewing over the zipper, go slowly and reinforce the stitch by going over it a few times to secure it.

Trim any extra fabric for a clean, finished edge.


Step 4: Turn and Press the Pocket

Flip your pocket right side out through the open zipper. Carefully press the edges with an iron to create a flat, crisp finish. This makes it easier to attach the pocket to your bag lining and gives your zipper pocket a professional look.


Step 5: Attach the Pocket to Your Bag Lining

Place the completed zipper pocket onto your bag lining with the right sides facing up. Pin or clip it into position, leaving some space from the top edge so you can continue constructing the bag without interference.

Topstitch around the pocket to secure it in place. Now you have a functional, neatly attached zipper pocket inside your tote bag.


How to Sew a Zipper Pocket

Tips for Sewing the Perfect Zipper Pocket

  1. Use the Right Needle โ€“ A 90/14 needle works well for most fabrics. For thick fabrics, try a micro-tech needle.
  2. Press Frequently โ€“ Use an iron to keep your fabric flat and edges crisp for a professional finish.
  3. Trim Excess Zipper โ€“ Cutting off extra zipper length prevents bulk and ensures smooth sewing.
  4. Use Clips Instead of Pins โ€“ Especially for thicker fabrics, clips hold everything securely.
  5. Go Slow Over the Zipper โ€“ Reinforce stitching where the zipper teeth meet fabric for durability.

How to Sew a Zipper Pocket

Benefits of This Lazy Zipper Pocket Method

This technique is perfect for anyone who wants efficiency without sacrificing quality. Hereโ€™s why this method stands out and why itโ€™s a game-changer for anyone learning how to sew a zipper pocket:

  • Time-saving: This approach is ideal for beginners or anyone short on time. You can complete your zipper pocket in a fraction of the time it would take using traditional methods. Learning how to sew a zipper pocket with this lazy method allows you to focus more on finishing your bag and less on complicated stitching techniques.
  • Beginner-friendly: There are no complicated folds, extra layers, or tricky steps to follow. By using simple, easy-to-understand steps, youโ€™ll see exactly where the zipper goes, how to align your fabric pieces, and how to secure everything neatly. Even if itโ€™s your first attempt, youโ€™ll feel confident in your results and be motivated to make more bags with built-in pockets.
  • Professional results: Despite the simplicity, this method produces polished, clean, and functional zipper pockets. Once youโ€™ve mastered how to sew a zipper pocket, youโ€™ll notice how professional your handmade bags look. The neat stitching and properly aligned zipper give your project a high-quality finish, making it perfect for gifts, personal use, or even small sewing business products.
  • Flexible: This technique works for any size of bag or lining. Whether youโ€™re making a small pouch, a large tote, or a handbag, knowing how to sew a zipper pocket allows you to adapt this method to any project. The versatility of this method means you can create custom pockets for all your projects, saving you time and effort while enhancing the functionality of your handmade creations.

By following this tutorial and these tips, youโ€™ll confidently add neat, secure zipper pockets to any bag. This technique not only improves your bagโ€™s usability but also elevates the overall design, giving your handmade items a professional touch with minimal effort.


How to Sew a Zipper Pocket

Final Thoughts on How to Sew a Zipper Pocket

Learning how to sew a zipper pocket doesnโ€™t have to be difficult, stressful, or time-consuming. Many beginners assume that adding a zipper to a bag requires advanced skills, complicated folding, or precise measurements. The truth is, with the right approach and a little guidance, you can create neat, functional zipper pockets with ease. This โ€œlazyโ€ method is perfect for beginners or anyone looking for a quick, effective solution to add a polished pocket to any tote, clutch, or bag lining.

Now that youโ€™ve learned the basics, itโ€™s important to understand why mastering how to sew a zipper pocket is such a valuable skill. Zipper pockets not only improve the functionality of your handmade bags, but they also give your projects a professional touch. By adding even a simple pocket, youโ€™re transforming an ordinary bag into something highly practical. Keys, wallets, phones, and other small essentials can now be stored safely, making your bag more organized and enjoyable to use.

One of the biggest advantages of this technique is that it emphasizes efficiency without sacrificing quality. When you know how to sew a zipper pocket, you can complete projects faster while still achieving clean, professional results. This method minimizes unnecessary steps and focuses on the essentials: measuring, pinning, stitching, and pressing. Even if youโ€™ve struggled with zippers before, youโ€™ll find that this method is straightforward and forgiving.

Another benefit is that once you know how to sew a zipper pocket, you can adapt it to any project. Whether youโ€™re making a small coin purse, a large tote, or a custom handbag, this method can be scaled up or down to suit your project size. You donโ€™t need special equipment just a sewing machine, your fabric, a zipper, and some basic sewing tools. Using a piping foot can make things even easier, helping your stitches stay close to the zipper teeth and giving you a neat finish.

Itโ€™s also worth mentioning that mastering this method will boost your overall sewing confidence. As a Certified Baby Lock Educator, I often see students hesitate at the idea of adding zippers. But once they try this lazy, beginner-friendly technique, they gain the confidence to experiment with more complicated bags and additional features. Knowing how to sew a zipper pocket opens up countless opportunities for creative bag designs, storage solutions, and functional additions to any project.

Here are a few tips to ensure your zipper pocket turns out perfectly every time:

  1. Prepare your materials carefully โ€“ Cut your fabric pieces accurately and choose a zipper slightly longer than your pocket pieces.
  2. Sew slowly over the zipper โ€“ Reinforce the stitching where the zipper teeth meet the fabric to ensure durability.
  3. Press for a crisp finish โ€“ Use an iron to flatten seams and make the pocket look professional.
  4. Use clips or pins strategically โ€“ Secure the edges while stitching to prevent shifting.
  5. Trim excess fabric and zipper ends โ€“ Reduces bulk and creates a smooth edge.
How to Sew a Zipper Pocket

By practicing this technique repeatedly, youโ€™ll soon find that adding zipper pockets becomes second nature. After a few projects, youโ€™ll instinctively know how to position the zipper, align your fabric pieces, and achieve a clean, secure finish. This is why understanding how to sew a zipper pocket is such an essential skill for any bag-making or sewing enthusiast.

So grab your fabric and zipper, follow these steps carefully, and youโ€™ll have a beautiful pocket ready to go. With a little practice and patience, youโ€™ll be making zipper pockets like a pro in no time. Every tote, clutch, or handmade bag you create will benefit from this practical addition. Remember, itโ€™s not just about sewing a pocket itโ€™s about improving your projectโ€™s functionality, appearance, and overall value.

Learning how to sew a zipper pocket may seem intimidating at first, but with this simple, step-by-step approach, it becomes manageable, fun, and rewarding. This technique allows you to enjoy the creative process without the stress of overly complicated steps. Once youโ€™ve mastered it, youโ€™ll be able to confidently add zipper pockets to any project, impressing friends, family, or customers with your neat, professional results.

Join my FACEBOOK GROUP

Faodail Creation Facebook Group Link where I have all my free patterns

READ NEXT

Master the Art of How to Sew a Zipper Pocket | Sewing Machine Tutorials & Tips for Beginners

Master the Art of How to Sew a Zipper Pocket | Sewing Machine Tutorials & Tips for Beginners is a fun way to explore sewing with zippers.

If you enjoyed Master the Art of How to Sew a Zipper Pocket | Sewing Machine Tutorials & Tips for Beginners, you might also like my How to Sew a Bed Caddy you can also try How to Sew a Zipper Pocket Bag Lining to learn more zipper projects using your sewing machine.

Latest Posts

SUBSCRIBE! So you don’t miss my next blog post

This Blogs Category

Categories List

Blog Tags

More Blog Posts

How to Sew a Snap Closure Cord Keeper : A Simple Step-by-Step Tutorial
This tutorial by Cassie Cartmell from Faodail Creation guides beginners on sewing …
How to Make a Fabric Garland
This content provides a step-by-step guide on creating a fabric garland using …
Make a Zipper Pouch on the Cricut : Easy, Brilliant Step-by-Step Tutorial
This is the link to the full you tube tutorial How to …
How to Embroider on Ribbon : 7 Easy Steps for Beautiful Personalized Christmas Ribbon
Cassie Cartmell's tutorial on embroidering ribbon using the Baby Lock Altair 2 …
Sewing Machine Tutorials Tips for Beginners

Sew a Glasses Case | Sewing Machine Tutorials & Tips for Beginners

This is the link to the you tube tutorial https://youtu.be/IfeRGDFAAt8?si=Ri6ZNPGN0g6bVrfS

Cassie Cartmell – Owner of Faodail Creation and Baby Lock Educator

Sew a Glasses Case

If youโ€™ve been wanting a quick and practical sewing project, this is the perfect one to try. In this tutorial, Iโ€™ll show you how to Sew a Glasses Case using a flex frame that keeps your glasses safe and secure.

This project is beginner-friendly, stylish, and a fantastic way to use up your fabric scraps. Plus, once you learn how to Sew a Glasses Case, you can customize it in endless ways!

Hello there, Iโ€™m Cassie from Faodail Creation, and Iโ€™m proud to be a Baby Lock Educator. I love sharing simple, approachable sewing projects that help build your skills while creating something useful youโ€™ll actually use every day. Learning to Sew a Glasses Case is a great way to gain confidence with basic sewing techniques like straight seams, working with layers, and creating casings for hardware like flex frames.

What I really love about this project is how adaptable it is. Once you know how to Sew a Glasses Case, you can easily change the size to fit sunglasses, reading glasses, or even turn it into a small pouch for other essentials. You can play with different fabrics, add quilting, or even incorporate embroidery for a more personalized finish.

Whether youโ€™re brand new to sewing or looking for a quick, satisfying make, this is a project youโ€™ll come back to again and again.


Sew a Glasses Case

Why Youโ€™ll Love This Sew a Glasses Case Project

Learning to Sew a Glasses Case is not only fun but also incredibly useful.

  • Protects your glasses from scratches
  • Compact and easy to carry
  • Great scrap-buster sewing project
  • Perfect for gifts or craft fairs
  • Beginner-friendly with simple techniques

This case comfortably fits even larger glasses while keeping them snug and secure.


Sew a Glasses Case

Materials Needed to Sew a Glasses Case

Below are a list of my Amazon Affiliate links, if you choose to purchase I may receive a small commission at no extra cost to you.

This is a link to my main Amazon Store : https://www.amazon.com/shop/faodailcreation

Before you start, gather the following materials:

๐Ÿ‘‰ Tip: When you Sew a Glasses Case, your fabric width should always be about ยฝ inch wider than your flex frame.


Sew a Glasses Case

Step 1: Create the Front Panel

To begin your Sew a Glasses Case project, weโ€™ll construct the decorative front.

Take your four 2.5-inch squares and sew them together in a vertical strip.

  • Place two squares right sides together
  • Sew along one edge using a ยผ inch seam allowance
  • Continue adding squares until all four are joined

Once sewn, finger press or press the seams flat.


Sew a Glasses Case

Step 2: Add Side Panels

Next, attach your side strips.

  • Place one strip right sides together along one side
  • Sew down the length
  • Repeat on the other side

After attaching both strips, trim your panel to:

8 inches long x 4.5 inches wide

This ensures your project stays aligned as you continue to Sew a Glasses Case.


Sew a Glasses Case

Step 3: Attach Fusible Fleece

Now itโ€™s time to add structure.

  • Place the adhesive side of the fusible fleece onto the wrong side of your lining fabric
  • Press to adhere

This step gives your glasses case a soft, padded feel while protecting your glasses.


Sew a Glasses Case

Step 4: Mark Sewing Lines

Using a fabric marking pen:

  • Measure 2.5 inches down from the top on both lining and exterior pieces
  • Draw a straight line

This marking is essential when you Sew a Glasses Case, as it creates space for the flex frame casing.


Sew a Glasses Case

Step 5: Sew the Lining

Place lining pieces right sides together.

  • Sew around the edges
  • Leave a 2-inch opening on one side
  • Stop sewing at the marked 2.5-inch lines

This opening will allow you to turn the project later.


Sew a Glasses Case

Step 6: Sew the Exterior

Repeat the same process with the exterior pieces.

  • Sew around all edges
  • Stop at the marked lines
  • Do NOT leave an opening

Carefully trim excess fabric at the corners (without cutting stitches).


Sew a Glasses Case

Step 7: Turn and Assemble

Turn the exterior piece right side out.

Leave the lining wrong side out.

  • Insert the exterior into the lining
  • Align right sides together
  • Clip edges in place

Now sew the remaining sections:

  • Sew each section separately (not in one continuous line)
  • Work in four parts for better control

This step is key to getting a clean finish when you Sew a Glasses Case.


Sew a Glasses Case

Step 8: Turn Right Side Out

Pull everything through the opening in the lining.

  • Push out corners gently
  • Fold the opening inward
  • Sew the opening closed

Now push the lining inside the pouch and press your case for a polished look.


Sew a Glasses Case

Step 9: Create the Flex Frame Casing

To insert the frame, we need to create a casing.

  • Fold down the top flap
  • Stitch along the edge to secure
  • Repeat on the other side

This creates a channel for your flex frame.


Sew a Glasses Case

Step 10: Insert the Flex Frame

Now for the final step in your Sew a Glasses Case project.

  • Insert both sides of the flex frame at the same time
  • Push it through the casing
  • Secure using the provided pin or screw

You may need pliers to push the pin fully into place.

Once inserted, adjust the fabric around the frame.


Finished Glasses Case Size

Your completed project should measure approximately:

  • 6.5 inches tall
  • 4 inches wide

This size comfortably fits larger glasses while keeping them secure.


Sew a Glasses Case

Final Thoughts on Sew a Glasses Case

Now that youโ€™ve learned how to Sew a Glasses Case, youโ€™ve got a practical and stylish accessory you can use every day.

This is a fantastic beginner sewing project that builds confidence and helps you practice:

Straight seams

Working with layers

Installing hardware (flex frame)

The more you Sew a Glasses Case, the more creative you can get with fabrics, colors, and design details. You might start with simple cotton prints, but quickly move into experimenting with quilted fabrics, linen textures, or even upcycled materials from old garments. Each time you Sew a Glasses Case, youโ€™ll refine your technique and discover new ways to make your project unique.

You can also personalize your glasses case by adding decorative stitching, labels, or even a small embroidered design. If you enjoy quilting, try piecing together scraps to create a one-of-a-kind front panel. This is a great opportunity to turn leftover fabric into something both beautiful and functional.

Another great idea when you Sew a Glasses Case is to adjust the size. Make a slightly larger version for sunglasses or a slimmer version for reading glasses. You could even create matching sets for family members or gifts for friends. Handmade items like this are always appreciated because they are both thoughtful and practical.

As you continue to Sew a Glasses Case, youโ€™ll notice your sewing becoming more precise and your confidence growing. Projects like this are perfect for building skills without feeling overwhelming, making them ideal for beginners and experienced sewers alike who want a quick, satisfying make.signs.


Want More Easy Sewing Projects?

If you enjoyed this tutorial, you might also love:

  • Scrappy zipper pouches
  • Fabric trays
  • Beginner tote bags

These projects pair perfectly with your new skills and help grow your sewing confidence.

Join my FACEBOOK GROUP

Faodail Creation Facebook Group Link where I have all my free patterns

Sew a Glasses Case | Sewing Machine Tutorials & Tips for Beginners

Sew a Glasses Case | Sewing Machine Tutorials & Tips for Beginners is a fun way to explore sewing projects

If you enjoyed Sew a Glasses Case | Sewing Machine Tutorials & Tips for Beginners, you might also like my How to Sew a Fabric Basket you can also try How to Sew English Paper Piecing Pincushion to learn more sewing projects.

SUBSCRIBE So you don’t miss my next blog post

Latest Posts

This Blogs Category

Categories List

More Blog Posts

How to Sew a Snap Closure Cord Keeper : A Simple Step-by-Step Tutorial
This tutorial by Cassie Cartmell from Faodail Creation guides beginners on sewing …
How to Make a Fabric Garland
This content provides a step-by-step guide on creating a fabric garland using …

Blog Tags

Sewing Machine Tutorials Tips for Beginners

How to Sew a Bed Caddy | Sewing Machine Tutorials & Tips for Beginners

Cassie Cartmell – Faodail Creation

This is the link to the you tube tutorial : https://www.youtube.com/watch?v=jyr5HSuJCQI

4โ€“6 minutes
Sew a Bed Caddy

If youโ€™ve ever struggled with clutter next to your bed, learning how to sew a bed caddy is the perfect solution. A bed caddy keeps everything organized and off the floor, from remotes to hand creams, and can easily hang at the side of your bed. In this step-by-step tutorial, Iโ€™ll show you exactly how to make this practical and stylish organizer.

Why You Should Sew a Bed Caddy

A bed caddy is more than just a storage solution itโ€™s a lifesaver for anyone who wants a tidy bedroom. By learning to sew a bed caddy, youโ€™ll create a space for all the items you need within armโ€™s reach. With pockets for your remote, phone, or favorite bedtime lotion, this project is both functional and fun to make.

Sew a Bed Caddy

Materials Youโ€™ll Need to Sew a Bed Caddy

Before you start, gather all your materials:

  • Fabric for the main sections and pockets
  • Lining fabric
  • Zipper (appropriate length for your caddy)
  • Sewing machine with a zipper foot
  • Pins or wonder clips
  • Thread matching your fabric

Having everything ready ensures that your project will go smoothly, and it will make it easier to focus on the fun part sewing your bed caddy.

Sew a Bed Caddy

Step 1: Prepare the Pieces to Sew a Bed Caddy

To begin, cut all your fabric pieces. For this project, youโ€™ll need:

  • Front pocket: 8 inches by 16.5 inches (cut 2 pieces)
  • Main section with zipper: 16 inches wide by 10 inches tall, plus a 2-inch top section for the zipper
  • Lining piece for back: 16.5 inches by 13 inches
  • Straps for hanging: 18 inches long and 7 inches wide, folded like a belt

Having your pieces accurately cut will make assembling your bed caddy much easier.

Sew a Bed Caddy

Step 2: Attach the Zipper

Now itโ€™s time to sew a bed caddy with a zipper. Start by attaching the zipper to the main section:

  1. Switch to your zipper foot.
  2. Align the fabric with the zipper teeth.
  3. Sew one side, then the other, ensuring the fabric stays straight.
  4. Topstitch the edges to secure it in place.

This ensures that your caddy opens smoothly and has a professional finish.

Step 3: Construct the Front Pocket

The front pocket is where youโ€™ll store your everyday items:

  1. Place the pocket pieces right sides together.
  2. Sew around the edges, leaving a small gap to turn it right side out.
  3. Trim corners and excess fabric, being careful not to cut your stitches.
  4. Pull the pocket right side out and press with an iron.

Once pressed, position your pocket onto the front of the main caddy section and pin it in place. Sew all around to secure.

Sew a Bed Caddy

Step 4: Create Internal Sections

For a well-organized bed caddy, youโ€™ll want separate sections inside the pocket:

  1. Decide where your items will go (e.g., remotes, hand cream).
  2. Mark reference lines on the pocket.
  3. Stitch along these lines to create compartments.

This is where the magic of sewing a bed caddy really shines you can customize the internal layout based on your needs.

Step 5: Attach the Straps to the Bed Caddy

The straps allow your bed caddy to hang neatly by your bed:

  1. Topstitch along each strap for reinforcement.
  2. Open the zipper halfway to make it possible to pull the caddy through later.
  3. Tuck straps inside the project, away from where youโ€™ll sew the outer edges.

Properly attaching the straps ensures your bed caddy will stay securely in place.

Sew a Bed Caddy

Step 6: Assemble the Bed Caddy

With your zipper, pocket, and straps ready:

  1. Place the lining piece face down over the main section.
  2. Pin or clip everything together carefully.
  3. Sew all the way around the edges no need to leave a gap this time.
  4. Unzip and pull the caddy through the zipper opening.
  5. Press the edges with an iron for a crisp, finished look.

By the end of this step, your bed caddy is almost complete and ready to use.

Step 7: Final Touches

Your handmade bed caddy is now ready to hang. Attach it to the side of your bed using safety pins or hooks, and enjoy a clutter-free space. Everything from remotes to night creams now has its place, making your bedroom both neat and stylish.

Sew a Bed Caddy

Tips for Success When You Sew a Bed Caddy

  • Use pins or wonder clips to hold pieces together this prevents fabric from shifting.
  • Customize your pockets according to what you keep by your bed.
  • Topstitch edges for a polished look and added durability.
  • Measure twice, cut once to ensure all pieces fit perfectly.

Following these tips makes sewing a bed caddy easier and ensures a professional result.

Why Youโ€™ll Love This DIY Bed Organizer

Learning to sew a bed caddy is rewarding because it combines creativity and functionality. This project is perfect for beginners and experienced sewers alike. Not only does it provide a practical solution for bedroom clutter, but it also allows you to express your style with fabric choices and pocket layouts.

Once you hang your caddy, youโ€™ll wonder how you ever lived without it!

Conclusion – Sew a Bed Caddy

Now you know exactly how to sew a bed caddy from start to finish. From cutting your pieces to adding zippers, pockets, and straps, this project is easy, fun, and functional. Your bed area will look neat, and your essentials will be right at your fingertips.

If you enjoyed this tutorial, donโ€™t forget to check out my other sewing projects and subscribe to my channel I post new sewing and quilting tutorials every Wednesday!

Join my FACEBOOK GROUP

Faodail Creation Facebook Group Link where I have all my free patterns

READ NEXT

How to Sew a Bed Caddy | Sewing Machine Tutorials & Tips for Beginners

How to Sew a Bed Caddy | Sewing Machine Tutorials & Tips for Beginners is a fun way to explore free motion quilting.

If you enjoyed , How to Sew a Bed Caddy | Sewing Machine Tutorials & Tips for Beginners you might also like my How to Sew a Fabric Basket you can also try Sewing Room Tour to learn more about sewing

Subscribe! So you don’t miss my next blog post

Latest Posts

This Blog Category

Blog Categories

Blog Tag

More Blog Posts

How to Sew a Snap Closure Cord Keeper : A Simple Step-by-Step Tutorial
This tutorial by Cassie Cartmell from Faodail Creation guides beginners on sewing …
How to Make a Fabric Garland
This content provides a step-by-step guide on creating a fabric garland using …
Sewing Machine Tutorials Tips for Beginners

Sewing Foot Pedal Sewing Tutorial | Sewing Machine Tutorials & Tips for Beginners

Here is the link to the you tube tutorial : https://www.youtube.com/watch?v=sDSZNyOOMyQ&t=2s

Cassie Cartmell – Faodail Creation

Sewing Foot Pedal Sewing Tutorial | Sewing Machine Tutorials & Tips for Beginners

If your sewing foot pedal constantly slides across the floor while you are sewing, you are not alone. Many sewists struggle with a sewing foot pedal that moves around during projects, making it harder to maintain speed and control.

This easy sewing tutorial will show you how to create a simple sewing foot pedal non-slip mat that keeps your sewing foot pedal firmly in place. The project is quick, beginner-friendly, and uses basic sewing supplies you may already have in your sewing room.

By the end of this tutorial, your foot pedal will stay exactly where you want it, helping you sew more comfortably and confidently.


Sewing Foot Pedal Sewing Tutorial | Sewing Machine Tutorials & Tips for Beginners

Why Your Sewing Foot Pedal Keeps Moving

A sliding foot pedal can be incredibly frustrating. When your foot pedal moves during sewing, it can interrupt your stitching rhythm and make controlling your machine difficult.

Here are some common reasons your foot pedal may slide:

  • Smooth floors such as hardwood or tile
  • Lightweight sewing machine pedals
  • Sewing for long periods of time
  • Not having a grip surface under the foot pedal

The good news is that with a small sewing project, you can create a non-slip sewing foot pedal mat that solves this problem instantly.


Sewing Foot Pedal Sewing Tutorial | Sewing Machine Tutorials & Tips for Beginners

Materials Needed for a Sewing Foot Pedal Non-Slip Mat

Before starting this sewing foot pedal project, gather the following materials:

Below are my Amazon Links if you decide to purchase I may receive a small commission at no cost to you:

My Amazon Store : https://www.amazon.com/shop/faodailcreation

Using non-slip material is the key to making sure your foot pedal stays secure while you sew.


Sewing Foot Pedal Sewing Tutorial | Sewing Machine Tutorials & Tips for Beginners

Step 1: Measure Your Sewing Foot Pedal

The first step in making a foot pedal mat is measuring your sewing foot pedal.

Measure the length and width of your foot pedal so you know how large to cut your fabric pieces.

For example:

  • My foot pedal measured 11 inches by 7 inches

Once measured, cut the following:

  • 2 fabric pieces (top and bottom)
  • 1 batting piece

All pieces should match the size of your foot pedal measurement.

These layers will form the base that supports your foot pedal while sewing.


Sewing Foot Pedal Sewing Tutorial | Sewing Machine Tutorials & Tips for Beginners

Step 2: Prepare the Non-Slip Fabric for the Sewing Foot Pedal

To prevent your foot pedal from sliding, you will need non-slip fabric.

This fabric is commonly found on:

  • Slipper soles
  • Anti-slip mats
  • Rug grip materials

Cut the non-slip fabric so it fits across the center of the foot pedal mat.

Instead of covering the entire mat, you can cut two strips:

  • One for the front
  • One for the back

This still gives your foot pedal plenty of grip while keeping the mat flexible.


Sewing Foot Pedal Sewing Tutorial | Sewing Machine Tutorials & Tips for Beginners

Step 3: Attach the Non-Slip Fabric

Now it is time to attach the non-slip fabric that will hold your foot pedal in place.

For one piece:

  1. Fold the raw edge slightly.
  2. Press with an iron.
  3. Stitch it down to the fabric backing.

For the other piece, you can attach it with binding.

Binding creates a cleaner finish and adds durability to the foot pedal mat.

After sewing, your backing piece should now have the non-slip fabric attached, giving your foot pedal the grip it needs.


Sewing Foot Pedal Sewing Tutorial | Sewing Machine Tutorials & Tips for Beginners

Step 4: Create the Sewing Foot Pedal Stopper

This step creates a padded stopper that prevents the foot pedal from sliding forward while you sew.

Cut two fabric strips:

  • 2ยฝ inches by 13 inches

Sew around the edges of the strip, leaving the top open.

Turn the piece right side out and lightly fill it with:

  • Polyfill
    or
  • Fabric scraps

Do not overfill, because the stopper still needs to be stitched to the foot pedal mat.

Place the stopper along the edge where your foot pedal rests. This creates a small barrier that helps keep the foot pedal from creeping forward.

Stitch the sides closed to secure the stopper in place.


Step 5: Assemble the Foot Pedal Mat

Now it’s time to assemble the full foot pedal mat.

Layer your pieces in this order:

  1. Backing fabric (face down)
  2. Batting
  3. Top fabric (face up)

Make sure everything is aligned so your foot pedal mat fits neatly.

Sew all the way around the edges to hold the layers together.

If needed, trim the edges so everything is even before finishing.


Sewing Foot Pedal Sewing Tutorial | Sewing Machine Tutorials & Tips for Beginners

Add Binding to Finish the Sewing Foot Pedal Mat

The final step is adding binding around the outside edge.

Binding helps:

  • Strengthen the edges
  • Improve durability
  • Give your foot pedal mat a polished finish

Cut binding strips about 2 inches wide and long enough to wrap around the mat.

Attach the binding around the edges and stitch it down securely.

Once finished, your foot pedal mat is complete.


Sewing Foot Pedal Sewing Tutorial | Sewing Machine Tutorials & Tips for Beginners

Test Your Sewing Foot Pedal Non-Slip Mat

Place your foot pedal on the finished mat and start sewing.

You should immediately notice:

  • The foot pedal stays in place
  • Less frustration while sewing
  • Better control of your sewing speed

This small project can make a huge difference in your sewing setup.


Benefits of Using a Sewing Foot Pedal Mat

Creating a foot pedal mat offers several benefits:

โœ” Keeps your foot pedal from sliding
โœ” Improves sewing comfort
โœ” Helps maintain consistent stitching speed
โœ” Works on hardwood, tile, or laminate floors
โœ” Quick and beginner-friendly sewing project

Many sewists are surprised how much easier sewing becomes once their foot pedal stays in place.


Sewing Foot Pedal Sewing Tutorial | Sewing Machine Tutorials & Tips for Beginners

Tips for a Better Sewing Foot Pedal Setup

Here are a few extra tips for managing your foot pedal while sewing:

  • Use a rubber-backed mat under your sewing area
  • Keep cords organized so they do not pull the foot pedal
  • Adjust your chair height for better foot control
  • Position your foot pedal directly under your knee

A stable foot pedal can greatly improve your sewing experience.


Final Thoughts on This Sewing Foot Pedal Project

A sliding foot pedal can make sewing frustrating, but this simple project solves the problem quickly.

By creating a foot pedal non-slip mat, you can keep your foot pedal stable and comfortable while working on your sewing projects.

This is also a great beginner sewing project that uses small pieces of fabric and can be completed in under an hour.

Once you try this foot pedal solution, you may wonder how you ever sewed without it.

READ THIS

Sewing Foot Pedal Sewing Tutorial | Sewing Machine Tutorials & Tips for Beginners

Sewing Foot Pedal Sewing Tutorial | Sewing Machine Tutorials & Tips for Beginners is a fun way to explore easy sewing projects.

If you enjoyed Sewing Foot Pedal Sewing Tutorial | Sewing Machine Tutorials & Tips for Beginners, you might also like my Sewing Foot Pedal tutorial.. You can also try How to Sew a Fabric Basket both sewing tutorials are very easy.

SUBSCRIBE! So you don’t miss my next blog

Latest Blog Posts

This Blogs Category

Categories List

Blog Tag

Sewing Machine Tutorials Tips for Beginners

How to Sew a Twisted Pole Table Runner | Sewing Machine Tutorials & Tips for Beginners

Link to the you tube video is here : https://www.youtube.com/watch?v=I3ior2a9Pt8&t=0s

Cassie Cartmell – Faodail Creation

How to Sew a Twisted Pole Table Runner | Sewing Machine Tutorials & Tips for Beginners

Learn how to sew a beautiful Twisted Pole Table Runner with this step-by-step tutorial. This unique quilted table runner design creates a stunning twisted effect and is a perfect project for adding handmade style to your dining table or giving as a thoughtful gift.

Twisted pole table runner projects are a beautiful way to combine simple piecing with a striking visual design. This Twisted pole table runner pattern uses half square triangles arranged in a clever layout to create the illusion of twisting movement across the runner. The finished project looks complex and impressive, yet it is actually very beginner-friendly for anyone interested in sewing and quilting.

In this tutorial, youโ€™ll learn how to sew a Twisted pole table runner step by step. We will cover fabric selection, cutting half square triangles, chain piecing techniques, pressing seams correctly, and assembling the quilt top. These essential skills are commonly used in quilting, and practicing them on a project like this helps build strong foundations for future quilting projects and improves overall quilting accuracy.

Iโ€™m also a Baby Lock educator, and in this tutorial I demonstrate how I sew my projects using my Baby Lock sewing machine. Teaching sewing and quilting techniques is something Iโ€™m passionate about, and I love sharing practical tips that make quilting easier and more enjoyable for beginners and experienced quilters alike. My goal is to help makers feel more confident when exploring new quilting projects and creative sewing ideas.

Whether you are new to quilting or simply looking for a quick project to practice your piecing skills, a Twisted pole table runner is a fantastic project to make. Not only will it help you develop confidence in quilting techniques, but you will also create a beautiful handmade piece that adds charm and color to your home.


Why Make a Twisted Pole Table Runner

A Twisted pole table runner is a great quilting project for several reasons.

First, it uses half square triangles, one of the most common blocks used in quilting. Learning how to work with these blocks will help you with many other quilting patterns and projects.

Second, the Twisted pole table runner looks visually impressive even though the construction is simple. By arranging the triangles in the correct direction, the pattern creates a twisting illusion that runs the length of the quilt, making it a striking piece for anyone who enjoys quilting and creative fabric design.

Finally, a Twisted pole table runner is very customizable. You can easily change:

  • Fabric colors
  • Size of the half square triangles
  • Overall length of the runner
  • Borders and binding

This flexibility makes the Twisted pole table runner perfect for seasonal dรฉcor, practicing new quilting techniques, or creating a thoughtful handmade gift.


How to Sew a Twisted Pole Table Runner | Sewing Machine Tutorials & Tips for Beginners

Fabrics Used for the Twisted Pole Table Runner

  • Yellow fabric
  • Gray fabric
  • White fabric

For this table runner, three fabrics were used:

The key when choosing fabrics for a table runner is contrast. High contrast between the fabrics helps the twisting pattern stand out clearly.

For example:

  • Light fabric (white)
  • Medium fabric (gray)
  • Bright or bold fabric (yellow)

The stronger the contrast, the more dramatic the final table runner will look.


Tools Needed to Make a Twisted Pole Table Runner

To sew this table runner, you will need:

  • Sewing machine
  • Rotary cutter and mat
  • Iron and ironing board
  • Quilting ruler
  • Thread
  • Fabric snips

For this demonstration, an AccuQuilt Go fabric cutter was used to quickly cut half square triangles. However, you can absolutely make your table runner using traditional cutting and piecing methods.


How to Sew a Twisted Pole Table Runner | Sewing Machine Tutorials & Tips for Beginners

Step 1: Cut Half Square Triangles for the Twisted Pole Table Runner

The foundation of the table runner is the half square triangle block.

For this design you will need:

  • 12 yellow and gray half square triangles
  • 24 white and gray half square triangles

If using a die cutter like the AccuQuilt Go, you can stack several layers of fabric and run them through the cutter to quickly create your pieces.

However, any method that produces accurate half square triangles will work perfectly for a Twisted pole table runner.


How to Sew a Twisted Pole Table Runner | Sewing Machine Tutorials & Tips for Beginners

Step 2: Prepare the Half Square Triangle Pairs

Each table runner block is created by sewing two triangles together to form a square.

Place one triangle on top of another with right sides together.

Align the edges carefully before sewing.

Accurate alignment helps ensure the final table runner lies flat and the twisting pattern lines up correctly.


How to Sew a Twisted Pole Table Runner | Sewing Machine Tutorials & Tips for Beginners

Step 3: Sew the Half Square Triangles

Using a sewing machine, stitch the half square triangles together using a quarter-inch seam allowance.

Typical machine settings might include:

  • Standard stitch length
  • Polyester thread
  • Microtex needle (90/14)

Once sewn, you will have squares that form the building blocks of the table runner.


How to Sew a Twisted Pole Table Runner | Sewing Machine Tutorials & Tips for Beginners

Step 4: Use Chain Piecing for Efficiency

When sewing many pieces for a Twisted pole table runner, chain piecing saves a lot of time.

Instead of sewing one block at a time, feed the next piece directly into the sewing machine after finishing the previous one.

This creates a long chain of connected blocks that looks almost like fabric bunting.

Chain piecing makes assembling a table runner much faster and more efficient.


Step 5: Separate the Pieces

After chain piecing all the half square triangles, use fabric snips to cut the threads between each piece.

You will now have all the blocks needed to assemble your table runner.


How to Sew a Twisted Pole Table Runner | Sewing Machine Tutorials & Tips for Beginners

Step 6: Press the Half Square Triangles

Pressing is very important when sewing a Twisted pole table runner.

Open each block and press the seam toward the darker fabric, which in this case is the gray fabric.

Pressing toward the darker fabric prevents shadowing through the lighter fabric and keeps your table runner looking crisp.


How to Sew a Twisted Pole Table Runner | Sewing Machine Tutorials & Tips for Beginners

Step 7: Arrange the First Row of the Twisted Pole Table Runner

The first row of the table runner contains three blocks.

The layout should look like this:

  • White and gray block
  • Yellow and gray block
  • White and gray block

This arrangement begins the twisting visual effect that makes the Twisted pole table runner pattern so interesting.


How to Sew a Twisted Pole Table Runner | Sewing Machine Tutorials & Tips for Beginners

Step 8: Sew the Row Together

Sew the blocks together using a quarter-inch seam allowance.

Join them carefully so the corners match neatly.

Because the blocks are small, accuracy is important when building the Twisted pole table runner.


Step 9: Create the Second Row

The second row continues the twisting illusion.

The orientation of the triangles changes so the pattern begins to rotate visually.

When placed beside the first row, the table runner begins to show its distinctive spiral pattern.


Step 10: Build the Twisted Pole Block

Each repeating section of the table runner consists of six squares arranged in two rows of three.

This block forms the repeating unit of the entire design.

Once you understand this block structure, extending the Twisted pole table runner becomes very easy.


How to Sew a Twisted Pole Table Runner | Sewing Machine Tutorials & Tips for Beginners

Step 11: Repeat the Blocks

Continue sewing additional six-square blocks.

Each block adds length to the table runner.

You can make your table runner as long as you like by simply repeating the block pattern.

This flexibility makes the table runner suitable for:

  • Dining tables
  • Coffee tables
  • Sideboards
  • Seasonal dรฉcor displays

Step 12: Add Borders to the Twisted Pole Table Runner

If you want to increase the overall size of the Twisted pole table runner, borders are a great option.

In this example, border strips were cut:

  • 4 inches wide
  • The full width of the fabric

Borders were added to the edges to slightly increase the size of the table runner while framing the twisted design.


Step 13: Quilt the Table Runner

Once the quilt top is finished, layer it with:

  • Batting
  • Backing fabric

You can quilt your Twisted pole table runner using:

  • Straight line quilting
  • Free motion quilting
  • Stitch in the ditch

Choose a quilting style that complements the twisting pattern.


Step 14: Add Binding

Binding finishes the edges of the table runner.

For this project, a two-tone binding was used that transitions between yellow and gray.

This binding choice helps highlight the colors within the table runner and makes the design pop.

Many quilters prefer hand binding for table runners because it creates a cleaner finish.


How to Sew a Twisted Pole Table Runner | Sewing Machine Tutorials & Tips for Beginners

Step 15: Enjoy Your Finished Twisted Pole Table Runner

Once the binding is complete, your table runner is finished.

The final result is a beautiful quilted piece that showcases a twisting visual pattern created entirely from half square triangles.

This table runner makes a wonderful handmade decoration for your home and is also a thoughtful gift for friends or family.


Tips for Sewing a Perfect Twisted Pole Table Runner

Here are a few helpful tips when making your table runner:

Use contrasting fabrics
Contrast helps the twisting pattern stand out clearly.

Press carefully
Accurate pressing keeps your table runner flat and professional looking.

Keep seam allowances consistent
A consistent quarter-inch seam is essential for matching points.

Lay out blocks before sewing
Seeing the full arrangement ensures your Twisted pole table runner pattern stays correct.


Final Thoughts on the Twisted Pole Table Runner and you tube tutorial

The Twisted pole table runner is a fantastic quilting project that combines simplicity with dramatic visual impact.

Because it uses half square triangles, itโ€™s perfect for beginner quilters who want to practice their skills. At the same time, the twisting layout makes the finished Twisted pole table runner look intricate and impressive.

With just a few fabrics, accurate piecing, and careful pressing, you can create a beautiful Twisted pole table runner that will brighten any table in your home.

Join my FACEBOOK GROUP

Faodail Creation Facebook Group Link where I have all my free patterns

READ NEXT

How to Sew a Twisted Pole Table Runner | Sewing Machine Tutorials & Tips for Beginners

How to Sew a Twisted Pole Table Runner | Sewing Machine Tutorials & Tips for Beginners is a fun way to explore your sewing machine.

If you enjoyed How to Sew a Twisted Pole Table Runner | Sewing Machine Tutorials & Tips for Beginners, you might also like my How to Sew a Sewing Machine Mat , a simple and quilt project to do. You can also try How to Sew a Fabric Tray another simple sewing project using your sewing machine.

SUBSCRIBE! So you don’t miss my next post

Latest Posts

Blog Categories

More Blog Posts

How to Sew a Snap Closure Cord Keeper : A Simple Step-by-Step Tutorial
This tutorial by Cassie Cartmell from Faodail Creation guides beginners on sewing …
How to Make a Fabric Garland
This content provides a step-by-step guide on creating a fabric garland using …
Sewing Machine Tutorials Tips for Beginners

Fabric Bookmark | Sewing Machine Tutorials & Tips for Beginners

Cassie Cartmell – Faodail Creation

Here is the link to the You tube tutorial https://www.youtube.com/watch?v=WoWwZdZWCqY&t=20s

Fabric Bookmark | Sewing Machine Tutorials & Tips for Beginners

Creating a fabric bookmark is a fun and simple sewing project, perfect for both beginners and experienced sewers. With just a few materials and some basic sewing skills, you can craft a beautiful bookmark that protects your books and adds a personal touch. In this tutorial, weโ€™ll show you how to make a cat-themed fabric bookmark in three easy steps.

Whether youโ€™re making this for yourself or as a gift, this project is a perfect way to practice your sewing skills while creating something functional and adorable. Letโ€™s dive in!


Fabric Bookmark | Sewing Machine Tutorials & Tips for Beginners

Step 1: Prepare Your Fabric and Materials

Before you start sewing, gather the materials for your fabric bookmark:

  • Three pieces of fabric, each cut 3 inches by 3 inches
  • Quilters batting cut to the same size
  • Sewing machine
  • Thread and a 90/14 sewing needle

For this project, I used a cute kitty cat fabric for the front of my fabric bookmark, which adds a fun touch. You can choose patterned fabric or a simple solid color itโ€™s completely up to you.

First, take your front piece of fabric and fold it over, with the backing piece underneath. This folding technique adds stabilization to your bookmark and makes sewing easier. Press the fabric lightly with an iron so it stays in place.

Next, set up your sewing machine for topstitching. Increase the stitch length to 3.0, insert your 90/14 needle, and sew around the edges of your folded fabric. This topstitching creates a clean edge and ensures your bookmark holds its shape.


Fabric Bookmark | Sewing Machine Tutorials & Tips for Beginners

Step 2: Assemble Your Fabric Bookmark โ€œSandwichโ€

Once your first piece is stitched, itโ€™s time to assemble your bookmark. Think of it as creating a little โ€œsandwichโ€:

  1. Place the quilt batting on the back piece of fabric.
  2. Position the top piece of fabric you just sewed onto the batting.
  3. Fold the edges together so all layers are enclosed.

Now, sew all the way around the edges, leaving a small opening along the side or bottom. This opening is essential because youโ€™ll need it to flip your bookmark right side out later. Remember: donโ€™t start sewing at the corners start a little inside for a cleaner finish.

After sewing, trim excess threads and carefully clip the corners, being careful not to cut into your stitches. This helps the corners of your fabric bookmark look neat and professional.


Fabric Bookmark | Sewing Machine Tutorials & Tips for Beginners

Step 3: Flip, Press, and Finish Sewing

Here comes the final step: flipping your bookmark right side out. Gently push the corners out using something blunt, like a chopstick or knitting needle. Avoid using scissors, as sharp objects can puncture the fabric.

Once the bookmark is flipped, press it lightly with an iron for crisp edges. Then, topstitch around all edges to close the opening and give your bookmark a finished, polished look.

Now your cat-themed bookmark is ready to use! Simply slide it onto the corner of your book. The great thing about this fabric bookmark is that it protects your book pages without bending or damaging them.


Fabric Bookmark | Sewing Machine Tutorials & Tips for Beginners

Bonus Tips for Sewing Your Fabric Bookmark

  • Use high-quality thread for a durable fabric bookmark.
  • Choose fabrics that complement each other for a stylish look.
  • Sew slowly around corners to avoid puckering.
  • Practice on scrap fabric if youโ€™re new to sewing.

Sewing a fabric bookmark is a perfect way to combine creativity with practicality. You can make several in different designs, experiment with patterns, and even gift them to friends and family.


Creating a fabric bookmark is a fun, easy sewing project that results in a functional and adorable accessory for any book lover. With just a few pieces of fabric, some quilting batting, and your sewing machine, you can make a professional-looking fabric bookmark in just three steps.

Grab your fabric, thread, and sewing machine, and start sewing your own fabric bookmark today!

Join my FACEBOOK GROUP

Faodail Creation Facebook Group where I have all my free patterns

READ NEXT

Fabric Bookmark | Sewing Machine Tutorials & Tips for Beginners

Fabric Bookmark | Sewing Machine Tutorials & Tips for Beginners is a fun way to explore your sewing machine

If you enjoyed Fabric Bookmark | Sewing Machine Tutorials & Tips for Beginners, you might also like How to Sew a Sewing Machine Mat . You can also try How to Sew a Fabric Basket to learn a really simple sewing project using your sewing machine.

SUBSCRIBE! So you don’t miss by next post

This Blog Category

Latest Blog Posts

Blog Tags

Blog Categories

More Blog Posts

How to Sew a Snap Closure Cord Keeper : A Simple Step-by-Step Tutorial
This tutorial by Cassie Cartmell from Faodail Creation guides beginners on sewing …
How to Make a Fabric Garland
This content provides a step-by-step guide on creating a fabric garland using …