


Cassie Cartmell – Faodail Creation
This is the link to the full you tube tutorial | How to sew a fabric basket | Beginner Sewing Machine Tutorials https://youtu.be/kk3mchQoMkI
Table of Contents

How to Sew a Fabric Basket is a fun and practical sewing project that is perfect for beginners. This adorable fabric basket can be used for storing sewing supplies, fabric scraps, craft supplies, toiletries, small toys, or anything else that needs a little bit of organization.
In this easy sewing tutorial, I’ll show you how to sew a fabric basket using just a few pieces of fabric, fusible fleece, ribbon, and some matching thread. You can also add decorative ric rac around the outside to give your basket a fun finished look.
This project is a great way to use coordinating fabrics and create a useful handmade storage basket for your sewing room, craft room, or home. You can choose fabrics that match your existing décor or have fun creating a colourful basket using contrasting fabrics.
The construction may look complicated at first, but once you understand how the pieces are arranged into a T-shape, the basket comes together surprisingly quickly. Each section is sewn using simple seams, making this an enjoyable project even if you are still building confidence with your sewing machine.
This sewing tutorial is also a great opportunity to practise working with fusible fleece. The fleece adds structure to the outer fabric, helping the finished basket hold its shape. You’ll also learn how to create a lining, attach ribbon handles, and neatly finish the top edge with topstitching.
Another useful part of this sewing tutorial is learning how to construct a basket from flat fabric pieces. Rather than starting with a complicated pattern, the pieces are arranged into a simple T-shape before the seams are sewn together. Once the sides are joined, the shape transforms into a practical fabric storage basket.
You can also personalize your basket by choosing different trims and fabrics. Ric rac is an easy way to add decoration, but you could leave it off for a simpler appearance. Seasonal fabrics would also work beautifully, allowing you to make baskets for Christmas, Easter, birthdays, or other special occasions.
Whether you are looking for a quick handmade gift or a useful project for your own home, this sewing tutorial is a great project to try. The finished basket is small enough to be practical but spacious enough to hold plenty of everyday items.
By following this sewing tutorial, you’ll learn several useful sewing techniques that can also be applied to other projects, including pressing seams, adding interfacing or fleece, constructing lined items, attaching handles, and finishing an opening neatly. Take your time with each step, press your seams as you go, and enjoy creating your own adorable fabric basket.
What You Need to Sew a Fabric Basket

Before starting How to Sew a Fabric Basket, gather all of your supplies. Having everything prepared before you begin will make how to sew a fabric basket much easier to follow.
Fabric Basket Materials – How to Sew a Fabric Basket
Below I have included my Amazon Affiliate links, if you decide to purchase from any of these links i may receive a small commission at no extra cost to you
My Amazon Store : https://www.amazon.com/shop/faodailcreation
You will need:
- Five 6-inch squares of outer fabric
- Five 6-inch squares of lining fabric
- Five 6-inch squares of fusible fleece
- Ribbon for the handles
- Matching sewing thread – https://amzn.to/4q04UgW
- Ric rac for decoration, optional https://amzn.to/4fS5s40
- Wonder Clips – https://amzn.to/4xwbmPE
- Sewing machine
- Iron – https://amzn.to/4wNwfFZ
- ironing mat – https://amzn.to/4bvoMTq
- 90/14 sewing machine needle https://amzn.to/4w9xLRH
- Quarter-inch presser foot
- Regular presser foot
A Microtex or universal 90/14 needle works well for this project.
I also recommend using a quarter-inch foot because the basket is constructed using quarter-inch seams.
Set your sewing machine stitch length to approximately 2.0.
Choosing Fusible Fleece
Fusible fleece is one of my favourite products to use when making bags and fabric baskets.
One side of fusible fleece feels rough or slightly sticky because that is the adhesive side. The other side is softer and fluffy.
When applying the fusible fleece, place the sticky side against the wrong side of your outer fabric.
Be careful when pressing the fleece. Try not to use too much steam because excessive moisture can cause the fabric to become wrinkled.
Fuse the fleece to all five outer fabric pieces.
Once all five pieces are fused, you’re ready to start constructing the basket.
How to Sew a Fabric Basket: Prepare the Outer Pieces
The first part of learning how to sew a fabric basket is arranging your fabric pieces correctly.
Lay your five outer fabric pieces on your work surface so they form a T-shape.
Take a moment to check the arrangement before sewing. Keeping the pieces in the correct position will make the construction much easier.
Step 1: Sew the First Seam – How to Sew a Fabric Basket

Take the appropriate section of your T-shape and fold the fabric pieces right sides together.
For this first seam, do not sew right from the very beginning.
Instead, start your stitching slightly away from the edge.
This small opening is intentional and will be important later when the basket is assembled.
Sew the seam using a quarter-inch seam allowance.
Once the seam is complete, press it open.
Pressing each seam as you go will help keep your fabric basket neat and make the later construction steps easier.
Step 2: Sew the Second Section – How to Sew a Fabric Basket

Return your fabric to the T-shape arrangement.
Take the next section and place the pieces right sides together.
Again, leave a small opening at the beginning of the seam.
Sew down the seam using your quarter-inch seam allowance.
When you reach the end, press the seam flat.
At this point, you should begin to see the top section of your fabric basket taking shape.
Step 3: Complete the T-Shape – How to Sew a Fabric Basket

Now we can begin working down the T-shape.
Take the next fabric piece and place it right sides together with the section you have already constructed.
The small opening you left earlier allows the seams to be joined neatly and enclosed.
Line up the edges carefully.
This time, start sewing at the beginning of the seam because this section needs to be completely closed.
Sew all the way down using a quarter-inch seam allowance.
Press the seam once again.
Step 4: Add the Final Fabric Piece – How to Sew a Fabric Basket

Take the final outer fabric piece and place it right sides together with the remaining section.
Unlike the earlier seams, you do not need to leave an opening here.
Sew straight down the seam using a quarter-inch seam allowance.
Press the seam.
Your fabric should now resemble the original T-shape, but the pieces have been joined together.
Step 5: Turn the T-Shape Into a Box – How to Sew a Fabric Basket

Now comes the fun part!
This is where your flat T-shaped piece begins turning into a fabric basket.
Take the side sections and bring the corresponding edges together.
Place them right sides together and sew all the way down the seam.
Continue joining the remaining sides.
As you sew these seams, you will notice the flat fabric beginning to form a three-dimensional box.
Continue until the remaining section has been sewn closed.
You should now have the basic outer fabric basket.
At this point, you could actually stop if you wanted a very simple fabric basket.
However, we’re going to continue and add a lining, handles, and decorative ric rac to create a more finished basket.
Step 6: Add the Ric Rac – How to Sew a Fabric Basket
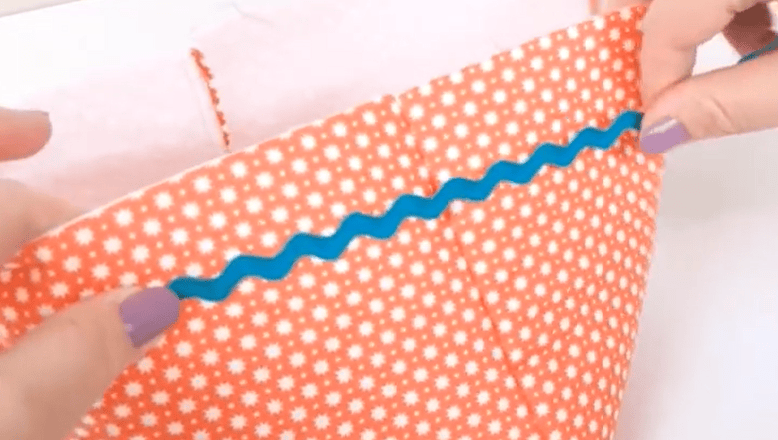
First, remove the arm section of your sewing machine if your machine allows you to do this.
This gives you more room to slide the basket around the machine.
Switch back to your regular presser foot.
Use coordinating thread for the best result.
Place the ric rac around the outside of the basket.
Start sewing approximately in the middle of the basket rather than directly at the beginning of the ric rac.
Leave a small amount of ric rac free at the beginning.
Stitch directly through the centre of the ric rac.
Slowly work your way around the basket.
Try not to position the ric rac too close to the top edge.
Remember that the lining will eventually be placed inside the basket and the basket will need to be turned right side out.
When you reach the other end, trim the ric rac so that the ends meet neatly.
Match the ends together and secure them.
Your outer fabric basket is now complete.
How to Sew a Fabric Basket Lining – How to Sew a Fabric Basket
Now that the outside of your basket is finished, we can make the lining.
The lining is constructed using exactly the same basic process as the outer basket.
Step 7: Construct the Lining – How to Sew a Fabric Basket

Take your five lining fabric squares and arrange them into the same T-shape.
Place the first two sections right sides together.
Leave the small opening at the beginning of the seam, just as you did when making the outer basket.
Sew the quarter-inch seam and press it.
Return the pieces to the T-shape.
Take the next section and place it right sides together.
Again, start slightly away from the edge and sew the seam.
Press it flat.
Continue working through the remaining sections.
Form the T-shape again after each seam so you can easily see which pieces need to be joined.
Fold the appropriate section over, keeping the other fabric pieces out of the way, and sew the next seam.
Press again.
Continue sewing until all of the lining pieces have been joined.
Finally, sew the remaining side seams together to form your lining basket.
You should now have two fabric baskets one made from your outer fabric and one made from your lining fabric.
Step 8: Make the Fabric Basket Handles – How to Sew a Fabric Basket

Now we’re ready to add the handles.
The length of your handles is completely up to you.
For my basket, I used approximately one metre of ribbon and folded it in half to determine the handle length.
Once folded, each handle measured approximately 15 inches.
You can make your handles longer or shorter depending on how you want your basket to look.
Attaching the Handles – How to Sew a Fabric Basket
Turn your outer basket so that you can clearly see the four sides.
Pinch or fold the sides slightly so you can determine where you want the handles positioned.
Wonder Clips are particularly useful here because they hold the ribbon securely without making unnecessary holes in the fabric.
Position one handle on one side of the basket.
Make sure the ribbon reaches slightly down the outside of the basket.
Leave a little overhang at the top.
This extra ribbon will eventually be enclosed when the lining and outer basket are sewn together.
Secure the handle with Wonder Clips.
Turn the basket around and attach the second handle to the opposite side.
Before continuing, check that both handles are positioned evenly.
Step 9: Join the Outer Basket and Lining – How to Sew a Fabric Basket

Now we are ready to put the two baskets together.
Turn your lining so it is inside out.
Place the outer fabric basket inside the lining.
The right sides of the outer basket and lining should now be facing each other.
Make sure the handles are pushed down between the two layers.
This is extremely important because you do not want to accidentally sew the handles into the wrong position.
Check that the top edges are lined up neatly.
Also make sure your seams are matched.
Take your time with this step because accurate alignment will give your finished basket a much more professional appearance.
Step 10: Sew Around the Top Edge – How to Sew a Fabric Basket

Before you begin sewing, remember that we need an opening large enough to turn the basket right side out.
Do not sew completely around the top edge.
Leave a generous opening between the beginning and end of your stitching.
The opening needs to be large enough to pull the bulky fabric basket through without forcing it.
Remove the arm section of your sewing machine if necessary so you can fit the basket comfortably around the machine.
Use a quarter-inch seam allowance.
As you sew around the top, take care around the handles.
You may need to lift your presser foot occasionally to help move the basket through the machine.
Go as quickly or as slowly as you feel comfortable.
There is absolutely no need to rush.
Continue around the basket and stop before you reach the other side of your opening.
Step 11: Turn the Fabric Basket Right Side Out – How to Sew a Fabric Basket

Now comes the part where your basket really starts to look like a finished project.
Before turning the basket, trim away the excess pieces of ribbon sticking out around the handle areas.
Then carefully begin pulling the basket through the opening.
This can feel a little difficult because there are several layers of fabric and fusible fleece.
Don’t force it.
Gently work each section through the opening until the entire basket has been turned right side out.
Push out the corners carefully.
Once everything has been pulled through, push the lining down inside the outer basket.
Take your time arranging the corners and seams.
Step 12: Press the Fabric Basket – How to Sew a Fabric Basket
Before finishing the top edge, give your basket a good press.
Flatten the seams and make sure the fabric is sitting neatly.
Pay particular attention to the opening where the basket was turned right side out.
Fold the raw edges neatly back into the opening.
Press the area flat.
A good press will make the final topstitching much easier.
Step 13: Topstitch the Basket – How to Sew a Fabric Basket

The final sewing step is to topstitch around the top edge of the basket.
Switch your thread to a coordinating colour if necessary.
For this project, I used a topstitch that was slightly less than a quarter of an inch from the edge.
Slowly sew around the entire top of the basket.
This will close the turning opening and help hold the lining neatly inside the basket.
Be particularly careful when sewing near the handles.
You want to make sure you don’t accidentally catch the handles while topstitching.
Continue around the entire basket until you reach your starting point.
Your Fabric Basket Is Finished! – How to Sew a Fabric Basket
And that’s how to sew a fabric basket!
You should now have a cute fabric basket with a coordinating lining, ribbon handles, and optional ric rac decoration.
This is a great beginner-friendly sewing project because it introduces several useful techniques, including working with fusible fleece, sewing accurate quarter-inch seams, constructing three-dimensional shapes, attaching handles, adding decorative trim, and finishing a lined project.
The basket can be used in so many different ways.
Use it to organize your sewing room, store fabric scraps, hold craft supplies, organize small items, or make one as a handmade gift.
You could also experiment with different fabric combinations to create baskets for different seasons and occasions.
For example, Christmas fabrics would make a lovely holiday storage basket, while floral fabrics could create a pretty spring version.
The basic construction remains the same, so once you’ve learned how to sew a fabric basket, you can make plenty of different versions.
Tips for Sewing a Fabric Basket – How to Sew a Fabric Basket
Press Every Seam
Don’t skip the pressing steps.
Pressing your seams as you go helps your basket maintain its shape and makes the later construction steps much easier.
Check Your Handles Before Sewing
Take a moment to check that both ribbon handles are the same length and positioned opposite each other.
It is much easier to correct the placement before the lining is attached.
Leave a Large Turning Opening
Don’t make the opening too small.
The finished basket contains several layers, so leaving a generous opening makes turning the basket much easier.
Take Your Time Around the Handles
When topstitching, slow down around the handles.
Move the basket carefully and lift your presser foot when necessary.
Use Coordinating Thread
Matching your thread to your fabric or ric rac can help create a clean and professional finish.
Frequently Asked Questions About Sewing a Fabric Basket

Can a beginner sew this fabric basket? – How to Sew a Fabric Basket
Yes! This is a good project for someone who is comfortable using a sewing machine and wants to practise making a three-dimensional project.
The individual seams are straightforward, and pressing between each stage helps keep everything under control.
Can I make the fabric basket without ric rac? – How to Sew a Fabric Basket
Absolutely.
The ric rac is purely decorative, so you can leave it off if you prefer a simpler design.
You could also experiment with other suitable trims.
Can I use different fabric sizes? – How to Sew a Fabric Basket
Yes, but changing the size of the fabric squares will change the finished dimensions of the basket.
If you want to make a larger or smaller version, you will need to adjust the other components accordingly.
What can I use a fabric basket for? – How to Sew a Fabric Basket
There are lots of possibilities.
A fabric basket can be used for sewing supplies, craft materials, fabric scraps, toys, accessories, toiletries, or general home organization.
They also make useful handmade gifts.
Why is fusible fleece used in the basket? – How to Sew a Fabric Basket
Fusible fleece adds structure and softness to the outer fabric.
It helps the finished basket hold its shape rather than collapsing completely when it is empty.
Final Thoughts – How to Sew a Fabric Basket
Learning how to sew a fabric basket is a great way to create something useful while practising important sewing techniques.
With just a few fabric squares, fusible fleece, ribbon, and your sewing machine, you can create a practical handmade storage basket that can be customized with different fabrics and trims.
The T-shaped construction may look unusual when you first begin, but once the seams are joined and the sides are closed, the basket quickly takes shape.
Remember to press your seams, leave the intentional openings where instructed, carefully position your handles, and leave a generous opening for turning the basket right side out.
Most importantly, take your time and enjoy the process.
I hope you’ve enjoyed this fabric basket tutorial. If you make your own version, experiment with different fabrics, ribbons, and decorative trims to make it completely your own.
Happy sewing!
Read this next : How to Sew a Fabric Basket from Old Jeans https://faodailcreation.ca/2026/07/22/how-to-sew-a-fabric-basket-from-old-jeans/
- Frankenstein Monster Applique : Easy & Fun Halloween Sewing Tutorial
- How to Sew a Cord Keeper | Sewing Machine Tutorials & Tips for Beginners
- How to Sew Fabric Napkins : Christmas Sewing
- How to Embroider a Christmas Towel – Machine Embroidery for Beginners
- Halloween Table Runner – A Fun & Easy Reversible Sewing Tutorial
