

Cassie Cartmell – Faodail Creation

Table of Contents
Seam Ripper : The Ultimate Guide to Using It the Right Way

If you’re struggling to remove stitches, you may be using your seam ripper incorrectly. Many beginners (and even experienced sewists) have been using their seam ripper the slow, frustrating way. They often don’t realize there’s a much faster and cleaner technique.
In this complete guide, you’ll learn how to use a seam ripper that will transform how you remove stitches. Whether you’re fixing mistakes, altering garments, or learning sewing basics, mastering this tool will save you time and protect your fabric. Using a seam ripper correctly is one of the most important basic skills in sewing. It can change your workflow once you understand the right motion and technique.
Most people don’t realize that the issue isn’t the tool itself; it’s how it’s being used. A seam ripper is designed to work with the fabric, not against it. When used properly, it glides through stitches smoothly instead of forcing you to pick them apart one by one. This improves efficiency and helps maintain the integrity of your fabric, especially when working with delicate materials.
Knowing how to use a seam ripper properly also helps you understand when to use gentle pressure versus when to let the tool do the work for you. Instead of focusing on every single stitch, you begin to see the seam as a whole line that can be removed more efficiently.
Another important factor is confidence. Many sewists hesitate when removing stitches, worried about damaging their project. However, once you understand the correct method, using a seam ripper becomes a quick and stress-free part of the sewing process. With practice, you’ll find that removing seams is no longer a chore but a simple step toward achieving a polished, professional finish.
Learning seam ripper for individual stitches can also help when precision is needed, especially in tight or detailed areas where control matters most. In these cases, you may still need to remove stitches how to use techniques carefully, focusing on control rather than speed.
As a Baby Lock educator, I always emphasize proper tool handling because it builds long-term sewing confidence and accuracy. Being a Baby Lock educator means teaching sewists not just how to complete a project, but how to truly understand their tools and improve their technique. A Baby Lock educator focuses on helping students work smarter, not harder, so they can enjoy sewing more and struggle less.
Why Seam Ripper Techniques Matter

Using this sewing tool correctly is essential for efficient sewing. If you’re still picking out stitches one by one, you’re wasting valuable time and risking fabric damage.
Here’s why learning seam ripper techniques is a game-changer:
- Speeds up seam removal dramatically
- Prevents fabric tears and damage
- Improves sewing workflow
- Reduces frustration during corrections
Once you understand using this sewing tool, you’ll never go back to the old way.
As a Baby Lock educator, one key tip I always share is this: don’t force the seam ripper through the fabric let the ball tip guide your motion. When you start with just 1–2 stitches and then glide the tool along the seam, the stitches release cleanly and evenly. This small adjustment makes a huge difference in both speed and accuracy, especially when working on detailed sewing projects where precision really matters.
Seam Ripper Basics – Understanding the Tool

Before diving into seam ripper methods, let’s break down the tool itself.
A seam ripper has two ends:
- A sharp pointed tip for cutting stitches
- A rounded ball tip designed to glide along fabric
Most people ignore the ball tip but, this is the most important part of this sewing tool.
The Common Mistake

The Slow and Inefficient Method
Many people use a this sewing tool incorrectly by:
- Inserting the sharp tip under each stitch
- Cutting stitches one at a time
- Repeating the process across the seam
This method works but it’s painfully slow.
If you’ve been doing this, don’t worry. Nearly everyone starts this way before learning better techniques.
The real issue is not your skill level but your understanding of how the tool is designed to work. A seam ripper is meant to glide through stitches in a controlled motion, not attack each stitch individually. Working stitch by stitch interrupts your flow and increases the chances of pulling or distorting the fabric, especially noticeable when working on longer seams or delicate materials.
Another aspect beginners often overlook is rhythm. Once you find a steady motion, seam removal becomes more efficient and less stressful. Instead of stopping and starting repeatedly, you develop a smooth technique that carries through the entire seam. This builds confidence, as you can see progress happening quickly and cleanly. With practice, your sewing projects will feel more manageable.
With practice, your sewing projects will feel more manageable, and fixing mistakes will no longer feel like a frustrating task.
The Correct Method (Fast & Efficient)

Step-by-Step Technique
Here’s the smarter way to use :
Step 1 – Start the Seam
Begin by using the sharp tip to cut 1–2 stitches only.
This opens the seam slightly and prepares it for the next step.
Step 2 – Use the Ball Tip
This is where this technique changes everything.
Insert the rounded ball tip into the seam. The ball prevents snagging and helps guide the tool smoothly.
By integrating these techniques into your sewing practice, you’ll find that fixing mistakes no longer feels frustrating.
Step 3 – Glide Through the Stitches
Now gently push the tool along the seam.
With proper usage, the blade will cut multiple stitches at once quickly and cleanly.
Step 4 – Watch the Magic Happen
You’ll notice the stitches come apart effortlessly.
This is the core of seam ripper efficiency minimal effort, maximum results.
Seam Ripper Demonstration Explained
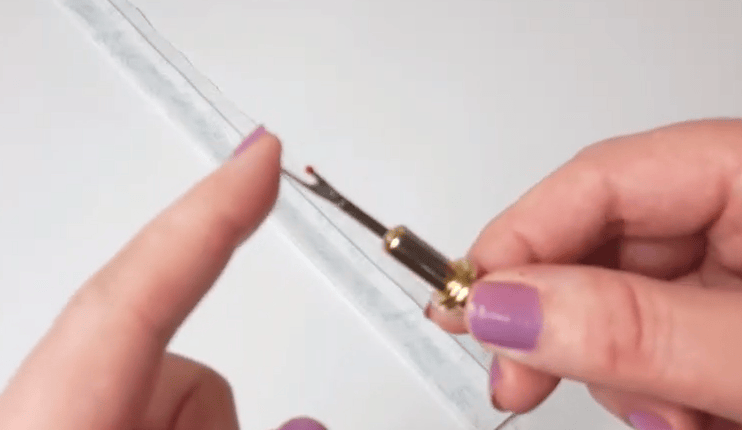
When applying these techniques, the difference is immediately noticeable:
- Instead of stopping repeatedly, you move continuously
- Instead of frustration, you gain control
- Instead of slow progress, you finish quickly
Practicing these methods just a few times will make this your default technique.
As a Baby Lock educator, one important tip I always highlight is this: the seam ripper should never be pushed aggressively through the fabric. Instead, start with a small opening of 1–2 stitches, then guide the tool along the seam using a smooth, controlled motion. This allows the blade and ball tip to do the work for you, reducing strain on the fabric and giving you a much cleaner finish. Mastering this simple adjustment can completely transform your sewing accuracy and speed.
Tips for Better Results

Keep Your Fabric Flat
For best results with the tool, lay your fabric on a flat surface. This improves control and prevents accidental cuts.
Use Gentle Pressure
Don’t force the tool. Proper usage relies on smooth gliding, not pressure.
Work in Sections
Even with efficient techniques, it’s helpful to work in manageable sections for precision.
Check for Loose Threads
After using your seam ripper, remove leftover threads to keep your project clean.
Seam Ripper : When Should You Use It?

You’ll rely on this tool in many sewing situations:
- Fixing stitching mistakes
- Removing hems
- Altering clothing
- Undoing seams for adjustments
- Correcting misaligned fabric
Mastering seam ripper ensures you can confidently fix any sewing error.
Seam Ripper Incorrect way vs Proper way
Old Way vs New Way
| Incorrect way | Proper way |
|---|---|
| Slow | Fast |
| Stitch-by-stitch | Multiple stitches at once |
| Higher risk | Safer with ball tip |
| Frustrating | Smooth and easy |
Clearly, the seam ripper offers a superior approach.

Seam Ripper Mistakes to Avoid
Even when using a seam ripper, avoid these common mistakes:
Even when using a seam ripper, avoid common mistakes. Always begin with 1–2 stitches, as this step is essential in ripping seams. The ball tip is key to proper usage, so don’t ignore it.
Always begin with 1–2 stitches. This step is essential in ripping seams
Ignoring the Ball Tip
The ball tip is key to proper seam ripper usage. Don’t overlook it.
Applying Too Much Force
Let the tool do the work. Overpressure can damage fabric.
When improving your results, patience is just as important as technique. Many beginners rush through seam removal, especially when eager to continue their sewing project. This often leads to small fabric snags or uneven edges. Taking an extra moment at the start of each seam ensures cleaner results and reduces mistakes that need fixing later.
It’s also helpful to regularly check your progress as you work. Pausing briefly allows you to adjust your grip, realign your fabric, and make sure everything is still smooth and controlled. These small habits can dramatically improve your accuracy over time. In sewing, consistency matters more than speed, especially when you are learning new techniques or refining your skills.
When you practice regularly, you begin to understand how fabric reacts, how threads release, and safe pressure to apply. This hands-on learning is essential in sewing as it helps develop control and accuracy over time.
Build Confidence and Sewing Skills Fast
If you’re new to sewing, learning seam ripper techniques early will save you hours of frustration.
Start by:
- Practicing on scrap fabric
- Testing both methods to feel the difference
- Building muscle memory
Soon, using a seam ripper will feel natural.
One of the best things you can do at the beginning of your sewing journey is give yourself permission to make mistakes. Every experienced sewist has spent time undoing stitches, and this is where confidence is actually built. When you practice regularly, you begin to understand how fabric reacts, how threads release, and how much pressure is safe to apply. This kind of hands-on learning is essential in sewing because it helps you develop control and accuracy over time.
It also helps to slow down during practice sessions. Instead of rushing through your project, focus on how the tool moves through the fabric. Notice how the stitches separate cleanly when the technique is correct. Repeating this process builds strong habits that will carry over into every future project. With consistent practice, your coordination improves, and you’ll find that both sewing and fixing mistakes become much easier and less stressful.
Seam Ripper Pro Tips
Use Good Lighting
Clear visibility helps you apply seam ripper techniques accurately.
Choose a Sharp Seam Ripper
A dull tool reduces the effectiveness of the seam ripper
Another helpful tip is to keep your workspace organized. A clutter-free sewing area allows better focus and helps avoid mistakes. Over time, these small improvements lead to better accuracy and smoother sessions.
If your seam ripper isn’t cutting cleanly, it’s time for a new one.
To improve your sewing experience even further, it’s also important to develop good habits while working with your tools. Always take your time when starting a new section of stitching removal so you don’t accidentally damage the fabric underneath. A steady hand makes a big difference in how clean your results will be. In sewing, precision matters more than speed at the beginning, but once you build confidence, speed will naturally follow.
Another helpful tip is to keep your workspace organised. When your sewing area is clutter-free, you can focus better and avoid mistakes. Many sewists underestimate how much environment affects performance, but a tidy space often leads to better accuracy and smoother sewing sessions. Over time, these small improvements add up and make every project more enjoyable and efficient.
Seam Ripper and Sewing Efficiency

Mastering these techniques don’t just improve seam removal it boosts your entire sewing workflow.
You’ll:
- Spend less time fixing mistakes
- Work more confidently
- Finish projects faster
This is why these skills are essential for every sewist.
This is why mastering these skills is essential for every sewist. When applying these techniques consistently, your workflow becomes much smoother and more enjoyable. Instead of getting stuck on small errors, you can quickly correct them and move forward, allowing more time for actual enjoyment in sewing.
These techniques are simple, powerful, and incredibly effective. Switching from the slow, stitch-by-stitch method to the glide technique using the ball tip can transform your sewing experience. If you’ve been using your seam ripper the old way, now is the time to upgrade your skills.
These techniques are simple, powerful, and incredibly effective. By switching from the slow, stitch-by-stitch method to the glide technique using the ball tip, you can completely transform your sewing experience.
If you’ve been using your seam ripper the old way, now is the perfect time to upgrade your skills. Once you start applying these methods consistently in your sewing projects, you’ll notice smoother results, less fabric damage, and a big improvement in your overall workflow. It also builds confidence, especially when tackling more advanced sewing projects where precision really matters. Over time, even small improvements like this can make a huge difference in your sewing journey.
Seam Ripper : What Will You Do Next?
Now that you’ve learned these techniques, you have a better, faster, and smarter method that changes how you approach sewing. Instead of struggling with each stitch, you can move through your projects with confidence and ease.
Now that you’ve learned these techniques, you have a better, faster, and smarter method that will completely change the way you approach sewing. Instead of struggling with each stitch, you can now move through your sewing projects with confidence and ease.
Start practicing today, and you’ll immediately notice the difference. The more you use this method in your sewing routine, the more natural it will feel. Over time, your sewing speed will improve, your results will look more professional, and you’ll spend far less time fixing mistakes. Good sewing habits like this build real skill, and they make every future sewing project smoother, quicker, and far more enjoyable.
As a Baby Lock educator, I always encourage sewists to focus on technique over speed in the beginning, because speed naturally develops once the foundation is correct. As a Baby Lock educator teaching students to understand that small improvements like how you handle a seam ripper can dramatically improve your overall sewing results and confidence.
Here is the link you the You Tube Tutorial : https://youtu.be/Ai-kM-mPS78?si=GrRVvxa0AUh63OOx
- How to Use Angelina Fibers – Amazing Sparkling Fabric Sewing Tutorial
- How to Sew Freezer Pop Holder with Velcro – Amazing Beginner Sewing Tutorial for Frozen Fingers
- How to Embroider a Baby Onesie – Easy Step-by-Step Tutorial for Beautiful Results
- Baby Lock Altair 2 In the Hoop Christmas Placemat : Easy Holiday Embroidery Tutorial
- How to Sew a Fabric Basket from Old Jeans
Here is another tutorial you may like : Put Velcro on a Cushion Cover https://faodailcreation.ca/2026/04/16/put-velcro-on-a-cushion-cover/
