


This is the full you tube tutorial Baby Lock Altair Tutorials | How to Embroider Fabric Labels https://youtu.be/OVKSxDg-zcw
Cassie Cartmell – Faodail Creation
Table of Contents
How to Embroider Fabric Labels is a fun way to add a personalized touch to jars, baskets, sewing room storage and handmade projects. In this tutorial, I’m going to show you how I created a cute embroidered fabric label for a jar that I use to store my pens.
Using the IQ Designer function on the Baby Lock Altair 2, you can create your own label design directly on the embroidery machine. You can choose a shape, add decorative stitches, include lettering and create buttonholes so the finished label can be attached with ribbon. This is also a great way to embroider reusable labels that can be moved between different storage containers and projects.
This is a simple project, but it is also a great way to experiment with the different design features available in IQ Designer. If you enjoy making personalized sewing projects, learning how to embroider reusable labels is a useful technique you can use again and again.
Whether you are new to machine embroidery or simply looking for a quick project for your sewing room, this How to Embroider Fabric Labels tutorial is a great one to try. You’ll also learn how to embroider reusable labels that can add a practical and decorative touch to your sewing room organization.
How to Embroider Fabric Labels Using IQ Designer

The first part of this project is creating the label design in IQ Designer.
For my label, I wanted something small enough to fit neatly on the front of my jar. I also wanted to include the word PENS, but you could personalise yours with almost any word you like.
You could make labels for:
- Pens
- Scissors
- Thread
- Ribbons
- Buttons
- Sewing clips
- Fabric
- Craft supplies
- Kitchen storage
- Children’s toys
- Baskets and boxes
The possibilities are almost endless.
What You Will Need – How to Embroider Fabric Labels
Before starting this How to Embroider Fabric Labels project, gather everything you need.
Below I have included my Amazon Affiliate Links, if you decide to purchase from one of these links I may receive a small commission at no extra cost to you
This is my Amazon Store Link https://www.amazon.com/shop/faodailcreation
Materials
- Embroidery machine with IQ Designer
- Small embroidery hoop
- Wash-away stabilizer – https://amzn.to/3SLNFUH
- Fabric for the front
- Fabric for the backing
- Thread – https://amzn.to/3Svzh2P
- Pink ribbon – https://amzn.to/4dlHSvS
- Masking tape – https://amzn.to/3SQ0mxy
- Scissors – https://amzn.to/4zWV3Nw
- embroidery scissors https://amzn.to/4zYrH1r
- Jar or container for your finished label https://amzn.to/3UIgCBq
You can choose coordinating fabrics and threads to match your sewing room or the item you are labelling.
Step 1: Choose a Shape for Your Fabric Label – How to Embroider Fabric Labels

To begin How to Embroider Fabric Labels, go into IQ Designer on your embroidery machine.
I started by looking through the available shapes to find one that would work for my jar.
There are lots of different shapes available, so take some time to look through them. You don’t have to use the same shape that I used. Choose something that suits the project you are making.
I selected a shape from the second set of options and pressed OK.
The shape appeared on the design screen.
Resize the Shape
I didn’t want my label to be too large, so the next thing I did was resize it.
Bring the shape in so that it is a suitable size for your project. I adjusted the size until it was approximately the size I wanted.
For my label, I used approximately 3 for the bottom measurement.
Once the shape was the correct size, press OK.
Step 2: Create the First Stitch – How to Embroider Fabric Labels

The next step in this How to Embroider Fabric Labels project is to turn the shape into a stitch.
I changed the shape to a running stitch.
You can also change the thread colour at this stage. I chose a colour that would work with the rest of my label.
After changing the stitch and colour, press OK.
This creates the first part of your embroidered label.
Press Next and save the design into IQ Designer.
I then previewed the design before saving it into the embroidery section of the machine.
Taking a moment to preview each part of your design is useful because you can check the size and placement before you begin stitching.
Step 3: Add a Decorative Fill – How to Embroider Fabric Labels

Next, I went back into IQ Designer to add some decoration inside the shape.
This is where you can have some fun with your How to Embroider Fabric Labels project.
I selected a fill pattern from the available options.
There are several decorative fill designs to choose from, so experiment with different options to see what you like.
Once I selected my fill, I changed the thread colour and pressed inside the shape to apply the fill.
Adjust the Size of the Fill – How to Embroider Fabric Labels
The fill was initially too large for my label, so I reduced the size.
I changed the size to approximately 50%.
I then turned off the other design element temporarily and pressed Set.
Save the design into IQ Designer and preview it.
The decorative fill should now sit nicely inside your label.
Once you are happy with it, press Memory to save it into the embroidery section.
Step 4: Add a Satin Stitch – How to Embroider Fabric Labels

The next element I wanted to create was a satin stitch.
Bring the shape back onto the screen and select the satin stitch option.
The design was already set to a satin stitch, so I simply changed the thread colour so that I could clearly see it.
Press inside the line until the area is selected.
Then press Next.
Adjust the Satin Stitch Density
For this part of How to Embroider Fabric Labels, you can adjust the density of the satin stitch.
Change the density to suit your fabric and the look you want.
Once you are happy with the settings, press Set.
Save the design into IQ Designer and preview it.
Then press Memory to save the design into the embroidery section of the machine.
Now you have the main decorative elements ready to build your label.
Step 5: Build the Fabric Label – How to Embroider Fabric Labels

Now we can start putting all of the pieces together.
This is the part of How to Embroider Fabric Labels where the individual design elements become a complete project.
I started by adding a placement stitch.
Press Set after adding the placement stitch.
Next, add the tack-down stitch.
I used the same shape for the tack-down stitch and then changed the thread colour so that I could easily identify the different steps.
Press Set.
Step 6: Add the Fabric Fill – How to Embroider Fabric Labels
Next, add the fill stitch to the design.
Select the fill and press Set.
This will create the main fabric area of your label.
At this stage, you can preview your design to make sure everything is positioned correctly.
Step 7: Add the Lettering – How to Embroider Fabric Labels
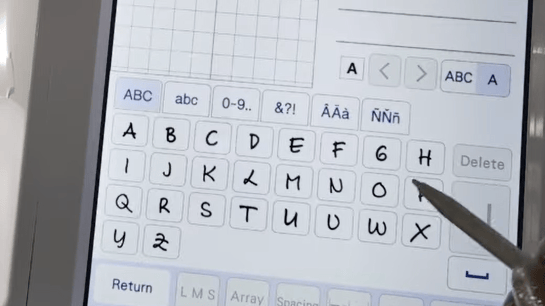
Now it’s time to personalise your label.
For my jar, I wanted the label to say:
PENS
Add the lettering using the lettering function on your embroidery machine.
Type the word you want to use and press Set.
You can use any word that suits your project.
For example, if you are making a label for a sewing basket, you could use:
- THREAD
- FABRIC
- BUTTONS
- RIBBON
- SCISSORS
- CLIPS
Resize the Lettering
The lettering initially appeared too large, so I reduced the size.
Resize the lettering until it fits comfortably inside the label.
Make sure there is enough space around the word so that it remains easy to read after embroidery.
Once you are happy with the size, press OK.
Step 8: Add Another Running Stitch – How to Embroider Fabric Labels
Next, I added another running stitch to the design.
Press Set after adding the stitch.
This creates another decorative element around the label and helps prepare the design for the buttonholes.
Step 9: Create the Buttonholes – How to Embroider Fabric Labels

The buttonholes are an important part of this How to Embroider Fabric Labels project because they allow you to attach the finished label to your jar with ribbon.
I selected a straight buttonhole design.
The first buttonhole was too large, so I reduced the size.
I then moved the buttonhole into position.
Rotate the Buttonhole
Because of the direction I wanted the ribbon to sit, I rotated the buttonhole by 90 degrees.
Use the Edit function and select the rotate option.
Move the buttonhole into the correct position.
Once the first buttonhole is positioned correctly, duplicate it.
Move the duplicate to the opposite side of the label.
Try to keep the two buttonholes parallel so the ribbon will sit neatly when it is threaded through.
Preview the design to make sure both buttonholes are positioned correctly.
Step 10: Add the Satin Stitch Border – How to Embroider Fabric Labels
The final design element is the satin stitch.
Add the satin stitch and check that it is positioned correctly around the label.
Make any final adjustments to the size or position.
Look carefully at the design to make sure none of the elements overlap in a way that you don’t want them to.
Once everything looks good, your embroidery design is ready to stitch.
Step 11: Prepare the Embroidery Hoop – How to Embroider Fabric Labels
For my How to Embroider Fabric Labels project, I used a small embroidery hoop with wash-away stabilizer.
Hoop the stabilizer securely.
Make sure it is smooth and taut inside the hoop.
You don’t want the stabilizer to be loose because this can affect the embroidery.
Attach the hoop to your embroidery machine and load your completed design.
Step 12: Stitch the Placement Stitch – How to Embroider Fabric Labels

Start the embroidery and allow the machine to stitch the placement stitch.
The placement stitch shows you exactly where your fabric needs to go.
Once the placement stitch has finished, place your fabric over the marked area.
I used a piece of fabric with a piece of batting behind it.
Position the fabric carefully so that it completely covers the placement area.
Secure the fabric with small pieces of masking tape.
Be careful that the tape does not interfere with the area where the needle will stitch.
Step 13: Stitch the Label – How to Embroider Fabric Labels
Now you can begin stitching the different elements of your label.
For the next part of How to Embroider Fabric Labels, I recommend using a light thread colour for the lettering or any element that you don’t want to overpower the design.
Allow the machine to stitch the word you selected.
For my project, the machine stitched PENS onto the label.
You can substitute your own word to make the label completely personalised.
Step 14: Add the Backing – How to Embroider Fabric Labels
Before stitching the buttonholes, remove the hoop from the machine.
Do not remove the project from the hoop.
This is important because you want to maintain the exact position of the project.
Now place your backing fabric onto the back of the project.
Make sure the backing completely covers the area.
Secure it carefully.
Stitch the Backing in Place
Return the hoop to the machine.
Stitch the placement stitch again.
This will secure the backing fabric to the back of the project.
Once the backing is secured, you can continue with the buttonholes.
Step 15: Stitch the Buttonholes – How to Embroider Fabric Labels

Now stitch the buttonholes.
The project should remain in the hoop while you stitch them.
Once the buttonholes have finished, remove the hoop from the machine.
Do not take the project out of the hoop just yet.
Step 16: Trim the Excess Fabric – How to Embroider Fabric Labels
Carefully trim away the excess fabric around the embroidered label.
Use sharp scissors and work slowly.
Be extremely careful not to cut the embroidery or the stabilizer inside the hoop.
You want to trim as close to the stitches as possible without cutting through them.
Turn the project over and trim the excess fabric from the reverse side as well.
Check all the way around the label.
Check the Edges
Make sure there are no loose threads sticking out.
Trim any threads that are visible.
The fabric should be cut neatly and closely around the embroidered stitches.
Also make sure that the same colour of thread is in the top and bottom of the machine before stitching the final elements.
Step 17: Remove the Fabric Label From the Hoop – How to Embroider Fabric Labels

Once all of the embroidery is complete, remove the project from the hoop.
You should now have a cute embroidered fabric label ready to finish.
At this point, you can carefully open the buttonhole areas.
Use small, sharp scissors and work slowly.
Only cut the opening inside the stitched buttonhole.
Take care not to cut the surrounding stitches.
Step 18: Remove the Wash-Away Stabilizer – How to Embroider Fabric Labels
One of the great things about using wash-away stabilizer for How to Embroider Fabric Labels is that you can remove the remaining stabilizer with water.
Put some warm water onto your fingers.
Gently rub the stabilizer.
It should begin to dissolve.
Don’t be too rough with the project. Work gently and gradually remove the stabilizer around the embroidery.
Allow the label to dry completely.
Step 19: Add the Ribbon – How to Embroider Fabric Labels

Now your fabric label is ready for the finishing touch.
I used a pretty pink ribbon.
Thread the ribbon through both buttonholes.
Arrange it so that the ribbon sits neatly across the back of the label.
You can then tie the ribbon around your jar.
This allows the label to be removed and changed whenever you want.
Step 20: Attach Your Finished Fabric Label – How to Embroider Fabric Labels
Tie the ribbon securely around your jar.
And that’s it!
You now have a cute personalised fabric label.
This How to Embroider Fabric Labels project would be perfect for organising your sewing room or adding a handmade touch to storage containers.
Ideas for Personalised Fabric Labels – How to Embroider Fabric Labels
Once you know How to Embroider Fabric Labels, you can make labels for almost anything.
Try making a collection of matching labels for your sewing room.
You could create labels that say:
- PENS
- THREAD
- NEEDLES
- RIBBON
- BUTTONS
- FABRIC
- SEWING
- EMBROIDERY
- APPLIQUE
You could also change the shape, colours and decorative stitches to create completely different looks.
Make Labels for Gifts
These embroidered labels would also make lovely handmade gifts.
Add a personalised label to a basket, storage box or jar and fill it with sewing supplies, craft materials or treats.
Because the label is removable, the recipient can reuse it on another container.
Tips for Successful Machine Embroidered Labels – How to Embroider Fabric Labels

Choose the Right Size
When learning How to Embroider Fabric Labels, remember that small projects don’t need to be complicated.
A simple design with clear lettering can be more effective than trying to fit too many elements into a small area.
Use Contrasting Thread
Choose thread colours that contrast with your fabric.
This will make the lettering and decorative stitches easier to see.
Test Your Design
If you are unsure about the stitch density, lettering size or colours, make a test sample first.
This can save fabric and thread and lets you see exactly how the finished design will look.
Trim Carefully
The final appearance of your label depends greatly on how carefully you trim the excess fabric.
Take your time and use sharp embroidery scissors.
Cut close to the stitching without cutting the stitches themselves.
Why I Love This Fabric Label Project – How to Embroider Fabric Labels
I love this How to Embroider Fabric Labels project because it is quick, practical and easy to personalise.
It also gives you an opportunity to explore several features of IQ Designer, including shapes, fills, satin stitches, lettering, resizing, duplication and rotation.
You don’t have to make your label exactly like mine.
Once you understand the basic process, you can change the shape, colours, lettering and decorative stitches to create something completely unique.
A simple fabric label can turn an ordinary storage jar into something that looks beautiful and handmade.
Final Thoughts – How to Embroider Fabric Labels
I hope you enjoyed learning How to Embroider Fabric Labels using IQ Designer.
This is a wonderful little embroidery project for beginners because you can start with a simple shape and gradually build up the design using different stitches and lettering.
The finished label is perfect for organising your sewing room, labelling craft supplies or adding a personalised touch to your storage.
I used my label for a jar of pens, but there are so many other possibilities.
Try creating different labels for your sewing supplies and experiment with different fabrics, thread colours and decorative stitches.
If you enjoyed this How to Embroider Fabric Labels tutorial, don’t forget to like the video, subscribe to my YouTube channel and leave a comment to let me know what you would put on your own fabric label.
Happy sewing and embroidery!
Read this next Baby Lock Altair Tutorials | How to Embroider Baby’s First Christmas Keepsake – A Beautiful Beginner Project https://faodailcreation.ca/2026/08/09/baby-lock-altair-tutorials-how-to-embroider-babys-first-christmas-keepsake/
- How to Sew a Tote Bag : Easy and Brilliant Knitting Project Bag Tutorial
- How to Embroider Fabric Labels – A Fun and Easy Sewing Project
- How to Free Motion Quilt Half Square Triangles – Easy Ruler Work Tutorial
- How to Applique – Daisy Lap Quilt – A Beautiful Beginner-Friendly Quilt
- How to Sew a Lattice Quilt Border – An Easy and Stunning Quilt Border Tutorial
