


Cassie Cartmell – Faodail Creation
This is the full you tube tutorial Baby Lock Altair Tutorials | How to embroider Baby’s First Christmas Keepsake https://youtu.be/BbPlcYFSt8k
Table of Contents
Creating a personalized Christmas keepsake is a wonderful way to celebrate a baby’s first Christmas. In this Baby Lock Altair Tutorials | How to Embroider Baby’s First Christmas Keepsake project, Baby Lock Educator Cassie Cartmell will show you how to use the built-in embroidery designs and lettering on the Baby Lock Altair 2 to create a beautiful handmade decoration that can be treasured for years to come.
This is a particularly useful project if you own a Baby Lock Altair 2 because the machine includes a selection of built-in embroidery designs. As Baby Lock Educator Cassie Cartmell, I love finding creative ways to use the designs and features already built into the machine. Rather than letting those designs sit unused, why not turn one into a personalized Christmas keepsake?
For this project, I chose a cute Christmas penguin and combined it with lettering, the baby’s name, and the year. Baby Lock Educator Cassie Cartmell will guide you through the process of creating the personalized embroidery and finishing it as a charming holiday decoration.
The finished embroidery can then be placed inside a small hand embroidery frame and finished with felt on the back. It makes a lovely handmade gift for a new baby, and you can personalize it for any child. Baby Lock Educator Cassie Cartmell hopes this project inspires you to explore the built-in designs on your Baby Lock Altair 2 and create a special keepsake that can be enjoyed for many Christmases to come.
What You Will Need for This Baby Lock Altair Tutorials | How to Embroider Baby’s First Christmas Keepsake Project

Before getting started, gather everything you will need.
Materials – Baby Lock Altair Tutorials | How to Embroider Baby’s First Christmas Keepsake
- Baby Lock Altair 2 or compatible embroidery machine
- Embroidery hoop
- Fabric for the front
- No-show mesh stabilizer
- Embroidery thread
- Bobbin thread
- Needle
- Hand-sewing thread
- Hand embroidery frame
- Felt for the back
- Scissors
- Embroidery scissors
- Tape measure or ruler
You will also need a suitable built-in Christmas embroidery design.
The exact supplies can vary depending on the fabric and embroidery design you choose.
Choosing Your Embroidery Design – Baby Lock Altair Tutorials | How to Embroider Baby’s First Christmas Keepsake

One of the great things about the Baby Lock Altair 2 is the collection of embroidery designs already available on the machine.
For a baby’s first Christmas project, look for something that has a festive theme.
I went into the Kids Corner section and looked through the available designs. There were several cute options, including a fox and penguins.
I chose the penguin that is ice skating because it worked particularly well with the Christmas theme.
The original design was approximately 3 inches by 3 inches, which was a good size for this project.
Setting Up the Design – Baby Lock Altair Tutorials | How to Embroider Baby’s First Christmas Keepsake

The first part of this Baby Lock Altair Tutorials | How to Embroider Baby’s First Christmas Keepsake project takes place directly on the embroidery machine.
Once you have selected your embroidery design, you can begin editing it.
Select Edit and then go into the Size function.
The machine provides different ways of changing the size of an embroidery design. When resizing an embroidery design, it is important to use the option that recalculates the stitches.
This allows the machine to adjust the embroidery stitches appropriately for the new size.
Why Proper Resizing Matters – Baby Lock Altair Tutorials | How to Embroider Baby’s First Christmas Keepsake

Simply making an embroidery design larger or smaller without considering the stitch count can affect the finished embroidery.
When you use the appropriate resizing function, the machine can adjust the stitch information for the new size.
For this project, I experimented with making the penguin smaller.
The design could be reduced to approximately 2 inches, but I decided that was a little too small. I increased it again to around 3 inches.
This gave me a good balance between the embroidery design and the lettering.
Creating a 4 x 4 Design Area – Baby Lock Altair Tutorials | How to Embroider Baby’s First Christmas Keepsake

Next, I brought a 4 x 4 hoop field onto the screen.
This is extremely helpful because it allows you to see how much space is available for your embroidery.
A 4 x 4 hoop provides a relatively small embroidery area, so you need to carefully plan where every element will go.
This is especially important when you are combining a decorative embroidery design with several lines of lettering.
Arranging the Penguin – Baby Lock Altair Tutorials | How to Embroider Baby’s First Christmas Keepsake
Once the hoop field was visible, I moved the penguin slightly upward.
The Baby Lock Altair 2 makes it easy to move designs around on the screen.
If you hold down on the design, it can move quickly. If you tap it once, you can make smaller adjustments.
This makes it easier to position your embroidery accurately.
Don’t worry about getting everything perfect immediately. You can return to the design later and make additional adjustments.
Adding the Baby’s First Christmas Lettering – Baby Lock Altair Tutorials | How to Embroider Baby’s First Christmas Keepsake

Now it is time to add the lettering.
Select Add and then choose the text function.
For a Christmas keepsake, I wanted the lettering to have a decorative appearance, so I selected a more elegant font.
Begin entering your wording.
For example, you can create lettering such as:
My First Christmas
You can switch between uppercase and lowercase letters as needed using the controls on the machine.
Creating Curved Lettering – Baby Lock Altair Tutorials | How to Embroider Baby’s First Christmas Keepsake
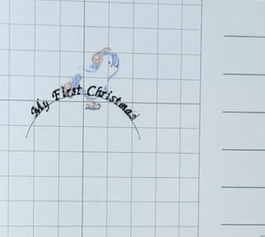
One of my favorite features for this project was the ability to arrange the lettering in a curve.
Before setting the lettering, use the array or curved lettering options to create the shape you want.
You can then adjust the amount of curve using the controls on the screen.
A gentle curve can help the lettering follow the shape of the decorative design and make the finished embroidery look much more professional.
Once you are happy with the lettering, set it and return to the editing screen.
You can then move it into position.
Adding the Baby’s Name – Baby Lock Altair Tutorials | How to Embroider Baby’s First Christmas Keepsake
The next step in this Baby Lock Altair Tutorials | How to Embroider Baby’s First Christmas Keepsake project is adding the baby’s name.
Select Add again and choose the text function.
Enter the child’s name and adjust the size to suit the available space.
For example, you might add the baby’s name underneath the Christmas wording.
Once the name has been created, select Set and then return to the editing screen.
Move the name into position.
You can continue to select the individual elements and move them around until you are happy with the overall arrangement.
Adding the Year – Baby Lock Altair Tutorials | How to Embroider Baby’s First Christmas Keepsake
A baby’s first Christmas keepsake is even more special when you include the year.
Add another text element and enter the year.
Resize it if necessary and move it into the remaining space.
This gives you three important personalized elements:
- A Christmas embroidery design
- The baby’s name
- The year
Together, these details create a keepsake that records a very special milestone.
Checking the Design Before Embroidering – Baby Lock Altair Tutorials | How to Embroider Baby’s First Christmas Keepsake

Before moving on to embroidery, take some time to carefully check the design.
Select each individual element and make sure it is positioned correctly.
You can move designs horizontally or vertically, rotate them, resize them, and make other adjustments.
The machine also provides centering options, which are useful when you want to make sure your design elements are properly aligned.
I like to use the centering functions as a final check.
Making Everything Fit
One issue with using a 4 x 4 hoop is that the available space is limited.
Once all of the lettering and the embroidery design had been added, the complete design was too large for the 4 x 4 embroidery area.
The solution was to reduce some of the elements.
Go back into the Size function and make the design smaller as necessary.
You can also resize the baby’s name and other lettering.
Continue making small adjustments until everything fits comfortably within the embroidery field.
Why a 5 x 7 Hoop Is Helpful – Baby Lock Altair Tutorials | How to Embroider Baby’s First Christmas Keepsake
This project also demonstrates why having a larger embroidery hoop can be useful.
A 4 x 4 hoop is very limiting when you want to combine multiple designs and several lines of lettering.
The Baby Lock Altair 2 includes a 5 x 7 hoop option, which provides considerably more room for creative projects.
If you are considering purchasing an embroidery machine and you know that you want to make larger personalized projects, the embroidery area is definitely something worth considering.
Preparing the Fabric and Stabilizer – Baby Lock Altair Tutorials | How to Embroider Baby’s First Christmas Keepsake

For this project, I used two pieces of no-show mesh stabilizer.
Place the stabilizer appropriately before hooping your fabric.
The correct stabilizer is extremely important when embroidering.
It helps support the fabric while the machine stitches the design and can help prevent problems such as puckering.
The stabilizer you choose should be suitable for both your fabric and the density of your embroidery design.
Why Stabilization Matters
If you are experiencing puckering around your embroidery, the stabilizer is one of the first things you should check.
Different fabrics and embroidery designs require different stabilization techniques.
A dense embroidery design requires adequate support because the machine is placing many stitches into the fabric.
Take some time to understand which stabilizer works best with your particular project.
Stitching the Embroidery Design – Baby Lock Altair Tutorials | How to Embroider Baby’s First Christmas Keepsake
Once your fabric is hooped and the design has been transferred to the embroidery section of the machine, you are ready to begin stitching.
Set the machine to embroidery and check your first thread color.
The machine will guide you through the different thread colors and stages of the design.
Once everything has been checked, start the embroidery.
The machine will stitch the design automatically.
Monitoring Your Embroidery – Baby Lock Altair Tutorials | How to Embroider Baby’s First Christmas Keepsake

One particularly useful feature of the Baby Lock Altair 2 is the IQ monitoring app.
During this Baby Lock Altair Tutorials | How to Embroider Baby’s First Christmas Keepsake project, you can use the app to monitor your embroidery without standing directly beside the machine.
The app can show information such as:
- The current stitching progress
- The number of stitches remaining
- The estimated time remaining
- The number of thread changes
- Notifications about thread changes
- Bobbin information
This can be convenient if you need to step away from the machine for a few minutes.
You can check the progress without constantly watching the embroidery machine.
Finishing the Embroidery – Baby Lock Altair Tutorials | How to Embroider Baby’s First Christmas Keepsake
Once the embroidery is complete, carefully remove the fabric from the hoop.
For this project, I don’t remove all of the stabilizer from the back.
There is no need to remove it completely because the embroidery will eventually be mounted into a hand embroidery frame.
Trim away the excess stabilizer carefully, leaving enough in place to support the embroidery.
Mounting the Embroidery in a Frame – Baby Lock Altair Tutorials | How to Embroider Baby’s First Christmas Keepsake

The next step turns your embroidery into a finished Christmas keepsake.
Place the embroidered fabric into the hand embroidery frame.
Once it is positioned correctly, turn the frame over and look at the excess fabric on the back.
You want to secure the fabric so that it is pulled neatly and tightly around the back of the frame.
Securing the Fabric
Using a needle and thread, begin basting around the excess fabric.
Make sure your thread is secure.
As you work around the frame, gently pull the thread so that the fabric becomes taut.
Take care not to pull so aggressively that you distort the embroidery.
The goal is to create a smooth, neat finish on the front of the keepsake.
Adding a Felt Backing – Baby Lock Altair Tutorials | How to Embroider Baby’s First Christmas Keepsake
To give the finished project a professional appearance, add a piece of felt to the back.
Measure the inside of the frame and cut a piece of felt to fit.
Position the felt over the back of the embroidery.
You can then use a blanket stitch to sew around the edge and secure the felt in place.
This hides the unfinished fabric and stabilizer while giving the back of the keepsake a neat handmade finish.
A Special Handmade Christmas Gift – Baby Lock Altair Tutorials | How to Embroider Baby’s First Christmas Keepsake
The finished embroidery makes a lovely baby’s first Christmas gift.
Because it includes the baby’s name and the year, it becomes much more than a simple Christmas decoration.
It is something that can be brought out every Christmas as a reminder of that very first Christmas.
You could also customize the project with different built-in Baby Lock embroidery designs, fonts, colors, and wording.
Final Thoughts – Baby Lock Altair Tutorials | How to Embroider Baby’s First Christmas Keepsake

This Baby Lock Altair Tutorials | How to Embroider Baby’s First Christmas Keepsake project is a great example of how you can use the built-in features of your embroidery machine to create something personal and meaningful.
The Baby Lock Altair 2 provides plenty of opportunities to experiment with embroidery designs, lettering, resizing, positioning, and personalization.
Don’t be discouraged if your first embroidery project isn’t perfect. There is always a learning curve when working with a new machine or technique.
The more projects you make, the more comfortable you will become with choosing stabilizers, positioning designs, selecting thread, and adjusting embroidery settings.
Most importantly, have fun with the process.
A personalized baby’s first Christmas keepsake is a wonderful project to make for your own family or as a thoughtful handmade gift for someone special.
And once you understand the basic process, you can use the same techniques to create many other personalized embroidery projects throughout the year.
Want to Try More Baby Lock Embroidery Projects? – Baby Lock Altair Tutorials | How to Embroider Baby’s First Christmas Keepsake
If you enjoyed this Baby Lock Altair Tutorials | How to Embroider Baby’s First Christmas Keepsake project, there are many other ways to use your Baby Lock embroidery machine.
Experiment with the built-in designs, try different fonts, personalize gifts with names and dates, and explore different hoop sizes.
The more you use the embroidery features on your machine, the more confident you will become.
Read this next : Baby Lock Altair 2 In the Hoop Christmas Placemat : Easy Holiday Embroidery Tutorial https://faodailcreation.ca/2026/07/22/baby-lock-altair-2-in-the-hoop-christmas-placemat/
- Frankenstein Monster Applique : Easy & Fun Halloween Sewing Tutorial
- How to Sew a Cord Keeper | Sewing Machine Tutorials & Tips for Beginners
- How to Sew Fabric Napkins : Christmas Sewing
- How to Embroider a Christmas Towel – Machine Embroidery for Beginners
- Halloween Table Runner – Quilting Techniques
