


Cassie Cartmell – Faodail Creation
Jere is the full you tube tutorial How to Sew a Crumb Quilt | How to sew quilt Blocks https://youtu.be/EasYdfhHHMA
Table of Contents
How to Sew a Crumb Quilt is a fun and creative way to turn leftover fabric scraps into a beautiful quilted project. If you have a collection of small fabric pieces sitting in your sewing room, this is the perfect project to use them!
Instead of throwing away those tiny pieces of fabric, you can combine them to create colorful crumb quilt blocks and turn them into a mini quilt, table topper, cushion, bag, pouch, or even a larger quilt.
In this tutorial, I’m going to show you how to sew a crumb quilt using scrap fabric pieces and contrasting black fabric for the sashing and borders. The dark fabric makes the colorful scrap pieces really stand out and gives the finished quilt a modern appearance.
The best thing about this project is that you don’t have to follow an exact pattern. You can make your crumb quilt as small or as large as you want.
What Is a Crumb Quilt? – How to Sew a Crumb Quilt

Before learning how to sew a crumb quilt, it helps to understand exactly what a crumb quilt is.
A crumb quilt is made by sewing small pieces of leftover fabric together to create larger sections or quilt blocks. Unlike traditional quilt blocks, crumb quilting doesn’t necessarily require perfectly measured pieces or a specific fabric collection.
It is a wonderful way to use up fabric scraps from previous sewing and quilting projects.
For this project, I had a collection of scrap fabric pieces left over from projects I worked on previously. Rather than putting them away for another day, I decided to turn them into a colorful mini quilt.
You can use the same idea to create:
- Mini quilts
- Table runners
- Mug rugs
- Fabric bags
- Zipper pouches
- Cushion covers
- Wall hangings
- Larger quilts
- Sewing room decorations
There really are no limits when it comes to how to sew a crumb quilt.
How to Sew Quilt Blocks Using Scrap Fabric – How to Sew a Crumb Quilt

One of the great things about crumb quilting is that you don’t have to worry about creating identical quilt blocks.
For my sample, I decided to create three sections across and four sections down. You could easily change these measurements depending on the size of your project.
The important thing is to have fun with your scraps.
I chose a selection of colorful fabric pieces and decided to use black fabric for my sashing and border. I don’t normally use a lot of black in my quilting projects, but I thought it would create a dramatic contrast against the brighter scrap fabrics.
Choosing Your Scrap Fabric – How to Sew a Crumb Quilt
When learning how to sew a crumb quilt, start by gathering your leftover fabric pieces.
You can use scraps in different colors, patterns, and sizes. This is actually what makes crumb quilting so much fun.
You don’t need to purchase new fabric specifically for this project.
Look through your scrap basket and collect pieces that coordinate together. You can use scraps from previous quilts, bags, appliqué projects, sewing projects, or even small pieces that would normally be too small for another project.
If you have lots of different colors, a contrasting sashing fabric can help bring everything together.
Materials Needed for a Crumb Quilt
Here are the basic supplies I used for this project:
- Scrap fabric pieces
- Black fabric for the sashing and border
- Sewing machine
- Coordinating thread
- Rotary cutter
- Quilting ruler
- Cutting mat
- Iron and ironing board
- Quarter-inch sewing foot
- Microtex needle
- Basic sewing supplies
I used my Baby Lock Soprano sewing machine for this project. It is a great machine for both quilting and everyday sewing.
For the top thread, I used regular white polyester thread. You could use black thread instead if you prefer. The choice is completely up to you.
I also used a quarter-inch foot with a guide and a 90/14 Microtex needle.
Step 1: Cut the Sashing Fabric – How to Sew a Crumb Quilt

The first step in learning how to sew a crumb quilt is preparing the fabric you will use between your scrap quilt blocks.
For my sample, I folded my black fabric over and cut strips approximately 2 inches wide.
The exact width isn’t important if you want to create a different-sized project. You can make your sashing wider or narrower depending on the appearance you want.
For my sample, I planned three crumb quilt sections across and four sections down.
The black strips would be placed between the colorful sections.
What Is Quilt Sashing?
Sashing is the fabric placed between individual quilt blocks.
It can be used to separate blocks and create a frame around each section of a quilt.
In this project, the black sashing provides a strong contrast against the colorful scrap fabric.
This is one of my favorite parts of how to sew a crumb quilt because the sashing can completely change the appearance of the finished project.
Step 2: Sew the First Scrap Fabric Section – How to Sew a Crumb Quilt

Place your first scrap fabric section and your sashing strip right sides together.
Line up the edges carefully.
Using your quarter-inch seam allowance, sew along the edge of the fabric.
A consistent quarter-inch seam is important when learning how to sew quilt blocks, as it helps your sections fit together properly.
Once you’ve sewn the seam, open the fabric pieces.
Take the section to your ironing board and press the seam.
Press Your Seams as You Sew
Don’t skip the pressing stage!
Pressing your seams as you work will help your quilt blocks stay flat and make the next steps much easier.
You don’t necessarily need to press every seam in exactly the same direction for every project, but you should make sure the fabric lies flat before attaching the next section.
This is particularly helpful when you’re learning how to sew a crumb quilt for the first time.
Step 3: Continue Adding the Sashing – How to Sew a Crumb Quilt

Next, take your next scrap fabric section and place it right sides together with the opposite side of the sashing.
Sew another quarter-inch seam.
Open the fabric and press the seam.
Continue adding the scrap fabric sections and sashing until you have completed your row.
Remember to check the direction of your piecing as you go.
It is easy to accidentally turn a section around when working with lots of colorful scraps, so take a moment to check everything before sewing.
Step 4: Create Your Quilt Rows
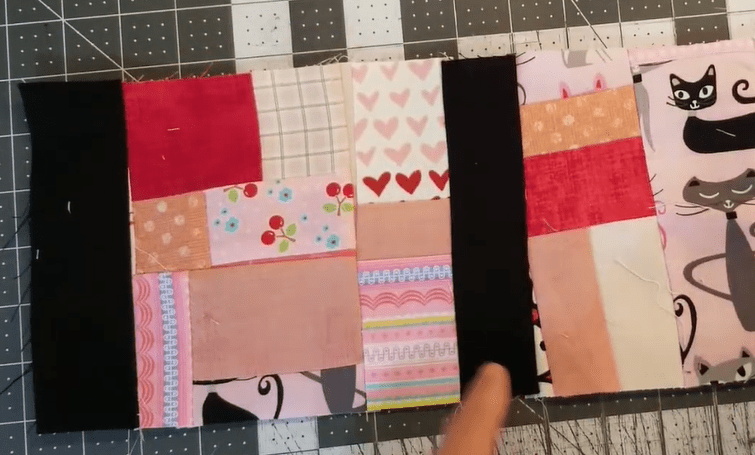
Once you have completed the individual sections, continue creating your rows.
For my project, I decided to make three sections across and four sections down.
This gives you a simple starting point for a mini crumb quilt.
However, you don’t have to follow these measurements.
If you want to make a larger quilt, simply continue adding sections.
If you’re making a small project such as a mug rug or pouch, you may only need a few sections.
That’s the beauty of how to sew a crumb quilt you can adapt the project to suit whatever you have available.
Step 5: Add the Outer Border – How to Sew a Crumb Quilt
Once your sections are joined together, it’s time to add the outer border.
I used the same black fabric for the border that I used for the sashing.
This creates a frame around the colorful scrap fabric and helps the individual pieces stand out.
For the sides, I used a border approximately the same width as the sashing.
You can adjust the border width to suit the size and style of your project.
Adding the Top and Bottom Border
I also added black fabric across the top and bottom of my quilt.
For these sections, I decided to use a slightly narrower strip, approximately 1½ inches wide.
I wasn’t following a strict pattern for this project. I was simply experimenting with the proportions and deciding what looked best as I went.
This is another reason I love how to sew a crumb quilt projects they can be very flexible.
Step 6: Press the Finished Quilt Top – How to Sew a Crumb Quilt

Once all your sections and borders have been sewn together, give the entire quilt top a good press.
Lay the quilt flat and check that all the seams are sitting properly.
This is also a good opportunity to check the quilt top for any areas that may need additional pressing.
Your finished scrap fabric quilt top should now have colorful crumb quilt sections separated by the contrasting sashing and framed with a border.
Step 7: Choose Your Quilting Design – How to Sew a Crumb Quilt
Now comes the fun part deciding how you want to quilt your project.
For this particular design, I wouldn’t recommend using an overly complicated quilting pattern.
The scrap fabric pieces are already providing lots of color, pattern, and visual interest.
Adding a very busy free-motion quilting design could compete with the fabric.
Instead, I think a simple quilting design would work beautifully.
Stitch in the Ditch Quilting
One option I would recommend is stitch in the ditch quilting.
This involves sewing along the seams between your fabric sections.
You can stitch around the individual quilt blocks and sections, creating a simple quilted design without distracting from the colorful scraps.
I would also quilt along the sashing so that it is securely stitched down.
This creates a clean and simple finished appearance.
If you’re new to quilting, stitch in the ditch is also a great technique to practice.
Step 8: Finish Your Crumb Quilt – How to Sew a Crumb Quilt

After quilting the project, you can finish it according to how you plan to use it.
If you’re making a mini quilt, you can add binding around the outside edge.
For a table topper, you can finish the edges with your preferred quilting method.
You could also use your crumb quilt panel to create something completely different.
Try turning your finished panel into a:
- Zipper pouch
- Tote bag
- Sewing bag
- Cushion cover
- Table runner
- Mug rug
- Wall hanging
Once you know how to sew a crumb quilt, you can use the same basic technique for many different sewing projects.
Why Crumb Quilting Is Perfect for Scrap Fabric – How to Sew a Crumb Quilt
One of the biggest advantages of how to sew a crumb quilt projects is that they help you use fabric that might otherwise be thrown away.
Small scraps can quickly accumulate in a sewing room.
Some pieces are simply too small for traditional quilt blocks, but crumb quilting gives them another purpose.
Instead of worrying about matching every fabric perfectly, you can embrace the randomness.
The result is often a unique quilt that you could never reproduce exactly.
Tips for Successful Crumb Quilt Blocks
If you’re new to crumb quilting, here are a few tips to make the process easier.
Keep Your Seam Allowance Consistent
A consistent quarter-inch seam will help your pieces fit together better.
Press Frequently
Pressing your seams as you work helps prevent the quilt top from becoming bulky or distorted.
Don’t Overthink Your Fabric Choices
Crumb quilting is supposed to be fun.
Mix colors, patterns, and textures and see what happens.
Use Contrasting Sashing
A darker sashing fabric can make colorful scrap pieces stand out beautifully.
However, you can use any color you like.
White, cream, gray, navy, or even a bright color could create a completely different look.
Make It Any Size
Don’t feel restricted to the measurements in this tutorial.
You can make a tiny crumb quilt or continue adding blocks until you have a full-sized quilt.
How to Sew a Crumb Quilt Without a Pattern – How to Sew a Crumb Quilt

One of my favorite things about how to sew a crumb quilt is that you don’t necessarily need a complicated pattern.
You can start with the fabric you already have and build your design as you go.
For a completely random crumb quilt, simply start joining scraps together.
For a more organized appearance, you can sort your scraps by color before you begin.
You could even create sections based on a particular color scheme.
For example, you might make one section using pink and purple scraps, another using blue and green scraps, and another using warm colors.
Then use the same sashing fabric between all the sections to create a cohesive finished project.
Frequently Asked Questions About Crumb Quilting – How to Sew a Crumb Quilt
What is the best fabric for a crumb quilt?
Cotton quilting fabric is an excellent choice for crumb quilting because it is easy to sew, press, and quilt.
You can use scraps from previous quilting projects as long as the fabrics are suitable for the project you’re making.
Do crumb quilt pieces have to be the same size?
No. One of the great things about crumb quilting is that your scraps can be different sizes and shapes.
You can piece them together to create larger sections before incorporating them into your quilt.
Can I make a large quilt using this technique? -How to Sew a Crumb Quilt
Absolutely!
The same basic technique can be used to create a larger quilt.
Simply make more sections and continue joining them together until you reach your desired size.
What quilting design should I use? – How to Sew a Crumb Quilt
For this particular design, I recommend keeping the quilting relatively simple.
Stitching in the ditch around the sections and through the sashing would allow the colorful scrap fabrics to remain the main feature.
However, you can experiment with free-motion quilting or other designs if you prefer.
Final Thoughts on How to Sew a Crumb Quilt

Learning how to sew a crumb quilt is a fantastic way to make something useful from leftover fabric.
This project doesn’t require you to have a perfectly coordinated fabric collection or follow a complicated quilt pattern.
Instead, you can take the scraps you already have and turn them into something completely new.
For my mini quilt, I loved the contrast between the colorful scrap fabric and the black sashing and border. The dark fabric really makes the individual crumb quilt sections pop.
And remember, you don’t have to make a quilt.
Once you learn how to sew quilt blocks using scrap fabric, you can use those finished panels for bags, pouches, cushions, table runners, mug rugs, wall hangings, and many other sewing projects.
So grab that scrap basket, turn on your sewing machine, and see what you can create!
If you enjoyed this tutorial, don’t forget to leave a comment and let me know how you would quilt your crumb quilt. Would you use stitch in the ditch, free-motion quilting, or another quilting design?
And don’t forget to subscribe to Faodail Creation so you don’t miss the next sewing and quilting tutorial.
Read this next Quarter Square Triangle Quilt Block – Easy & Amazing Beginner Quilting Tutorial https://faodailcreation.ca/2026/06/05/quarter-square-triangle-quilt-block/
- Frankenstein Monster Applique : Easy & Fun Halloween Sewing Tutorial
- How to Sew a Cord Keeper | Sewing Machine Tutorials & Tips for Beginners
- How to Sew Fabric Napkins : Christmas Sewing
- How to Embroider a Christmas Towel – Machine Embroidery for Beginners
- Halloween Table Runner – A Fun & Easy Reversible Sewing Tutorial

2 thoughts on “How to Sew a Crumb Quilt | How to sew quilt Blocks”