How to sew quilt Blocks, Quilting

How to Sew Half Square Triangle Quilt Blocks | How to sew quilt Blocks

Cassie Cartmell – Faodail Creation

This is the link to the full you tube tutorial How to sew Half Square Triangle Quilt Blocks | How to sew quilt Blocks https://youtu.be/EwMt-wAH-WA

Table of Contents

How to sew Half Square Triangle Quilt Blocks is one of the most useful quilting techniques to learn if you are beginning to make quilts. Half square triangles, often shortened to HSTs, are simple quilt units made from two triangles of fabric. Once you know how to make them accurately, you can use them to create hundreds of different quilt blocks and patterns.

In this tutorial, I am going to show you how to sew Half Square Triangle Quilt Blocks using two squares of fabric. This is a straightforward method that is perfect for beginners and only requires a few basic quilting supplies.

The method is also very versatile. You can make your Half Square Triangle Quilt Blocks as small or as large as your quilt project requires.

If you have never made Half Square Triangle Quilt Blocks before, don’t worry. The process is much easier than it may initially look. With accurate cutting, careful marking, and a consistent seam allowance, you can create beautiful Half Square Triangle Quilt Blocks for your next quilting project.

What Are Half Square Triangle Quilt Blocks?

Baby Lock Educator Cassie Cartmell

Before learning how to sew Half Square Triangle Quilt Blocks, it helps to understand exactly what you are making.

A half square triangle is a square quilt unit made up of two triangular pieces of fabric. The finished square has a diagonal seam running from one corner to the opposite corner.

Because each unit contains two contrasting fabrics, Half Square Triangle Quilt Blocks can create beautiful geometric designs.

You can arrange your Half Square Triangle Quilt Blocks in different directions to create stars, diamonds, chevrons, pinwheels, zigzags, and many other quilt designs.

Learning how to sew Half Square Triangle Quilt Blocks therefore gives you an excellent foundation for many future quilting projects.

Why Learn How to Sew Half Square Triangle Quilt Blocks?

Why Learn How to Sew Half Square Triangle Quilt Blocks

There are several reasons Half Square Triangle Quilt Blocks are so popular with quilters.

First, they are relatively easy to make. Once you understand the basic technique, you can quickly produce multiple units.

Second, Half Square Triangle Quilt Blocks are extremely versatile. You can use them in everything from small table runners and cushions to full-size quilts.

Third, they are a great way to use contrasting fabrics. A light fabric paired with a darker fabric can make the diagonal design stand out beautifully.

If you are learning how to sew Half Square Triangle Quilt Blocks, start with fabrics that have good contrast. This makes it easier to see the finished design.

Supplies for How to Sew Half Square Triangle Quilt Blocks

Supplies for How to Sew Half Square Triangle Quilt Blocks

Before starting how to sew Half Square Triangle Quilt Blocks, gather everything you need.

Below I have provided my Amazon Affiliate links, if you decide to purchase from any of these links I may receive a small commission at no extra cost to you

This is the Link to my main Amazon Store https://www.amazon.com/shop/faodailcreation

You will need:

For this demonstration, I am using two 3-inch squares of fabric.

The size of your squares can be changed depending on your project. If you need larger Half Square Triangle Quilt Blocks, simply begin with larger squares.

If you are making several Half Square Triangle Quilt Blocks, take the time to cut all of your fabric squares accurately. Accurate cutting will make the sewing process much easier.

Choosing Fabric for Half Square Triangle Quilt Blocks

When making Half Square Triangle Quilt Blocks, quilting cotton is an excellent choice.

Choose two fabrics that contrast with each other. For example, you could use a dark fabric with a light fabric.

Strong contrast will make the diagonal line of your Half Square Triangle Quilt Blocks much easier to see.

You can also experiment with prints, solids, florals, and seasonal fabrics. Once you are comfortable with how to sew Half Square Triangle Quilt Blocks, you can start combining different fabrics to create unique quilt designs.

How to Sew Half Square Triangle Quilt Blocks Step by Step

Now let’s get started with how to sew Half Square Triangle Quilt Blocks.

This method begins with two squares of fabric. When finished, you will have two half square triangle units.

Step 1: Cut Two Fabric Squares – How to Sew Half Square Triangle Quilt Blocks

Cut Two Fabric Squares - How to Sew Half Square Triangle Quilt Blocks

The first step in how to sew Half Square Triangle Quilt Blocks is cutting your fabric.

For this tutorial, cut two squares measuring 3 inches by 3 inches.

Remember that you can make your squares larger or smaller depending on the finished size you need.

When cutting fabric for Half Square Triangle Quilt Blocks, accuracy is important. Use your rotary cutter and quilting ruler to make sure the edges are straight and the squares are exactly the same size.

Uneven squares can make your Half Square Triangle Quilt Blocks more difficult to sew accurately.

Step 2: Place the Fabric Right Sides Together – How to Sew Half Square Triangle Quilt Blocks

Take your two fabric squares and place them right sides together.

Make sure all four edges are lined up as accurately as possible.

This is an important step when learning how to sew Half Square Triangle Quilt Blocks because the two fabric squares need to remain aligned while you mark and sew them.

If the fabric shifts, your finished Half Square Triangle Quilt Blocks may not be as accurate as you would like.

Use your fingers to gently smooth the fabric before moving to the next step.

Step 3: Mark the Sewing Lines – How to Sew Half Square Triangle Quilt Blocks

Mark the Sewing Lines - How to Sew Half Square Triangle Quilt Blocks

The next step in how to sew Half Square Triangle Quilt Blocks is marking your sewing lines.

You can use a quilting ruler with diagonal markings to make this process easier.

Place your ruler so the diagonal line runs from one corner of the fabric square to the opposite corner.

Instead of sewing directly on the center diagonal line, we are going to mark sewing lines ยผ inch away from the center line.

Mark one line ยผ inch from the diagonal center line.

Then turn the ruler or fabric as needed and mark another line ยผ inch from the opposite side of the diagonal.

You should now have two sewing lines running diagonally across the fabric.

These lines are what make this method of creating Half Square Triangle Quilt Blocks so simple.

Why Mark Two Lines?

When learning how to sew Half Square Triangle Quilt Blocks, it is important to understand why there are two lines.

The center diagonal line represents where you will eventually cut the fabric.

The two additional lines are your stitching lines.

You will sew along both of these marked lines. After sewing, you will cut directly along the center diagonal line.

This creates two Half Square Triangle Quilt Blocks from the original pair of fabric squares.

Step 4: Take the Fabric to Your Sewing Machine – How to Sew Half Square Triangle Quilt Blocks

Take the Fabric to Your Sewing Machine - How to Sew Half Square Triangle Quilt Blocks

Once your fabric is marked, take it to your sewing machine.

Before beginning, check your stitch length.

For this method of making Half Square Triangle Quilt Blocks, I like to use a slightly shorter stitch length. This helps create a secure seam.

Place the fabric underneath the presser foot.

Start at one edge and sew directly along one of your marked ยผ-inch sewing lines.

Try to maintain a consistent seam allowance as you sew.

Accurate stitching is one of the most important parts of learning how to sew Half Square Triangle Quilt Blocks.

Step 5: Sew the Second Line – How to Sew Half Square Triangle Quilt Blocks

After sewing the first diagonal line, turn your fabric around.

Now sew along the second marked line.

You should have two diagonal lines of stitching running parallel to each other.

Take your time with this step. There is no need to rush when making Half Square Triangle Quilt Blocks.

A consistent seam allowance will help your finished units come together neatly.

Step 6: Cut the Half Square Triangle Units – How to Sew Half Square Triangle Quilt Blocks

Cut the Half Square Triangle Units - How to Sew Half Square Triangle Quilt Blocks

Now we can turn our sewn squares into Half Square Triangle Quilt Blocks.

Place the fabric on your cutting mat.

Using your rotary cutter, carefully cut directly along the original diagonal center line between the two rows of stitching.

Be careful with your rotary cutter and keep your fingers away from the blade.

Once you have made the cut, you will have two pieces.

Open each piece out and you will see that you have created two Half Square Triangle Quilt Blocks.

This is one of the reasons this method is so useful. Two fabric squares can quickly become two matching quilt units.

Step 7: Press Your Half Square Triangle Quilt Blocks – How to Sew Half Square Triangle Quilt Blocks

Press Your Half Square Triangle Quilt Blocks - How to Sew Half Square Triangle Quilt Blocks

The next step in how to sew Half Square Triangle Quilt Blocks is pressing.

Open your newly created units so the fabric lies flat.

Take each unit to your ironing surface and press it carefully.

You can press the seam toward one side or press the seam open, depending on your preferred quilting method and the pattern you are following.

Be careful not to stretch the fabric while pressing.

Proper pressing helps your Half Square Triangle Quilt Blocks lie flat and makes them much easier to use in your next quilting project.

Step 8: Trim the Dog Ears – How to Sew Half Square Triangle Quilt Blocks

After pressing your Half Square Triangle Quilt Blocks, you may notice small triangular pieces of fabric sticking out at the corners.

These are commonly called dog ears.

Trim the dog ears carefully with your rotary cutter and ruler.

Removing the dog ears gives your Half Square Triangle Quilt Blocks a much cleaner appearance and makes it easier to sew them together with other quilt units.

The Finished Size of Half Square Triangle Quilt Blocks

The Finished Size of Half Square Triangle Quilt Blocks

There is one very important measurement to remember when learning how to sew Half Square Triangle Quilt Blocks.

The starting size of your fabric squares is not the finished size of your half square triangle.

In this example, we started with two 3-inch squares.

After sewing, cutting, and pressing, the finished Half Square Triangle Quilt Blocks measure approximately 2ยฝ inches.

This means you lose approximately ยฝ inch from the original square size.

Why Do Half Square Triangle Quilt Blocks Get Smaller?

The reduction in size happens because of the seam allowances.

When making Half Square Triangle Quilt Blocks, the fabric is sewn with a ยผ-inch seam allowance on each side of the diagonal.

Once the unit is cut and opened, the finished square is smaller than the original fabric square.

This is extremely important when planning a quilt.

If your pattern tells you that you need a finished 2ยฝ-inch Half Square Triangle Quilt Block, you need to start with the correct size fabric squares.

Always check the pattern instructions before cutting a large quantity of fabric.

How to Sew Half Square Triangle Quilt Blocks Accurately

How to Sew Half Square Triangle

Accuracy is particularly important when making Half Square Triangle Quilt Blocks.

Even a small difference in size can become noticeable when you sew many units together.

Here are a few tips that can help.

Use an Accurate Seam Allowance

One of the biggest tips when learning how to sew Half Square Triangle Quilt Blocks is to keep your seam allowance consistent.

A standard quilting seam allowance is generally ยผ inch.

If your seam allowance is too large or too small, your finished Half Square Triangle Quilt Blocks may not measure correctly.

Cut Your Squares Carefully – How to Sew Half Square Triangle Quilt Blocks

Accurate cutting is just as important as accurate sewing.

Use a sharp rotary cutter and a quilting ruler.

Make sure your fabric is lying flat before cutting.

When making multiple Half Square Triangle Quilt Blocks, cutting all of your squares to exactly the same measurement will help you achieve much more consistent results.

Press Without Stretching – How to Sew Half Square Triangle Quilt Blocks

Fabric can stretch when you handle it, especially when pressing along a diagonal seam.

When making Half Square Triangle Quilt Blocks, avoid dragging your iron across the fabric.

Instead, gently press the unit.

This will help prevent distortion.

Check Your Finished Measurement – How to Sew Half Square Triangle Quilt Blocks

Before sewing your Half Square Triangle Quilt Blocks into a larger quilt block, measure them.

If your finished units are not the correct size, you may need to trim them.

A quilting ruler designed for half square triangles can be particularly helpful for this.

How to Sew Half Square Triangle Quilt Blocks for Quilts

How to Sew Half Square Triangle Quilt Blocks for Quilts

Once you understand how to sew Half Square Triangle Quilt Blocks, you can start experimenting with different layouts.

Try placing four units together to create a pinwheel design.

You can also rotate the units to create zigzag patterns.

With enough Half Square Triangle Quilt Blocks, you can create stars, diamonds, chevrons, flying geese-inspired layouts, and many other geometric quilt designs.

This is why Half Square Triangle Quilt Blocks are such an important technique for beginner and experienced quilters alike.

Experiment With Fabric Placement – How to Sew Half Square Triangle Quilt Blocks

The direction of your Half Square Triangle Quilt Blocks can completely change the appearance of your quilt.

Try arranging the dark triangles together.

Then rotate some of the units.

You may be surprised by how many different patterns you can create from the same basic Half Square Triangle Quilt Blocks.

Common Mistakes When Making Half Square Triangle Quilt Blocks

If your first Half Square Triangle Quilt Blocks are not perfect, don’t worry.

Here are some common problems beginners encounter.

The Squares Do Not Match

If your fabric squares are different sizes, they may shift while sewing.

Always cut your squares carefully before starting.

The Diagonal Line Is Off – How to Sew Half Square Triangle Quilt Blocks

If your marked diagonal line is not accurate, your Half Square Triangle Quilt Blocks may have uneven triangles.

Take your time when marking the fabric.

The Finished Unit Is Too Small – How to Sew Half Square Triangle Quilt Blocks

If your finished Half Square Triangle Quilt Blocks are too small, check your seam allowance.

A seam allowance that is larger than ยผ inch can reduce the finished size.

The Unit Is Not Square – How to Sew Half Square Triangle Quilt Blocks

If your finished Half Square Triangle Quilt Blocks are not perfectly square, you may need to trim them.

A square quilting ruler can help you straighten the edges before joining the units to other quilt pieces.

How to Sew Half Square Triangle Quilt Blocks for Beginners

How to Sew Half Square Triangle Quilt Blocks for Beginners

If you are completely new to quilting, how to sew Half Square Triangle Quilt Blocks is a great technique to start with.

The process only requires two fabric squares, some basic sewing supplies, and your sewing machine.

Start with a small project rather than immediately attempting a large quilt.

You could use your first Half Square Triangle Quilt Blocks to make a mug rug, table runner, cushion cover, wall hanging, or small quilt.

As your confidence grows, you can begin combining different sizes and layouts.

Final Thoughts on How to Sew Half Square Triangle Quilt Blocks

Learning how to sew Half Square Triangle Quilt Blocks gives you a useful technique that you can return to again and again.

The method is simple: cut two squares, place them right sides together, mark your diagonal sewing lines, stitch, cut between the seams, press, and trim.

For this demonstration, we started with two 3-inch squares and finished with approximately 2ยฝ-inch Half Square Triangle Quilt Blocks.

The most important thing to remember is that your finished unit will be smaller than your starting squares.

Once you understand this measurement, you can confidently plan your next quilting project.

Half Square Triangle Quilt Blocks are simple, versatile, and incredibly useful. With practice, you will be able to make them quickly and accurately and incorporate them into a wide variety of quilt designs.

If you enjoyed this tutorial and want to learn more simple sewing and quilting techniques, make sure you subscribe to Faodail Creation. New sewing tutorials, machine tips, quilting projects, and helpful sewing techniques are regularly shared to help you become more confident at your sewing machine.

Happy sewing and quilting!

Read this next : How to Sew a Crumb Quilt โ€“ Easy Scrap Fabric Quilt Blocks for Beginners https://faodailcreation.ca/2026/08/10/how-to-sew-a-crumb-quilt-2/

How to sew quilt Blocks, Quilting

How to Sew a Crumb Quilt | How to sew quilt Blocks

Cassie Cartmell – Faodail Creation

Jere is the full you tube tutorial How to Sew a Crumb Quilt | How to sew quilt Blocks https://youtu.be/EasYdfhHHMA

How to Sew a Crumb Quilt is a fun and creative way to turn leftover fabric scraps into a beautiful quilted project. If you have a collection of small fabric pieces sitting in your sewing room, this is the perfect project to use them!

Instead of throwing away those tiny pieces of fabric, you can combine them to create colorful crumb quilt blocks and turn them into a mini quilt, table topper, cushion, bag, pouch, or even a larger quilt.

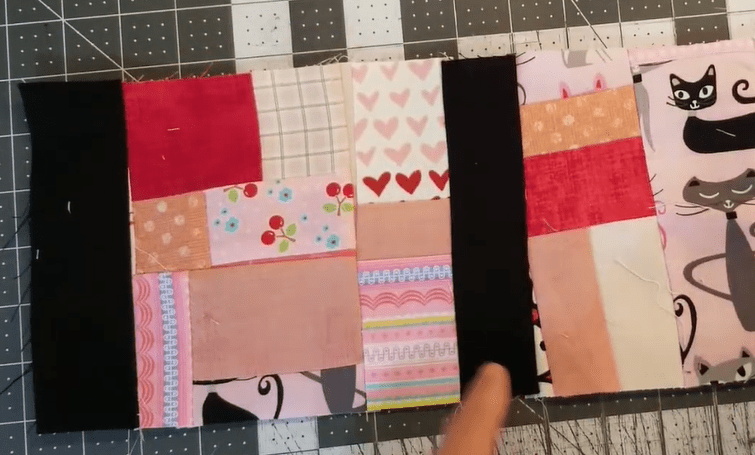
In this tutorial, Iโ€™m going to show you how to sew a crumb quilt using scrap fabric pieces and contrasting black fabric for the sashing and borders. The dark fabric makes the colorful scrap pieces really stand out and gives the finished quilt a modern appearance.

The best thing about this project is that you don’t have to follow an exact pattern. You can make your crumb quilt as small or as large as you want.

What Is a Crumb Quilt? – How to Sew a Crumb Quilt

How to Sew a Crumb Quilt - Easy Scrap Fabric Quilt Blocks for Beginners

Before learning how to sew a crumb quilt, it helps to understand exactly what a crumb quilt is.

A crumb quilt is made by sewing small pieces of leftover fabric together to create larger sections or quilt blocks. Unlike traditional quilt blocks, crumb quilting doesn’t necessarily require perfectly measured pieces or a specific fabric collection.

It is a wonderful way to use up fabric scraps from previous sewing and quilting projects.

For this project, I had a collection of scrap fabric pieces left over from projects I worked on previously. Rather than putting them away for another day, I decided to turn them into a colorful mini quilt.

You can use the same idea to create:

  • Mini quilts
  • Table runners
  • Mug rugs
  • Fabric bags
  • Zipper pouches
  • Cushion covers
  • Wall hangings
  • Larger quilts
  • Sewing room decorations

There really are no limits when it comes to how to sew a crumb quilt.

How to Sew Quilt Blocks Using Scrap Fabric – How to Sew a Crumb Quilt

How to Sew Quilt Blocks Using Scrap Fabric - How to Sew a Crumb Quilt

One of the great things about crumb quilting is that you don’t have to worry about creating identical quilt blocks.

For my sample, I decided to create three sections across and four sections down. You could easily change these measurements depending on the size of your project.

The important thing is to have fun with your scraps.

I chose a selection of colorful fabric pieces and decided to use black fabric for my sashing and border. I don’t normally use a lot of black in my quilting projects, but I thought it would create a dramatic contrast against the brighter scrap fabrics.

Choosing Your Scrap Fabric – How to Sew a Crumb Quilt

When learning how to sew a crumb quilt, start by gathering your leftover fabric pieces.

You can use scraps in different colors, patterns, and sizes. This is actually what makes crumb quilting so much fun.

You don’t need to purchase new fabric specifically for this project.

Look through your scrap basket and collect pieces that coordinate together. You can use scraps from previous quilts, bags, appliquรฉ projects, sewing projects, or even small pieces that would normally be too small for another project.

If you have lots of different colors, a contrasting sashing fabric can help bring everything together.

Materials Needed for a Crumb Quilt

Here are the basic supplies I used for this project:

  • Scrap fabric pieces
  • Black fabric for the sashing and border
  • Sewing machine
  • Coordinating thread
  • Rotary cutter
  • Quilting ruler
  • Cutting mat
  • Iron and ironing board
  • Quarter-inch sewing foot
  • Microtex needle
  • Basic sewing supplies

I used my Baby Lock Soprano sewing machine for this project. It is a great machine for both quilting and everyday sewing.

For the top thread, I used regular white polyester thread. You could use black thread instead if you prefer. The choice is completely up to you.

I also used a quarter-inch foot with a guide and a 90/14 Microtex needle.

Step 1: Cut the Sashing Fabric – How to Sew a Crumb Quilt

Cut the Sashing Fabric - How to Sew a Crumb Quilt

The first step in learning how to sew a crumb quilt is preparing the fabric you will use between your scrap quilt blocks.

For my sample, I folded my black fabric over and cut strips approximately 2 inches wide.

The exact width isn’t important if you want to create a different-sized project. You can make your sashing wider or narrower depending on the appearance you want.

For my sample, I planned three crumb quilt sections across and four sections down.

The black strips would be placed between the colorful sections.

What Is Quilt Sashing?

Sashing is the fabric placed between individual quilt blocks.

It can be used to separate blocks and create a frame around each section of a quilt.

In this project, the black sashing provides a strong contrast against the colorful scrap fabric.

This is one of my favorite parts of how to sew a crumb quilt because the sashing can completely change the appearance of the finished project.

Step 2: Sew the First Scrap Fabric Section – How to Sew a Crumb Quilt

Sew the First Scrap Fabric Section - How to Sew a Crumb Quilt

Place your first scrap fabric section and your sashing strip right sides together.

Line up the edges carefully.

Using your quarter-inch seam allowance, sew along the edge of the fabric.

A consistent quarter-inch seam is important when learning how to sew quilt blocks, as it helps your sections fit together properly.

Once you’ve sewn the seam, open the fabric pieces.

Take the section to your ironing board and press the seam.

Press Your Seams as You Sew

Don’t skip the pressing stage!

Pressing your seams as you work will help your quilt blocks stay flat and make the next steps much easier.

You don’t necessarily need to press every seam in exactly the same direction for every project, but you should make sure the fabric lies flat before attaching the next section.

This is particularly helpful when you’re learning how to sew a crumb quilt for the first time.

Step 3: Continue Adding the Sashing – How to Sew a Crumb Quilt

Continue Adding the Sashing - How to Sew a Crumb Quilt

Next, take your next scrap fabric section and place it right sides together with the opposite side of the sashing.

Sew another quarter-inch seam.

Open the fabric and press the seam.

Continue adding the scrap fabric sections and sashing until you have completed your row.

Remember to check the direction of your piecing as you go.

It is easy to accidentally turn a section around when working with lots of colorful scraps, so take a moment to check everything before sewing.

Step 4: Create Your Quilt Rows

Create Your Quilt Rows

Once you have completed the individual sections, continue creating your rows.

For my project, I decided to make three sections across and four sections down.

This gives you a simple starting point for a mini crumb quilt.

However, you don’t have to follow these measurements.

If you want to make a larger quilt, simply continue adding sections.

If you’re making a small project such as a mug rug or pouch, you may only need a few sections.

That’s the beauty of how to sew a crumb quilt you can adapt the project to suit whatever you have available.

Step 5: Add the Outer Border – How to Sew a Crumb Quilt

Once your sections are joined together, it’s time to add the outer border.

I used the same black fabric for the border that I used for the sashing.

This creates a frame around the colorful scrap fabric and helps the individual pieces stand out.

For the sides, I used a border approximately the same width as the sashing.

You can adjust the border width to suit the size and style of your project.

Adding the Top and Bottom Border

I also added black fabric across the top and bottom of my quilt.

For these sections, I decided to use a slightly narrower strip, approximately 1ยฝ inches wide.

I wasn’t following a strict pattern for this project. I was simply experimenting with the proportions and deciding what looked best as I went.

This is another reason I love how to sew a crumb quilt projects they can be very flexible.

Step 6: Press the Finished Quilt Top – How to Sew a Crumb Quilt

Press the Finished Quilt Top - How to Sew a Crumb Quilt

Once all your sections and borders have been sewn together, give the entire quilt top a good press.

Lay the quilt flat and check that all the seams are sitting properly.

This is also a good opportunity to check the quilt top for any areas that may need additional pressing.

Your finished scrap fabric quilt top should now have colorful crumb quilt sections separated by the contrasting sashing and framed with a border.

Step 7: Choose Your Quilting Design – How to Sew a Crumb Quilt

Now comes the fun part deciding how you want to quilt your project.

For this particular design, I wouldn’t recommend using an overly complicated quilting pattern.

The scrap fabric pieces are already providing lots of color, pattern, and visual interest.

Adding a very busy free-motion quilting design could compete with the fabric.

Instead, I think a simple quilting design would work beautifully.

Stitch in the Ditch Quilting

One option I would recommend is stitch in the ditch quilting.

This involves sewing along the seams between your fabric sections.

You can stitch around the individual quilt blocks and sections, creating a simple quilted design without distracting from the colorful scraps.

I would also quilt along the sashing so that it is securely stitched down.

This creates a clean and simple finished appearance.

If you’re new to quilting, stitch in the ditch is also a great technique to practice.

Step 8: Finish Your Crumb Quilt – How to Sew a Crumb Quilt

How to Sew a Crumb Quilt

After quilting the project, you can finish it according to how you plan to use it.

If you’re making a mini quilt, you can add binding around the outside edge.

For a table topper, you can finish the edges with your preferred quilting method.

You could also use your crumb quilt panel to create something completely different.

Try turning your finished panel into a:

  • Zipper pouch
  • Tote bag
  • Sewing bag
  • Cushion cover
  • Table runner
  • Mug rug
  • Wall hanging

Once you know how to sew a crumb quilt, you can use the same basic technique for many different sewing projects.

Why Crumb Quilting Is Perfect for Scrap Fabric – How to Sew a Crumb Quilt

One of the biggest advantages of how to sew a crumb quilt projects is that they help you use fabric that might otherwise be thrown away.

Small scraps can quickly accumulate in a sewing room.

Some pieces are simply too small for traditional quilt blocks, but crumb quilting gives them another purpose.

Instead of worrying about matching every fabric perfectly, you can embrace the randomness.

The result is often a unique quilt that you could never reproduce exactly.

Tips for Successful Crumb Quilt Blocks

If you’re new to crumb quilting, here are a few tips to make the process easier.

Keep Your Seam Allowance Consistent

A consistent quarter-inch seam will help your pieces fit together better.

Press Frequently

Pressing your seams as you work helps prevent the quilt top from becoming bulky or distorted.

Don’t Overthink Your Fabric Choices

Crumb quilting is supposed to be fun.

Mix colors, patterns, and textures and see what happens.

Use Contrasting Sashing

A darker sashing fabric can make colorful scrap pieces stand out beautifully.

However, you can use any color you like.

White, cream, gray, navy, or even a bright color could create a completely different look.

Make It Any Size

Don’t feel restricted to the measurements in this tutorial.

You can make a tiny crumb quilt or continue adding blocks until you have a full-sized quilt.

How to Sew a Crumb Quilt Without a Pattern – How to Sew a Crumb Quilt

How to Sew a Crumb Quilt Without a Pattern - How to Sew a Crumb Quilt

One of my favorite things about how to sew a crumb quilt is that you don’t necessarily need a complicated pattern.

You can start with the fabric you already have and build your design as you go.

For a completely random crumb quilt, simply start joining scraps together.

For a more organized appearance, you can sort your scraps by color before you begin.

You could even create sections based on a particular color scheme.

For example, you might make one section using pink and purple scraps, another using blue and green scraps, and another using warm colors.

Then use the same sashing fabric between all the sections to create a cohesive finished project.

Frequently Asked Questions About Crumb Quilting – How to Sew a Crumb Quilt

What is the best fabric for a crumb quilt?

Cotton quilting fabric is an excellent choice for crumb quilting because it is easy to sew, press, and quilt.

You can use scraps from previous quilting projects as long as the fabrics are suitable for the project you’re making.

Do crumb quilt pieces have to be the same size?

No. One of the great things about crumb quilting is that your scraps can be different sizes and shapes.

You can piece them together to create larger sections before incorporating them into your quilt.

Can I make a large quilt using this technique? -How to Sew a Crumb Quilt

Absolutely!

The same basic technique can be used to create a larger quilt.

Simply make more sections and continue joining them together until you reach your desired size.

What quilting design should I use? – How to Sew a Crumb Quilt

For this particular design, I recommend keeping the quilting relatively simple.

Stitching in the ditch around the sections and through the sashing would allow the colorful scrap fabrics to remain the main feature.

However, you can experiment with free-motion quilting or other designs if you prefer.

Final Thoughts on How to Sew a Crumb Quilt

Final Thoughts on How to Sew a Crumb Quilt

Learning how to sew a crumb quilt is a fantastic way to make something useful from leftover fabric.

This project doesn’t require you to have a perfectly coordinated fabric collection or follow a complicated quilt pattern.

Instead, you can take the scraps you already have and turn them into something completely new.

For my mini quilt, I loved the contrast between the colorful scrap fabric and the black sashing and border. The dark fabric really makes the individual crumb quilt sections pop.

And remember, you don’t have to make a quilt.

Once you learn how to sew quilt blocks using scrap fabric, you can use those finished panels for bags, pouches, cushions, table runners, mug rugs, wall hangings, and many other sewing projects.

So grab that scrap basket, turn on your sewing machine, and see what you can create!

If you enjoyed this tutorial, don’t forget to leave a comment and let me know how you would quilt your crumb quilt. Would you use stitch in the ditch, free-motion quilting, or another quilting design?

And don’t forget to subscribe to Faodail Creation so you don’t miss the next sewing and quilting tutorial.

Read this next Quarter Square Triangle Quilt Block โ€“ Easy & Amazing Beginner Quilting Tutorial https://faodailcreation.ca/2026/06/05/quarter-square-triangle-quilt-block/

How to sew quilt Blocks, Quilting

How to Sew a Cat Quilt Block | How to sew quilt Blocks

Cassie Cartmell – Faodail Creation

This is the full you tube tutorial How to sew a Cat Quilt Block | How to sew quilt Blocks https://youtu.be/NVcSbsrfCRE

Table of Contents

How to Sew a Cat Quilt Block | Easy & Fun Quilt Block Tutorial

How to Sew a Cat Quilt Block is a fun and beginner-friendly quilting project that can be used for quilts, cushions, wall hangings, bags, and many other sewing projects. In this step-by-step quilting tutorial, I’ll show you how to make an adorable cat quilt block using half square triangles, simple fabric pieces, and accurate quarter-inch seams.

This cute cat design is a great project for anyone who enjoys creating fun and unique quilt blocks. Whether you’re completely new to quilting or have been sewing for years, this project gives you an opportunity to practise several useful quilting techniques while creating a charming finished design.

In this quilting tutorial, we’ll start by preparing the half square triangle pieces that create the cat’s ears and lower face. I’ll then show you how to sew the pieces together, press the seams, assemble the different sections, and square up the completed block.

One of the best things about this project is that you don’t need complicated techniques to create an eye-catching design. With careful cutting, a consistent quarter-inch seam allowance, and a little pressing along the way, you can create a cat quilt block that looks great and can be used in many different ways.

You can make your cat block using two highly contrasting fabrics so the design really stands out, or experiment with different colours and patterns to create your own unique version. Once finished, the block can become part of a larger quilt or be turned into a decorative wall hanging, cushion cover, bag, or another creative sewing project.

What You Need to Make a Cat Quilt Block

What You Need to Make a Cat Quilt Block

Before starting How to Sew a Cat Quilt Block, gather all your fabric and sewing supplies.

Below I have included links to my Amazon Affiliate, if you decide to purchase from any of these links I may receive a small commission at no extra cost to you

My Amazon Store : https://www.amazon.com/shop/faodailcreation

You will need:

Choose Contrasting Fabrics – How to Sew a Cat Quilt Block

Choose Contrasting Fabrics - How to Sew a Cat Quilt Block

One of the easiest ways to make your cat quilt block stand out is to choose fabrics with plenty of contrast. The right fabric combination can make a big difference in how clearly the cat’s face and individual sections appear once everything has been sewn together.

For example, you could use a light background with a darker cat face, or a bright cat fabric with a neutral background. White, cream, pale grey, or other light fabrics can work beautifully as a background when paired with a stronger colour for the cat.

High-contrast fabrics make the shape of the cat much easier to see once the block is assembled. This is particularly helpful when you’re making your first cat quilt block because you can clearly see how each individual piece contributes to the overall design.

I recommend avoiding fabrics that are too similar in colour because the individual sections of the cat’s face may disappear into the background. If your fabrics have similar values, the half square triangles may not stand out as much as you would like.

Consider Fabric Patterns – How to Sew a Cat Quilt Block

You can use solid fabrics, small prints, stripes, dots, florals, or other quilting cottons for this project. However, keep in mind that very large or busy prints may make the cat’s face harder to see.

Small-scale prints are often a good choice because they add interest without overwhelming the simple shapes of the quilt block.

Try Your Fabrics Together First – How to Sew a Cat Quilt Block

Try Your Fabrics Together First - How to Sew a Cat Quilt Block

Before cutting your fabric, place your chosen fabrics next to each other. This gives you an opportunity to see how they work together before you’ve invested time in cutting and sewing.

You can also take a quick photograph of the fabrics on your phone. Sometimes a photo makes it easier to notice whether the colours have enough contrast.

Don’t be afraid to experiment. You could make a traditional-looking cat using neutral colours, create a bright and playful cat using colourful fabrics, or even use seasonal colours for a holiday-themed quilt.

Choosing fabrics is one of the most enjoyable parts of quilting, so have fun creating a combination that reflects your own style.

Preparing the Half Square Triangles – How to Sew a Cat Quilt Block

The first part of How to Sew a Cat Quilt Block is preparing four half square triangle blocks.

My half square triangles are going to be 3 ยฝ inches finished.

I’m using an AccuQuilt GO! system to cut mine because it makes preparing multiple identical pieces quick and easy.

If you don’t have an AccuQuilt GO!, you can make the same half square triangles using traditional quilting techniques. The cutting method may be different, but the finished pieces will work exactly the same way in this cat block.

Step 1: Cut the Half Square Triangles – How to Sew a Cat Quilt Block

Place your fabric onto the appropriate AccuQuilt die.

The die can cut several layers of fabric at once, depending on the fabric thickness and the particular die being used. I’m using several layers to prepare my pieces quickly.

Place the die through the AccuQuilt GO! and apply light, even pressure as it passes through the machine.

Once you’ve finished cutting, lift the plastic section to reveal your half square triangle pieces.

This is one of the reasons I enjoy using a fabric cutting system. It saves time and eliminates some of the measuring and rotary cutting involved in preparing multiple identical pieces.

If you’re making your half square triangles manually, take your time measuring carefully. Accurate cutting at this stage will make the rest of the quilt block much easier to assemble.

Setting Up the Sewing Machine – How to Sew a Cat Quilt Block

Setting Up the Sewing Machine - How to Sew a Cat Quilt Block

For How to Sew a Cat Quilt Block, I’m using my Baby Lock Soprano sewing machine.

I’m using white polyester thread in both the top and bobbin.

As a general rule, I like to choose thread that works well with the fabrics I’m sewing. White thread is a good choice for lighter fabrics, while darker projects may benefit from black or another coordinating colour.

I’m also using a Microtex 90/14 needle.

Step 2: Attach a Quarter-Inch Foot – How to Sew a Cat Quilt Block

Attach a Quarter-Inch Foot - How to Sew a Cat Quilt Block

Accurate seams are especially important when piecing quilt blocks.

Attach a quarter-inch presser foot with a guide to your sewing machine.

The guide helps maintain a consistent quarter-inch seam allowance as you sew.

A consistent seam allowance is important because even small differences can affect the finished size of your quilt block.

If your sewing machine has a feature that automatically raises the presser foot when you stop sewing, you can use that feature to make chain piecing even easier.

On my Baby Lock Soprano, I’m using the pivot function.

This allows the presser foot to raise automatically when I remove my foot from the sewing machine pedal.

Step 3: Chain Piece the Half Square Triangles – How to Sew a Cat Quilt Block

Chain Piece the Half Square Triangles - How to Sew a Cat Quilt Block

Now it’s time to start sewing.

For this cat quilt block, we need four half square triangle units.

Place the first pair of triangles underneath the presser foot.

Sew along the edge using your quarter-inch seam allowance.

When you reach the end of the first pair, don’t cut the thread.

Instead, continue sewing the next pair.

Then sew the third pair and finally the fourth pair.

This technique is called chain piecing.

Why Chain Piecing Is Useful – How to Sew a Cat Quilt Block

Chain piecing is one of my favourite quilting techniques because it allows you to sew multiple pieces without stopping to cut the thread after every seam.

It saves thread and makes sewing several identical units much faster.

Once all four half square triangles have been stitched, remove the chain from the sewing machine.

The pieces will look a little like a fabric banner.

Use your small scissors or thread snips to cut the threads between each unit.

Troubleshooting Fabric That Gets Stuck – How to Sew a Cat Quilt Block

Occasionally, a small fabric piece may not feed properly into the sewing machine.

If one of your triangles gets stuck in the feed dogs, don’t panic.

Simply move the fabric farther underneath the presser foot so that the feed dogs can properly grab it.

This is usually caused by the fabric not extending far enough into the sewing area.

Step 4: Press the Half Square Triangles – How to Sew a Cat Quilt Block

Press the Half Square Triangles - How to Sew a Cat Quilt Block

After sewing the four units, take them to your pressing area.

Open each half square triangle and press the seam toward the same fabric.

For this cat quilt block, I’m pressing my seams toward the pink fabric.

Pressing your seams carefully will help the pieces lie flat and make assembly easier.

Try not to stretch the fabric as you press. Simply place the iron over the seam and press it flat.

Consistent pressing is just as important as accurate sewing when you’re making quilt blocks.

Step 5: Cut the Remaining Fabric Pieces – How to Sew a Cat Quilt Block

Cut the Remaining Fabric Pieces - How to Sew a Cat Quilt Block

Now that the half square triangles are prepared, it’s time to cut the remaining pieces needed to build the cat’s face.

For the background section, cut a piece measuring:

3 inches wide ร— 3 ยฝ inches tall

Then cut another piece of the same size from the fabric you’re using for the cat’s face:

3 inches wide ร— 3 ยฝ inches tall

These pieces will form part of the centre section of the cat’s face.

The centre portion of my cat quilt block measures approximately:

5 inches wide ร— 8 ยพ inches tall

Make sure you measure your own pieces carefully because fabric thickness, seam allowances, and pressing can affect the final measurements.

Step 6: Lay Out the Cat Quilt Block – How to Sew a Cat Quilt Block

Lay Out the Cat Quilt Block - How to Sew a Cat Quilt Block

Before sewing anything together, arrange all your pieces on your work surface.

This is an important step in How to Sew a Cat Quilt Block because it allows you to check that everything is facing the correct direction before you begin sewing.

Place the half square triangles so that they create the cat’s ears and lower portion of the face.

Then place the remaining fabric pieces in the centre.

You should now be able to see the cat beginning to take shape.

Take a moment to check the orientation of every piece.

This is much easier to fix before sewing than after the block has been assembled.

Step 7: Sew the Top and Bottom Sections – How to Sew a Cat Quilt Block

Once everything is laid out correctly, take the pieces to your sewing machine.

We’re going to sew the top section together first.

Then sew the bottom section together.

Use a consistent quarter-inch seam allowance throughout the process.

Once these sections have been sewn, take them back to your pressing area.

Press the seams in whichever direction they naturally want to fall.

You don’t necessarily need to force every seam in the same direction. The important thing is to keep your block flat and your seams neat.

Step 8: Add the Centre of the Cat’s Face – How to Sew a Cat Quilt Block

Add the Centre of the Cat's Face - How to Sew a Cat Quilt Block

Now we’re ready to attach the centre section.

Place the top portion of the cat’s face right sides together with the centre section.

Match the edges carefully.

Sew across the seam using a quarter-inch seam allowance.

Press the seam after sewing.

Next, attach the bottom section in the same way.

Fold it up so the right sides are together, line up the edges, and sew across the seam.

Press the seam once again.

At this point, your cat’s face should clearly start to appear.

Step 9: Square Up the Cat Quilt Block – How to Sew a Cat Quilt Block

Once the cat quilt block has been assembled, it’s time to square it up.

Squaring up a quilt block helps create clean, straight edges and makes it easier to add the block to another project.

My unfinished cat block measures approximately:

8 ยฝ inches ร— 10 ยฝ inches

Trim away any loose threads and uneven edges.

Use a quilting ruler to check that your edges are straight.

Take your time with this step because accurate trimming will make adding borders much easier.

Step 10: Add a Border – How to Sew a Cat Quilt Block

Add a Border - How to Sew a Cat Quilt Block

For my project, I’m going to add a white border around the cat’s face because I’m planning to turn the block into a wall hanging.

However, you don’t have to add a border if you don’t want one.

A border can change the finished size of your block and can also help frame the cat design.

For my border, I cut two strips measuring:

2 ยผ inches wide ร— the length of the cat quilt block

Sew one strip to each side of the block.

Press the strips into place.

Then cut the remaining border strips to fit across the top and bottom.

Sew them into place and press.

If you’re aiming for a 12-inch quilt block, you can trim the top and bottom sections to achieve the size you need.

Always measure your actual block before cutting the final border pieces.

How to Sew a Cat Quilt Block Without an AccuQuilt – How to Sew a Cat Quilt Block

You don’t need an AccuQuilt GO! to complete this project.

If you don’t have a fabric die-cutting system, you can cut your fabric pieces using a rotary cutter, ruler, and cutting mat.

The most important thing is accuracy.

Measure your pieces carefully and make sure your half square triangles finish at the correct size.

A quarter-inch seam allowance will also help ensure that the finished pieces fit together properly.

This makes How to Sew a Cat Quilt Block accessible whether you use specialty quilting equipment or traditional quilting tools.

Creative Ways to Use Your Cat Quilt Block – How to Sew a Cat Quilt Block

One of the things I love about quilt blocks is that they don’t always have to become part of a traditional quilt.

Your finished cat block could be used to make:

  • A wall hanging
  • A cushion cover
  • A table topper
  • A tote bag
  • A decorative pillow
  • A baby quilt
  • A cat-themed quilt
  • A sewing room decoration
  • A quilted wall art piece

You could even make several cat blocks using different colours and fabrics.

Try creating a collection of cats with different facial colours or backgrounds.

Tips for Making Your Cat Quilt Block

Tips for Making Your Cat Quilt Block

Use High-Contrast Fabrics

Choose fabrics that contrast strongly enough for the cat’s face to stand out.

Measure Carefully

Accurate cutting is one of the most important parts of successful quilt piecing.

Maintain a Quarter-Inch Seam

Use a quarter-inch presser foot or a clearly marked seam guide to help keep your seams consistent.

Press as You Go

Don’t wait until the entire block is finished before pressing.

Pressing after each section helps keep the block flat and makes the next steps easier.

Check Your Layout

Always lay out the complete block before sewing the sections together.

This gives you a chance to catch a misplaced piece before it’s stitched into the block.

Frequently Asked Questions – How to Sew a Cat Quilt Block

Can Beginners Make This Cat Quilt Block?

Yes. This is a great project for beginners who are learning basic quilt piecing techniques.

The block uses simple shapes, half square triangles, straight seams, and a quarter-inch seam allowance.

Do I Need an AccuQuilt?

No. An AccuQuilt GO! can make cutting faster, but you can cut your fabric using traditional quilting tools.

What Size Are the Half Square Triangles?

The half square triangles used in this tutorial are 3 ยฝ inches finished.

Can I Make the Cat Block Larger?

Yes. You can adapt the design by changing the size of the individual components.

However, remember that changing the measurements will also change the finished size of the block.

Final Thoughts – How to Sew a Cat Quilt Block

I hope you enjoyed learning How to Sew a Cat Quilt Block.

This cute cat design is a fun way to practise half square triangles, accurate quarter-inch seams, chain piecing, pressing, and quilt block assembly.

You can keep your finished block as a small piece of quilted wall art, add a border to create a larger decorative block, or incorporate several cat blocks into a larger quilt.

Don’t be afraid to experiment with different fabric colours and patterns. A high-contrast combination can make the cat design really stand out, while softer fabrics can create a completely different look.

The great thing about quilting is that there isn’t just one way to use a finished block. Once you’ve learned How to Sew a Cat Quilt Block, you can turn your finished design into a quilt, cushion, wall hanging, bag, or another creative sewing project.

If you enjoyed this tutorial, be sure to subscribe to Faodail Creation on YouTube. I have hundreds of sewing, quilting, and machine embroidery tutorials to help you learn new techniques and create beautiful projects.

Happy sewing!

Read this next : How to Sew a Crumb Quilt Block : The Ultimate Beginner-Friendly Guide https://faodailcreation.ca/2026/07/13/how-to-sew-a-crumb-quilt-block/

How to sew quilt Blocks

How to Sew a Crumb Quilt Block | How to sew quilt Blocks

This is the full link for the you tube tutorial How to Sew a Crumb Quilt Block https://youtu.be/7MWRcN80sFQ

Cassie Cartmell – Foadail Creation

Table of Contents

How to Sew a Crumb Quilt Block : The Ultimate Beginner-Friendly Guide

If you’ve ever wondered what to do with all those tiny fabric scraps left over from previous sewing and quilting projects, learning How to Sew a Crumb Quilt Block is one of the easiest and most satisfying solutions. Instead of throwing away those small pieces of fabric, you can transform them into a beautiful, colourful quilt block that is completely unique.

Crumb quilting is a wonderful way to reduce fabric waste while creating eye-catching designs. Every block is different, making each finished quilt a true one-of-a-kind creation. Whether you’re a beginner or an experienced quilter, this technique is relaxing, creative, and perfect for using even the smallest scraps.

In this tutorial, I’ll show you how I create a simple crumb quilt block using straight seams, a few basic quilting tools, and my Baby Lock Soprano sewing machine. You’ll also learn why fabric contrast matters, how to square up your block, and how to turn a small crumb block into a larger quilt block.


Why Make a Crumb Quilt?

Why Make a Crumb Quilt

One of the biggest advantages of making a crumb quilt is that almost nothing goes to waste. Those tiny leftovers from previous projects can become the star of your next quilt.

A crumb quilt is made by sewing together small pieces of scrap fabric until they form a larger piece of fabric. Unlike traditional quilt blocks that require precise measurements, crumb quilting encourages creativity and freedom.

Benefits include:

  • Reducing fabric waste
  • Saving money on quilting supplies
  • Creating completely unique quilt blocks
  • Practising accurate quarter-inch seams
  • A relaxing, low-pressure quilting project

No two crumb quilt blocks will ever look exactly the same, which is part of their charm.


Supplies You’ll Need – How to Sew a Crumb Quilt Block

Supplies You'll Need - How to Sew a Crumb Quilt Block

Before learning How to Sew a Crumb Quilt Block, gather a few basic quilting supplies.

Fabric Scraps – How to Sew a Crumb Quilt Block

Collect a variety of cotton quilting fabrics in different colours and prints. Large scraps work well, but don’t overlook the tiny pieces either. Some of the smallest scraps often create the most interesting designs.

Rotary Cutter and Quilting Ruler – How to Sew a Crumb Quilt Block

A rotary cutter and acrylic quilting ruler make trimming and squaring your block much easier. Accurate trimming helps your finished block fit together perfectly with the rest of your quilt.

Sewing Machine – How to Sew a Crumb Quilt Block

I use my Baby Lock Soprano sewing machine for this project because it offers features that make quilting enjoyable, including automatic needle threading, the Pivot function, and the quarter-inch quilting foot.

Thread – How to Sew a Crumb Quilt Block

A neutral polyester thread works well for crumb quilting because it blends nicely with many different fabric colours.

Iron or Pressing Mat – How to Sew a Crumb Quilt Block

Pressing each seam helps your block stay flat and makes adding new fabric pieces much easier.


Choosing Fabric for Your Crumb Quilt Block

Choosing Fabric for Your Crumb Quilt Block

The fun begins with selecting your fabric scraps.

One of my favourite tips is to mix light and dark values together. Even if two fabrics are the same colour, using one lighter and one darker creates much more visual interest.

For example:

  • Light orange with dark orange
  • Pale blue with navy
  • Bright pink with burgundy

High contrast helps each scrap stand out and gives your finished block much more depth.

Don’t worry about matching prints perfectly. Crumb quilting is designed to look spontaneous and playful.


Start Sewing Your First Scraps Together – How to Sew a Crumb Quilt Block

Start Sewing Your First Scraps Together - How to Sew a Crumb Quilt Block

Begin by selecting two scraps with a reasonably straight edge.

Place the fabrics right sides together and sew a straight seam using a quarter-inch seam allowance.

Accuracy is more important than speed. Keeping your seams straight makes it much easier to continue building your block.

Once sewn, press the seam open or to one side using your preferred method.

At this stage, your block may not look like much, but every seam gradually builds toward the finished design.


Trim to Create Another Straight Edge – How to Sew a Crumb Quilt Block

After pressing, examine your new fabric unit.

If one piece is much larger than the other, trim away part of the excess to create another straight edge.

This trimmed edge becomes the perfect place to attach your next fabric scrap.

Remember, crumb quilting doesn’t require perfect measurements.

The only goal is to continue creating straight sewing edges as you build the block.

Each new seam adds another interesting shape to your design.


Continue Building Your Crumb Quilt Block – How to Sew a Crumb Quilt Block

Continue Building Your Crumb Quilt Block - How to Sew a Crumb Quilt Block

Repeat the process over and over:

  • Find a straight edge.
  • Place another scrap right sides together.
  • Sew a straight seam.
  • Press the seam flat.
  • Trim if necessary.

As your block grows, you’ll notice the random shapes creating an interesting mosaic of fabrics.

Don’t overthink the layout.

One of the best parts of crumb quilting is allowing the design to develop naturally instead of trying to control every detail.

The finished block often looks much better when it grows organically.


Don’t Throw Away Every Offcut

As you trim your block, you’ll create even more small fabric pieces.

Instead of throwing them away, place them in a separate pile.

Many of these offcuts can be added back into your block later or saved for another crumb quilting project.

It’s a wonderful way to make the most of every piece of fabric in your sewing room.


Square Up Your Crumb Quilt Block

Square Up Your Crumb Quilt Block

Once your sewn scraps are large enough, it’s time to square the block.

Using your quilting ruler, trim all four sides until your crumb section measures 4 inches square.

Take your time during this step.

A neatly squared block makes assembling larger quilt blocks much easier later.

The ruler should line up perfectly on all four sides before making each cut.

A sharp rotary cutter will help produce clean, accurate edges.

Add Background Fabric to Complete the Block – How to Sew a Crumb Quilt Block

After you’ve finished trimming your 4-inch crumb block, it’s time to turn it into a larger quilt block. This is where the design really starts to shine.

Choose a background fabric that contrasts nicely with your colourful crumb block. A solid fabric works especially well because it allows the centre design to become the focal point.

Before sewing, remove the selvage edge from your fabric. The selvage is the tightly woven edge created during the fabric manufacturing process, and it isn’t suitable for quilt blocks because it can affect the finished size and texture.

Measure Your Background Pieces

For this project, the goal is to create a 10-inch unfinished quilt block.

Your 4-inch crumb block will sit in the centre, with background strips added around it until the finished block reaches the correct size.

Remember that every seam uses a quarter-inch seam allowance, so always account for this when measuring your background pieces.

Take your time with the calculations, and measure twice before cutting.

Sew the Side Strips First

Start by sewing one background strip to the right-hand side of the crumb block.

Place the fabrics right sides together and stitch using a quarter-inch seam allowance.

Once sewn, press the seam flat. Pressing after every seam helps keep the block accurate and prevents bulky seams from building up.

Repeat this process for the opposite side.

After adding both side strips, your block will already begin to look balanced, with the colourful centre framed by the background fabric.

Finish with the Top and Bottom Strips

Next, sew the remaining background strips to the top and bottom of the block.

Again, use a consistent quarter-inch seam allowance and press each seam after stitching.

As you add each strip, check that your block remains square. Small inaccuracies can become larger problems later when joining multiple quilt blocks together.

Once all four background pieces have been attached, trim the completed block so it measures exactly 10 inches square.

Tips for Better Crumb Quilt Blocks - How to Sew a Crumb Quilt Block

Tips for Better Crumb Quilt Blocks – How to Sew a Crumb Quilt Block

One of the reasons quilters love learning How to Sew a Crumb Quilt Block is that there are very few strict rules. However, a few simple tips can make your finished block look even better.

Use High-Contrast Fabrics

Combining light and dark fabrics creates visual interest.

Even two shades of the same colour can produce a striking effect when placed beside each other. Contrast helps individual fabric pieces stand out instead of blending together.

Keep the Pieces Small

Because the centre crumb block measures only 4 inches, smaller scraps generally create a more detailed and interesting design.

Large pieces can overpower the block and reduce the “crumb” effect.

Don’t be afraid to use tiny leftover pieces that might otherwise end up in the scrap bin.

Press Often

Pressing after each seam may seem like an extra step, but it makes a huge difference.

A flat block is easier to trim accurately, easier to sew, and produces much better-looking results.

Whether you prefer using an iron, a mini iron, or finger pressing, consistency is key.

Let the Design Grow Naturally

Many beginners worry about making every scrap fit perfectly.

The beauty of crumb quilting is that perfection isn’t the goal.

Instead of planning every fabric placement, allow the block to develop naturally as you add pieces. The random arrangement often creates the most attractive finished design.

Why Every Crumb Quilt Block Is Unique – How to Sew a Crumb Quilt Block

Why Every Crumb Quilt Block Is Unique - How to Sew a Crumb Quilt Block

One of my favourite things about crumb quilting is that no two blocks are ever the same.

Even if you start with identical fabric scraps, you’ll sew them together differently, trim different edges, and make different design choices along the way.

That’s what makes crumb quilts so much fun.

Each finished block reflects your creativity, your fabric collection, and your personal quilting style.

It’s also an excellent way to preserve memories. Small scraps left over from previous quilts, gifts, baby blankets, or special projects can all become part of a new quilt with its own story.

Common Mistakes to Avoid – How to Sew a Crumb Quilt Block

If you’re learning How to Sew a Crumb Quilt Block for the first time, here are a few common mistakes to watch for.

Forgetting to Create Straight Edges

After every seam, look for your next straight edge before adding another fabric piece.

Straight sewing lines make construction much easier and keep your block growing evenly.

Using Fabrics That Are Too Similar

If every fabric is the same shade or value, your crumb block can look flat.

Mix lights, mediums, and darks to create more depth and interest.

Not Squaring Up the Block

Always square your crumb section before adding the background fabric.

This simple step makes assembling larger quilts much easier and produces more professional-looking results.

Skipping the Pressing

Skipping the iron might save a few minutes now, but it often creates problems later.

Pressed seams make trimming more accurate and help the quilt block lie flat.

Creative Ways to Use Crumb Quilt Blocks – How to Sew a Crumb Quilt Block

Once you’ve mastered this technique, you’ll quickly discover how versatile crumb quilt blocks can be.

Try using them to create:

  • Full-size quilts
  • Baby quilts
  • Table runners
  • Cushion covers
  • Tote bags
  • Zipper pouches
  • Wall hangings
  • Mug rugs
  • Mini quilts
  • Sewing machine mats

These projects are a fantastic way to use up your fabric stash while creating something both practical and beautiful.

Frequently Asked Questions About Crumb Quilting – How to Sew a Crumb Quilt Block

Frequently Asked Questions About Crumb Quilting - How to Sew a Crumb Quilt Block

Is crumb quilting suitable for beginners?

Absolutely! One of the best things about learning How to Sew a Crumb Quilt Block is that it doesn’t require perfect cutting or complicated piecing. If you can sew a straight seam, you can make a crumb quilt block.

What size should my fabric scraps be?

There isn’t a minimum or maximum size. Tiny scraps, odd-shaped leftovers, and larger offcuts can all be incorporated into your design. Just remember that smaller pieces usually create a more detailed-looking crumb block.

Do I have to use matching fabrics?

Not at all. In fact, crumb quilting is the perfect opportunity to mix different prints, colours, and fabric collections. Combining a variety of fabrics gives each block its own personality.

Why should I use contrasting colours?

Using light, medium, and dark fabrics creates depth and makes the individual scraps stand out. High contrast gives your finished block a much more vibrant appearance than using fabrics that are all a similar shade.

Can I make larger crumb quilt blocks?

Yes. Once you understand How to Sew a Crumb Quilt Block, you can easily adjust the finished size. Simply continue adding scraps until your crumb section reaches the dimensions you need before squaring it up.

Helpful Quilting Tips – How to Sew a Crumb Quilt Block

If you’re new to quilting, these simple habits will improve your results with almost every project.

Replace Your Rotary Cutter Blade Regularly – How to Sew a Crumb Quilt Block

A sharp blade makes cleaner cuts and is much safer than trying to force a dull blade through multiple layers of fabric.

Use a Quarter-Inch Quilting Foot – How to Sew a Crumb Quilt Block

A quarter-inch quilting foot helps maintain an accurate seam allowance throughout your project. Consistent seam allowances are one of the keys to well-fitting quilt blocks.

Keep Similar Scraps Together – How to Sew a Crumb Quilt Block

Sorting your scraps by colour or value makes it easier to build balanced crumb blocks. You’ll spend less time searching through your fabric pile and more time sewing.

Save Even the Smallest Pieces – How to Sew a Crumb Quilt Block

Many quilters are surprised by how useful tiny scraps can be. Pieces that seem too small for traditional patchwork often become perfect additions to a crumb quilt.

Why I Love Making Crumb Quilt Blocks – How to Sew a Crumb Quilt Block

One of the reasons I return to crumb quilting again and again is that it’s both creative and relaxing. There isn’t any pressure to follow an exact pattern, and every sewing session produces something completely unique.

It’s also incredibly satisfying to turn a pile of fabric scraps into a beautiful quilt block that would never have existed otherwise. Instead of throwing away leftovers, you’re giving them a second life in a colourful and meaningful project.

Whether you’re trying to reduce fabric waste, practise your quilting skills, or simply enjoy a fun afternoon in your sewing room, crumb quilting is a technique that’s well worth learning.

Watch the Full Video Tutorial – How to Sew a Crumb Quilt Block

If you’d like to see every step demonstrated, be sure to watch my YouTube tutorial where I show you How to Sew a Crumb Quilt Block from start to finish. You’ll see exactly how I choose my scraps, sew the pieces together, square the block, and add the background fabric to create a finished 10-inch quilt block.

Watching the process can make it even easier to follow along, especially if you’re making your very first crumb quilt block.

Final Thoughts on How to Sew a Crumb Quilt Block – How to Sew a Crumb Quilt Block

Learning How to Sew a Crumb Quilt Block is a wonderful way to make the most of your fabric scraps while creating a quilt block that’s full of colour, texture, and personality. There are no complicated templates or strict layouts to follow just simple straight seams, a little creativity, and a willingness to let the design evolve naturally.

Every crumb quilt block tells its own story because no two will ever be exactly alike. That’s part of the magic of this quilting technique. Whether you’re making a single block for a small project or enough blocks for an entire quilt, you’ll be amazed at how quickly those leftover fabric scraps can be transformed into something beautiful.

I’d love to see what you create! If you have any questions about crumb quilting or this tutorial, leave a comment below. I’m always happy to help fellow quilters. And if you enjoyed this project, don’t forget to subscribe to the Faodail Creation YouTube channel for more sewing, quilting, embroidery, and beginner-friendly tutorials every week.

Happy quilting!

Read this next : Crumb Quilt Wall Art โ€“ Amazing Scrap Fabric Project Every Quilter Will Love https://faodailcreation.ca/2026/06/12/crumb-quilt-wall-art/

How to sew quilt Blocks

How to Piece Triangles for Quilting โ€“ Easy, Powerful & Beginner-Friendly Triangle Method

Cassie Cartmell – Faodail Creation

How to Piece Triangles for Quilting Step-by-Step Comparison Tutorial

How to Piece Triangles for Quilting โ€“ Easy, Powerful & Beginner-Friendly Triangle Method

How to piece triangles for quilting is one of the most essential skills in patchwork and modern quilting. It forms the foundation of countless quilt designs, from simple geometric blocks to complex layouts that rely on accuracy and repetition. Mastering how-to-piece-triangles-for-quilting can elevate your quilting projects significantly.

In this tutorial, we are focusing on how to piece triangles for quilting using two different cutting methods and comparing them side-by-side. The goal is to understand which method gives better accuracy, easier alignment, and more consistent results when sewing how-to-piece-triangles-for-quilting.

If you have ever struggled with mismatched seams, uneven points, or fabric slipping during sewing, this guide will help simplify the entire process and build your confidence step by step.

You will also learn how fabric choice and cutting accuracy directly affect the final outcome when working with how-to-piece-triangles-for-quilting. Small details like consistent seam allowance, careful alignment at corners, and pressing seams properly can make a big difference in your finished quilt blocks.

By understanding these basics, you will avoid common beginner mistakes and improve your precision with every project. This method also helps you develop better control at the sewing machine, making how-to-piece-triangles-for-quilting easier and more enjoyable as you gain experience and confidence over time.


How to Piece Triangles for Quilting Using Two Different Methods

How to Piece Triangles for Quilting Using Two Different Methods

In this project, how to piece triangles for quilting is demonstrated using two separate approaches: the traditional method and the ruler method. These techniques are essential for anyone looking to perfect their skills in how-to-piece-triangles-for-quilting.

The first method uses a triangle template that came from a quilting magazine. This template already includes seam allowance markings, which can make cutting quicker and more structured.

The second method uses a standard quilting ruler, specifically a 6-inch by 24-inch ruler, which allows you to create 60-degree angles manually. This method produces equilateral triangles without relying on pre-made templates.

Both methods aim to achieve the same outcome, but the experience and final accuracy can differ significantly.

The purpose of this comparison is to help you decide which approach works best for your own quilting style when learning how to piece triangles for quilting.


Why Fabric Choice Matters in How to Piece Triangles for Quilting

Why Fabric Choice Matters in How to Piece Triangles for Quilting

When learning how to piece triangles for quilting, fabric selection plays a major role in visibility and accuracy.

High contrast fabrics are extremely important because they allow you to clearly see where seams meet and how points align. Without contrast, it becomes difficult to judge whether your triangles are matching correctly.

Some effective combinations include:

  • Dark fabric paired with light fabric
  • Black and white combinations
  • Soft pastel paired with bold prints
  • Pale yellow combined with stronger yellow tones

Using high contrast fabrics makes how to piece triangles much easier, especially for beginners who are still learning how seams behave during stitching.

It also helps you quickly identify mistakes before pressing, which saves time and reduces frustration later in the process.


How to Piece Triangles Using a Magazine Template

How to Piece Triangles for Quilting Using a Magazine Template

The first method of how to piece triangles for quilting uses a pre-made triangle template included in a quilting magazine.

This template is designed with built-in seam allowance, which means you do not need to manually calculate extra fabric when cutting. It provides a guided shape that can be helpful for beginners who are still getting comfortable with triangle geometry.

The template also includes marked edges that help guide your cutting and alignment, making the process more structured.


Cutting and Preparing Fabric With the Template

To begin how to piece triangles for quilting using this method:

First, place your fabric flat on a cutting mat. Lay the template on top and ensure it is aligned properly with the grain of the fabric.

Next, cut around the template carefully, making sure all edges are smooth and accurate. Once cut, you will have triangle pieces that already include seam allowance.

After cutting, pair your fabrics right sides together. This is important in how to piece triangles for quilting because it ensures the correct side of the fabric is facing outward after sewing.


Sewing the Template Method

How to Piece Triangles for Quilting

Once your pieces are prepared, the next step in how to piece triangles for quilting is sewing.

Use a straight stitch set to approximately 2.5mm length. A quarter-inch seam allowance is essential for consistency.

Carefully guide your fabric through the sewing machine, ensuring edges remain aligned. A quarter-inch foot or guide is extremely helpful here because it keeps your seam consistent without guessing.

After sewing, press the seam open or to one side depending on your quilting preference.


How to Piece Triangles for Quilting – Pros of the Template Method

How to Piece Triangles for Quilting - Pros of the Template Method

The template method of how to piece triangles for quilting has several advantages:

It is beginner-friendly and easy to follow. Since seam allowance is included, there is less calculation involved. It also speeds up the cutting process because the shape is already defined.

This method can be helpful for quick projects or when you are following a pre-designed pattern.

Another advantage of the template method in how to piece triangles for quilting is that it provides consistency when cutting multiple pieces, especially for smaller projects or practice blocks. It reduces the need for advanced measuring skills, making it ideal for beginners who are still building confidence.

The clear outline of the template also helps reduce cutting errors and improves workflow speed. For quilters who prefer guided structure rather than freehand measuring, this method of how to piece triangles for quilting can feel more controlled and less intimidating, especially when working with repetitive shapes.


Cons of the Template Method – How to Piece Triangles for Quilting

Cons of the Template Method - How to Piece Triangles for Quilting

However, there are also some drawbacks when using this version of how to piece triangles.

The alignment can sometimes feel confusing because the edges do not always match visually in a clear straight line. This can lead to slight inconsistencies when joining multiple pieces.

It is also less flexible, meaning you are limited to the shape provided by the template rather than adjusting measurements yourself.


How to Piece Triangles for Quilting Using a 60-Degree Ruler

The second method of how to piece triangles for quilting uses a standard quilting ruler with a 60-degree angle.

This method creates perfect equilateral triangles, meaning all sides are equal in length. This is especially useful in modern quilting designs where precision is important.

Unlike templates, this method gives you full control over sizing and layout.


How to Piece Triangles for Quilting – Cutting Fabric With a Quilting Ruler

How to Piece Triangles for Quilting - Cutting Fabric With a Quilting Ruler

To begin how to piece triangles for quilting using this method:

Use your 6-inch by 24-inch ruler and align it at a 60-degree angle on your fabric. Cut carefully to ensure straight, clean edges.

Repeat this process to create multiple identical triangle shapes.

One important detail is that this method does not include seam allowance automatically, so you must account for that when cutting.


Sewing the Ruler Method – How to Piece Triangles for Quilting

Sewing the Ruler Method - How to Piece Triangles for Quilting

Once your triangles are cut, continue how to piece triangles by pairing fabric pieces right sides together.

Align one corner carefully before sewing. It is important to match at least one point accurately before stitching.

Sew using a quarter-inch seam allowance and maintain steady pressure while guiding the fabric.

After sewing each piece, press the seam and continue building rows.

Dog ears (small overhanging fabric edges) will naturally form and can be trimmed later for a cleaner finish.


How to Piece Triangles for Quilting – Pros of the Ruler Method

How to Piece Triangles for Quilting - Pros of the Ruler Method

The ruler method of how to piece triangles for quilting offers several strong advantages.

It produces more accurate and consistent triangle shapes. It also makes alignment easier when joining multiple rows because edges are more predictable.

This method is generally preferred for larger quilting projects due to its precision and flexibility.


Cons of the Ruler Method – How to Piece Triangles for Quilting

There are a few challenges when using this approach for how to piece triangles.

It requires more attention to detail during cutting. Beginners may also find it slightly harder at first because seam allowance must be considered separately.

However, once mastered, it becomes one of the most reliable quilting techniques.


How to Piece Triangles for Quilting at the Sewing Machine

How to Piece Triangles for Quilting at the Sewing Machine

Once your fabric pieces are prepared, the sewing stage begins.

This part of how to piece triangles for quilting is where accuracy really matters.

Use a quarter-inch seam foot to maintain consistent spacing. Keep your stitch length around 2.5mm for balanced strength and flexibility.

Place fabric right sides together and align corners carefully before stitching.

Take your time during this step. Speed is not as important as accuracy when learning how to piece triangles for quilting.


How to Piece Triangles for Quilting and Building Rows

How to Piece Triangles for Quilting and Building Rows

As you continue, how to piece triangles for quilting becomes about joining multiple units into rows.

Each new triangle must align with the previous piece to maintain a straight, consistent row.

Dog ears will appear as you sew, especially in the ruler method. These should be trimmed after stitching to reduce bulk and improve accuracy.

Pressing each seam as you go is important because it helps keep your quilt flat and easier to manage.

When building rows in how to piece triangles, it is also helpful to constantly check alignment before sewing the next piece. Taking a moment to lay your triangles out in order ensures your design stays consistent and prevents mistakes from compounding across the row.

Small adjustments made early can save a lot of time later. Keeping a steady seam allowance throughout is also key to achieving sharp points and clean intersections. This step in how to piece triangles for quilting is where accuracy really shows, so slow and steady sewing will always produce better results than rushing through the process.


Template vs Ruler โ€“ Which is Better for How to Piece Triangles for Quilting?

Template vs Ruler โ€“ Which is Better for How to Piece Triangles for Quilting?

After comparing both methods of how to piece triangles for quilting, clear differences become visible.

The template method is easier to start with and works well for beginners, but it can feel less precise when assembling larger blocks.

The ruler method requires more initial skill but delivers better accuracy and consistency, especially for full quilt projects.

Overall, the ruler method is more reliable for long-term quilting success.


Final Thoughts on How to Piece Triangles for Quilting

Final Thoughts on How to Piece Triangles for Quilting

Learning how to piece triangles for quilting opens the door to many creative sewing projects.

From quilt blocks to cushion covers and wall hangings, triangle piecing is a fundamental skill that improves with practice.

The most important takeaway is consistency. Whether you use a template or a ruler, the key to success in how to piece triangles for quilting is accurate cutting, careful alignment, and consistent seam allowance.

With practice, this technique becomes second nature and greatly improves the quality of your finished quilts.

It is also important to remember that mistakes are part of the learning process when mastering how to piece triangles for quilting. Each project helps you understand fabric behaviour, improve your precision, and build confidence at the sewing machine.

Over time, your speed and accuracy will naturally improve, allowing you to create more complex and visually striking quilt designs with ease.


You should read this next : Baby Lock Mid Arm Unboxing โ€“ Powerful Tiara 3 Quilting Machine Review for Quilters https://faodailcreation.ca/2026/06/16/baby-lock-mid-arm/

How to sew quilt Blocks

Quarter Square Triangle Quilt Block | How to sew quilt Blocks

Cassie Cartmell – Faodail Creation

This is the full you tube tutorial : https://youtu.be/-CrcSSu7NvQ

Quarter Square Triangle Quilt Block - Easy & Amazing Beginner Quilting Tutorial

The Quarter Square Triangle Block is one of the most useful and beautiful quilt blocks you can learn as a quilter. Even though it may look complicated at first glance, this classic quilting block is actually very beginner-friendly once you understand the process. In this tutorial, you will learn how to make a Quarter Square Triangle Quilt Block step by step using simple sewing and cutting techniques.

If you have already learned how to make a half square triangle, then you are already halfway to creating a Quarter Square Triangle Quilt Block. This quilting technique is perfect for beginners who want to improve their quilting skills while creating beautiful quilt patterns with sharp points and professional-looking results.

The best part about making a Quarter Square Triangle Quilt Block is that you can create two blocks at the same time. This saves fabric, saves time, and helps you build your quilt blocks quickly and efficiently.

Whether you are making a quilt, wall hanging, table runner, cushion cover, or another sewing project, the Quarter Square Triangle Quilt Block adds movement, contrast, and visual interest to your quilting designs.

Another reason quilters love the Quarter Square Triangle Quilt Block is because it works beautifully with many different fabric styles and color combinations. You can create bold modern quilt layouts, soft traditional quilt patterns, or fun scrappy quilting projects using this versatile quilt block.

The Quarter Square Triangle Quilt Block is also an excellent way to practice accurate piecing and improve your sewing confidence. As you continue making more Quarter Square Triangle Quilt Block units, you will quickly notice your quilting skills becoming more precise, helping all your future quilting projects look cleaner and more professional.


Why Quilters Love the Quarter Square Triangle Quilt Block

Why Quilters Love the Quarter Square Triangle Quilt Block

The Quarter Square Triangle Quilt Block Is Versatile

One reason quilters love the Quarter Square Triangle Quilt Block is because it works beautifully in many different quilt designs. You can create modern quilts, traditional quilts, scrap quilts, and even seasonal projects using this versatile block.

The Quarter Square Triangle Quilt Block also works well with many fabric combinations. You can use:

  • Solid fabrics
  • Floral fabrics
  • Modern prints
  • Scrappy fabrics
  • Holiday-themed fabrics
  • High-contrast fabrics

Because of its geometric shape, the Quarter Square Triangle Quilt Block creates stunning visual movement inside a quilt.


Quarter Square Triangle Quilt Block Is Great for Beginners

Quarter Square Triangle Quilt Block Is Great for Beginners

Many beginner quilters think the Quarter Square Triangle Block looks difficult, but it is actually easier than expected. Once you learn the marking and sewing method, the process becomes very simple.

This quilting block teaches important quilting skills including:

Accurate cutting

Precise cutting helps your Quarter Square Triangle Quilt Block line up properly.

Sewing consistent seams

Using a quarter-inch seam allowance is extremely important in quilting.

Pressing techniques

Pressing your seams correctly helps reduce bulk and improves accuracy.

Trimming quilt blocks

Removing dog ears and trimming your block keeps everything neat and square.

Learning the Quarter Square Triangle Quilt Block is a fantastic way to build confidence in quilting.


Supplies Needed for a Quarter Square Triangle Quilt Block

Supplies Needed for a Quarter Square Triangle Quilt Block

Basic Quilting Supplies

Before starting your Quarter Square Triangle Block, gather the following quilting supplies.

Fabric Squares

You will need:

  • One half square triangle
  • One plain fabric square

Both squares must be exactly the same size.

Rotary Cutter

A rotary cutter helps create clean and accurate cuts.

Quilting Ruler

A quilting ruler is essential for measuring quarter-inch markings accurately.

Fabric Marker or Pen

You will use this to draw sewing lines for your Quarter Square Triangle Block.

Sewing Machine

A sewing machine with a straight stitch works perfectly for this project.

90/14 Needle

Using a 90/14 needle helps sew through quilting cotton smoothly.


How to Make a Quarter Square Triangle Quilt Block

Step 1: Prepare Your Squares

To begin your Quarter Square Triangle Block, place your half square triangle and plain fabric square right sides together.

If one of your fabrics does not have a right or wrong side, simply align the fabrics evenly.

Accuracy is very important when making a Quarter Square Triangle Block, so make sure all edges line up neatly before marking your lines.


Step 2: Mark the Center Line

Mark the Center Line - Quarter Square Triangle Quilt Block

Using your ruler and fabric marker, draw a line directly down the center of the block diagonally.

This center line is the cutting line for your Quarter Square Triangle Block.

Take your time during this step because accurate markings will improve your final results.

Careful marking helps your sewing lines stay perfectly even and keeps your Quarter Square Triangle Quilt Block accurate after cutting and pressing. If the center line is crooked, your finished quilt block may become uneven or lose its sharp points.

Always double-check your ruler placement before drawing the lines to achieve the best quilting results possible.


Step 3: Draw Quarter-Inch Sewing Lines

Draw Quarter-Inch Sewing Lines - Quarter Square Triangle Quilt Block

Now place your ruler so the center line aligns with the quarter-inch marking on your ruler.

Draw a line a quarter inch away from the center line.

Repeat on the opposite side.

You should now have:

  • One center line
  • Two sewing lines

The two outer lines are where you will sew your Quarter Square Triangle Block.


Sewing the Quarter Square Triangle Quilt Block

Step 4: Sew Along Both Outer Lines

Sewing the Quarter Square Triangle Quilt Block

Take your fabric to the sewing machine.

Sew directly on the two outer lines while leaving the center line untouched.

For this Quarter Square Triangle Block, reducing your stitch length slightly can help improve seam strength and accuracy.

A stitch length around 2.0 works beautifully.

As you sew, keep your seams consistent and steady.


Step 5: Double Check Fabric Placement

Before cutting your Quarter Square Triangle Block, pull the fabrics back slightly to make sure the fabric placement looks correct.

You should see:

  • Two quarter sections
  • One half square triangle section

This quick check helps prevent mistakes before cutting.


Cutting the Quarter Square Triangle Quilt Block

Cutting the Quarter Square Triangle Quilt Block

Step 6: Cut Down the Center

Now comes the exciting part.

Using your rotary cutter, carefully cut directly down the center line.

As soon as you separate the fabric, you will discover that you have created TWO beautiful Quarter Square Triangle Quilt Block units instead of one.

This quilting method is efficient and beginner-friendly.


Step 7: Remove Dog Ears

The small fabric points sticking out from the corners are called dog ears.

Trim these away carefully using your rotary cutter or scissors.

Removing dog ears gives your Quarter Square Triangle Block a clean and polished appearance.


Finished Size of the Quarter Square Triangle Quilt Block

Quarter Square Triangle Quilt Block

Final Measurements

After trimming and pressing, the finished Quarter Square Triangle Block measures approximately four inches square.

Always measure your quilt block after sewing to ensure accuracy.

If needed, trim the edges slightly so your block remains perfectly square.

Accurate blocks make quilt assembly much easier later.


Tips for Perfect Quarter Square Triangle Quilt Blocks

Use Accurate Quarter-Inch Seams

One of the most important quilting skills is sewing accurate quarter-inch seams.

Even small seam differences can affect the final size of your Quarter Square Triangle Block.

A quilting foot or seam guide can help improve consistency.


Press Carefully

Pressing your seams correctly makes a huge difference.

Avoid stretching the fabric while pressing your Quarter Square Triangle Block.

Lift and press instead of dragging the iron across the fabric.


Use Sharp Rotary Blades

Sharp blades produce cleaner cuts and more accurate quilt blocks.

A dull blade may cause uneven edges or fabric shifting.


Square Up Your Blocks

Before adding your Quarter Square Triangle Block into a quilt, trim and square up the block carefully.

This step helps all your quilt blocks fit together neatly.


Creative Ways to Use a Quarter Square Triangle Quilt Block

Quarter Square Triangle Quilt Block

Quilts

The Quarter Square Triangle Block creates beautiful movement in quilt layouts.


Table Runners

Add several blocks together to create stunning table runners.


Cushion Covers

A Quarter Square Triangle Block looks beautiful on decorative cushions.


Wall Hangings

Mix colorful fabrics to create eye-catching quilted wall decor.


Baby Quilts

Soft pastel fabrics work beautifully in a Quarter Square Triangle Quilt Block baby quilt.


Common Mistakes When Making a Quarter Square Triangle Quilt Block

Uneven Cutting

Always double-check measurements before cutting fabric.


Sewing on the Wrong Line

Remember to sew only on the outer lines, not the center line.


Skipping Pressing

Pressing is essential for a professional-looking Quarter Square Triangle Block.


Not Trimming Dog Ears

Removing dog ears keeps your quilt blocks neat and accurate.


Why You Should Practice the Quarter Square Triangle Quilt Block

The Quarter Square Triangle Block is an essential quilting technique that helps build quilting confidence and accuracy.

Once you learn this block, you can create countless quilt designs and combinations.

Practicing the Quarter Square Triangle Quilt Block improves:

  • Precision sewing
  • Fabric handling
  • Quilt block assembly
  • Rotary cutting skills
  • Quilting confidence

The more you practice, the easier quilting becomes.


Final Thoughts on the Quarter Square Triangle Quilt Block

Final Thoughts on the Quarter Square Triangle Quilt Block

Learning how to make a Quarter Square Triangle Block is a fantastic quilting skill for beginners and experienced quilters alike. Even though the block may appear advanced, the process is simple once broken down into manageable steps.

By combining a half square triangle with a plain square, marking sewing lines, stitching carefully, and cutting down the center, you can quickly create beautiful quilt blocks with sharp points and clean finishes.

The Quarter Square Triangle Quilt Block is perfect for quilts, home decor projects, table runners, baby quilts, and so much more. It is versatile, timeless, and fun to sew.

With practice, your Quarter Square Triangle Block units will become more accurate and polished every time you sew.

If you enjoyed learning this quilting technique, be sure to explore more beginner quilting tutorials and practice new quilt blocks regularly.

Happy quilting!


FAQ About the Quarter Square Triangle Quilt Block

What is a Quarter Square Triangle Quilt Block?

A Quarter Square Triangle Quilt Block is a quilt block made using four triangle sections arranged into a square.


Is the Quarter Square Triangle Quilt Block Beginner Friendly?

Yes. The Quarter Square Triangle Block is beginner-friendly once you understand the marking and sewing process.


What Size Needle Should I Use?

A 90/14 needle works very well for quilting cotton fabrics.


Why Are My Quilt Blocks Too Small?

This usually happens because of inaccurate seam allowances or fabric stretching.


What Are Dog Ears in Quilting?

Dog ears are the small fabric points sticking out after sewing triangle units together.

You will like this post next Mini Quilt Block Tutorial for Beginners https://faodailcreation.ca/2026/05/29/mini-quilt-block-tutorial/

How to sew quilt Blocks

How to Sew a Hexagon Quilt | How to sew quilt Blocks

This is the Link to the you tube tutorial : https://youtu.be/pOA8ViIHgWk

Cassie Cartmell – Faodail Creation

How to Sew a Hexagon Quilt - Powerful Beginner-Friendly Tips for Beautiful Results

How to Sew a Hexagon Quilt

Learning How to Sew a Hexagon Quilt is a fun and creative way to improve your quilting skills while creating a beautiful project you can treasure for years. Hexagon quilts have become incredibly popular because they create a stunning honeycomb-style pattern that looks impressive while still being beginner friendly.

If you have ever wondered How to Sew a Hexagon Quilt, this tutorial will walk you through the entire process step by step. From aligning your hexagons to sewing accurate seams and avoiding puckers, you will learn everything you need to confidently create your own hexagon quilt rows.

This quilting tutorial is based on a simple sewing method that helps you join hexagons neatly and accurately using your sewing machine. Whether you are a beginner quilter or someone looking for a new quilting technique, this guide will help you feel more comfortable sewing hexagons together.

One of the best things about learning How to Sew a Hexagon Quilt is that the design possibilities are endless. You can mix bright fabrics, use scraps from previous projects, or create a coordinated quilt using your favorite colors.


Why Quilters Love Learning How to Sew a Hexagon Quilt

Why Quilters Love Learning How to Sew a Hexagon Quilt

There are many reasons why quilters enjoy making hexagon quilts.

Hexagons create movement and texture in a quilt design. Unlike traditional square quilt blocks, hexagons fit together in a unique honeycomb pattern that instantly adds visual interest.

Another reason people enjoy learning How to Sew a Hexagon Quilt is because the shapes can easily be combined into rows, flowers, stars, and larger quilt layouts. You can create modern quilts, traditional quilts, or even scrappy quilts using the same basic sewing method.

Hexagon quilting is also a wonderful way to practice precision sewing. Because the shapes must line up carefully, this type of project helps improve accuracy and sewing confidence.

If you are new to quilting, donโ€™t worry. Once you understand the basic sewing order and seam placement, learning How to Sew a Hexagon Quilt becomes much easier than it first appears.


Supplies Needed for How to Sew a Hexagon Quilt

Before you begin sewing your hexagon quilt, gather the following supplies:

Fabric

Choose quilting cotton fabrics that coordinate well together. You can use:

  • Scrap fabrics
  • Fat quarters
  • Jelly roll leftovers
  • Coordinated fabric collections

Bright fabrics often make hexagon quilts stand out beautifully.

Sewing Machine

A standard sewing machine works perfectly for this project. A machine with adjustable stitch length is especially helpful.

Thread

Use thread that blends with your fabric whenever possible. Contrasting thread can make stitches more visible.

Rotary Cutter and Ruler

Accurate cutting is very important when learning How to Sew a Hexagon Quilt because uneven pieces can create puckering later.

Fabric Marker

You will need to mark quarter-inch dots on every corner of your hexagons.


Preparing Your Hexagons Properly

Preparing Your Hexagons Properly - How to Sew a Hexagon Quilt

One of the most important parts of learning How to Sew a Hexagon Quilt is preparation.

Before sewing, each hexagon should already be cut out and marked correctly. Marking quarter-inch seam points on every corner helps guide your stitching and keeps the quilt flat.

These dots are extremely important because they tell you where to start and stop sewing.

Without these markings, your hexagons may not fit together correctly.

Why Quarter-Inch Dots Matter

The quarter-inch dots help create flexible seams where multiple hexagons join together.

When sewing hexagons:

  • Start sewing at the dot
  • Stop sewing at the next dot
  • Backstitch at both ends

This method allows the quilt pieces to pivot and align properly.

If you sew past the dots, the fabric may pucker or bunch.


Adjust Your Stitch Length Before Sewing

Another useful tip when learning How to Sew a Hexagon Quilt is adjusting your stitch length.

A slightly smaller stitch length helps:

  • Strengthen seams
  • Reduce visible stitching
  • Improve durability
  • Prevent gaps between hexagons

Smaller stitches also create a cleaner finish overall.

If your stitches are too large, they may show through the fabric and make the seams more noticeable.


How to Sew a Hexagon Quilt Step by Step

How to Sew a Hexagon Quilt Step by Step

Now letโ€™s begin sewing the hexagons together.

Step 1: Place Hexagons Right Sides Together

Take two hexagons and place them right sides together.

The marked dots should remain visible on the outside.

Carefully align the edges so the corners match neatly.

Step 2: Begin Sewing at the Dot

Start sewing exactly at the marked quarter-inch dot.

Take a few stitches forward.

Then reverse stitch to lock the seam into place.

Continue sewing slowly toward the next marked dot.

Step 3: Stop at the Second Dot

As you approach the next dot:

  • Slow down
  • Avoid sewing beyond the dot
  • Backstitch carefully
  • Cut the thread

This is one of the most important parts of learning How to Sew a Hexagon Quilt successfully.

Stopping accurately prevents seam tension problems later.

Step 4: Continue Building Your Row

Repeat the same process with additional hexagons until your row is complete.

Many quilters prefer sewing rows of five or more hexagons at a time.

Take your time and focus on accuracy rather than speed.


Do Not Press Your Hexagons Yet

Do Not Press Your Hexagons Yet - How to Sew a Hexagon Quilt

One of the biggest mistakes beginners make when learning How to Sew a Hexagon Quilt is pressing too early.

Avoid ironing your rows immediately after sewing.

Leaving the seams unpressed gives the fabric flexibility when joining multiple rows together.

This makes alignment much easier later.

Keeping the seams soft and movable also helps the hexagons nest together more naturally as you build additional rows. If the fabric is pressed too soon, the seams can become stiff and difficult to manipulate, which may lead to uneven points or puckering. Taking your time during this stage will help your quilt top lay flatter and look much more professional once everything is fully sewn together and finally pressed at the end of the project.


Joining Hexagon Rows Together

Once two rows are complete, it is time to join them together.

This part may feel tricky at first, but with practice it becomes much easier.

Interlock the Rows

Place the rows together so the hexagons interlock naturally.

One row will sit slightly offset from the other.

The corners should line up neatly.

Match Right Sides Together

Select the first pair of hexagons to join.

Place them right sides together while keeping the neighboring hexagons out of the way.

This step is very important when learning How to Sew a Hexagon Quilt because accidentally catching another hexagon in the seam can distort the quilt shape.

Sew Between the Dots

Sew from one dot to the next exactly as before.

Remember:

  • Backstitch at the beginning
  • Backstitch at the end
  • Do not sew beyond the dots

Repeat this process all the way down the row.


Common Mistakes When Learning How to Sew a Hexagon Quilt

Common Mistakes When Learning How to Sew a Hexagon Quilt

Every beginner makes mistakes while quilting.

Fortunately, most hexagon quilting problems are easy to fix.

As you continue practicing How to Sew a Hexagon Quilt, you will quickly become more confident with seam placement, stitching accuracy, and fabric alignment. Small mistakes are a normal part of the learning process and can actually help improve your quilting skills over time. The key is to sew slowly, stay patient, and focus on accuracy instead of speed.

Sewing Too Far Past the Dots

This is the most common issue.

If you sew beyond the quarter-inch dots, the fabric cannot spread properly.

This causes puckers and bunching.

Using Large Stitches

Large stitches can show through the fabric and weaken the seam appearance.

Smaller stitches usually create cleaner results.

Pressing Too Early

Pressing before all rows are joined can make alignment more difficult.

Wait until the rows are fully connected before pressing.

Sewing Too Fast

Many quilters naturally sew quickly.

However, slowing down is extremely important when learning How to Sew a Hexagon Quilt because precision matters more than speed.


Pressing Your Finished Hexagon Rows

Once all your rows are sewn together, it is finally time to press.

Use a warm iron and gently press the seams flat.

Avoid stretching the fabric while ironing.

Proper pressing helps:

  • Flatten seams
  • Improve quilt appearance
  • Create crisp edges
  • Prepare the quilt for quilting

At this stage, your hexagon rows should lie flat without puckering.


Fabric and Color Tips for Hexagon Quilts

How to Sew a Hexagon Quilt - Fabric and Color Tips for Hexagon Quilts

Fabric selection plays a huge role in the final quilt appearance.

Use Contrasting Colors

Contrasting fabrics help highlight the hexagon shapes.

Bright colors against dark fabrics often look especially beautiful.

Avoid Highly Visible Thread

Matching thread creates a cleaner appearance.

White thread on dark fabrics may become distracting.

Scrap Quilts Work Beautifully

Hexagon quilts are perfect scrap-busting projects.

Mixing prints and colors creates a charming patchwork effect.


Beginner Confidence Tips for How to Sew a Hexagon Quilt

If you feel nervous about quilting hexagons, remember that practice makes a huge difference.

Start with small sample rows before attempting a large quilt.

The more rows you sew, the easier the process becomes.

Slow Your Sewing Machine Down

Many sewing machines allow you to reduce sewing speed.

This can dramatically improve control and accuracy.

Focus on Accuracy First

Perfect seams matter more than finishing quickly.

Take your time matching corners and sewing carefully.

Practice Backstitching

Strong seams are especially important in quilts.

Always secure the beginning and end of each seam.


Why This Hexagon Method Works So Well

Why This Hexagon Method Works So Well - How to Sew a Hexagon Quilt

There are many different ways to make hexagon quilts.

Some quilters prefer hand sewing.

Others use English Paper Piecing.

However, machine sewing hexagons is faster and more durable for many projects.

This sewing method works especially well because:

  • The seams remain flexible
  • Rows align neatly
  • Puckers are minimized
  • Construction is beginner friendly

Once you understand the sewing order, learning How to Sew a Hexagon Quilt becomes much more enjoyable.

This method is also ideal for quilters who want to complete projects more quickly without sacrificing accuracy. By sewing from dot to dot and carefully controlling your seams, you can achieve clean, professional-looking results even as a beginner. With practice, the process becomes easier, faster, and much more relaxing to sew.


Final Thoughts on How to Sew a Hexagon Quilt

Learning How to Sew a Hexagon Quilt may seem intimidating at first, but once you understand the quarter-inch dots and sewing sequence, the process becomes surprisingly manageable.

The key to success is accuracy.

Remember to:

  • Sew from dot to dot
  • Backstitch carefully
  • Keep nearby hexagons out of the way
  • Use smaller stitches
  • Avoid pressing too early

With practice, your hexagon rows will become flatter, neater, and more professional looking.

Hexagon quilts are beautiful, versatile, and incredibly satisfying to make. Whether you are creating a full-size quilt, a table runner, or a decorative sewing project, this technique is a fantastic addition to your quilting skills.

Now that you know How to Sew a Hexagon Quilt, you can start experimenting with colors, layouts, and fabric combinations to create a quilt that is uniquely yours.

Happy quilting!

You may also enjoy this post : English Paper Piecing Templates with the Cricut โ€“ Powerful & Easy Method for Perfect Results https://faodailcreation.ca/2026/05/04/english-paper-piecing-templates-with-the-cricut/

How to sew quilt Blocks, Quilting

String Quilt Block Tutorial | How to sew quilt Blocks

Cassie Cartmell – Faodail Creation

This is the full you tube tutorial : https://youtu.be/0AdjNwTaORQ

String Quilt Block Tutorial : Powerful & Easy Beginner Guide to Stunning Quilting

String Quilt Block Tutorial for Beginners

Baby Lock Educator

If you’re looking for a fast, creative, and beginner-friendly quilting project, this String Quilt Block tutorial is exactly what you need and as I always share, Iโ€™m a Baby Lock Educator, so I love teaching techniques that are both simple and professional.

A String Quilt Block is one of the most versatile and scrap-friendly quilting techniques. Whether you’re working with leftover fabric or jelly rolls, this method helps you turn even the smallest pieces into something beautiful. As Iโ€™m a Baby Lock Educator, I often recommend this style of quilting because it builds confidence while helping you master essential sewing skills.

In this guide, youโ€™ll learn step-by-step how to create this Quilt Block, how to avoid common mistakes, and how to achieve a clean, professional finish every time. And again, as Iโ€™m a Baby Lock Educator, my goal is to help you create something youโ€™re truly proud of while making the process enjoyable and approachable.


Why a String Quilt Block Is Perfect for Beginners

Why a String Quilt Block Is Perfect for Beginners

A String Quilt Block is ideal for beginners because it removes a lot of the pressure that comes with precise cutting and matching seams.

Hereโ€™s why this Quilt Block is such a great project:

  • You can use any size fabric strips
  • Perfect for scrap fabric projects
  • Quick and easy to assemble
  • Great for practicing foundation piecing
  • Creates a stunning, modern quilt design

When you make a String Quilt Block, youโ€™re focusing more on creativity and flow rather than perfection.


Materials Needed for a String Quilt Block

Materials Needed for a String Quilt Block

Fabric Requirements

  • Scrap fabric or jelly roll strips
  • Strips cut to 2.5 inches (recommended for consistency)
  • A contrasting fabric for your guide strip (leader piece)

Tools & Supplies

Using the right tools will make constructing your Quilt Block much faster and more accurate.


How to Cut Fabric for a String Quilt Block

How to Cut Fabric for a String Quilt Block

Preparing Your Fabric Strips

Start by cutting your fabric into 2.5-inch strips. This size works perfectly because it matches standard jelly roll strips.

You can:

  • Use scraps of any size
  • Cut from yardage
  • Mix colors for a scrappy look

A quilting ruler like a Stripology ruler can speed up the process by allowing you to cut multiple strips quickly and accurately.

Pro Tip for Better Results

Always square up your fabric before cutting. Straight edges ensure your this Quilt Block comes together neatly.


Preparing the Foundation for Your String Quilt Block

Preparing the Foundation for Your String Quilt Block

Why Use Foundation Paper

A String Quilt Block is much easier to assemble using foundation paper. It stabilizes your fabric and keeps everything aligned.

Cutting Your Foundation Pieces

  • Final block size: 10 inches
  • Foundation size: 11 inches

This extra inch gives you room to trim and square up later.

You can use:

  • Tracing paper (best option)
  • Regular printer paper (avoid thick paper)

The lighter the paper, the easier it will be to remove after sewing your Quilt Block.


Step-by-Step: How to Sew a String Quilt Block

Step-by-Step: How to Sew a String Quilt Block

Step 1: Place Your Guide Strip

Choose a bold fabric (like orange) as your guide strip.

  • Place it diagonally in the corner of your foundation paper
  • This strip sets the direction of your entire Quilt Block

โš ๏ธ This step is critical. If your guide strip is off, your final design will be affected.


Step 2: Add Your First Fabric Strip

  • Place your next strip right sides together with the guide strip
  • Sew along the edge using a quarter-inch seam

Once sewn:

  • Flip the fabric open
  • Press it flat

Step 3: Build Your String Quilt Block

Continue adding strips:

  • Alternate sides of the guide strip
  • Place each strip right sides together
  • Sew โ†’ Flip โ†’ Press

Repeat this process until your entire foundation paper is covered.

This method makes building the Quilt Block quick and efficient.


Step 4: Trim Excess Fabric

If fabric extends beyond the paper:

  • Trim it off
  • Keep edges manageable

Donโ€™t worry about perfection here your Quilt Block will be squared later.


How to Square Up Your String Quilt Block

Step 5: Trim to Size

Flip your block over so you can see the foundation paper.

  • Trim your block down to 10 inches
  • Use your ruler for accuracy

Step 6: Cut the Diagonal

Align your ruler:

  • Use the 45-degree angle line
  • Match it with your guide strip

Cut carefully along the diagonal.

This step gives your Quilt Block its signature look.


Removing the Foundation Paper

Once trimmed:

  • Gently tear away the paper
  • Tracing paper removes easily without damaging stitches

Now your Quilt Block is ready to assemble into a quilt.

Tips from a Baby Lock Educator

As a Baby Lock Educator, I always recommend taking your time when removing foundation paper to avoid putting stress on your seams.


How to Assemble Your String Quilt Block Quilt

How to Assemble Your String Quilt Block Quilt

Once you have multiple blocks:

Layout Options

  • Rotate blocks for different patterns
  • Create chevrons or zig-zag effects

Sewing Blocks Together

  • Place blocks right sides together
  • Sew using a quarter-inch seam
  • Press seams flat

Continue joining rows until your quilt top is complete.


Common Mistakes to Avoid in a String Quilt Block

1. Misplacing the Guide Strip

If your guide strip isnโ€™t in the corner:

  • Your angles wonโ€™t line up
  • The design will look off

2. Incorrect Diagonal Cutting

Always use the 45-degree line on your ruler.

3. Skipping Pressing

Pressing after each seam keeps your String Quilt Block flat and accurate.

4. Not Using a Foundation

Without foundation paper:

  • Fabric may shift
  • Blocks may warp

Baby Lock Educator

Tips for a Perfect String Quilt Block

Tips from a Baby Lock Educator

Use Contrast for Impact

A bold guide strip makes your String Quilt Block design pop. Choosing a strong, standout color helps define the direction of your block and makes the overall quilting design more visually striking.

Keep It Scrappy

Mix colors and prints for a dynamic quilt. One of the joys of creating a String Quilt Block is embracing a scrappy look, which adds personality and charm to your quilting project.

Stay Consistent

Keep strip widths similar for a cleaner finish. While quilting allows for creativity, consistency in strip size will help your String Quilt Block look more polished and professional.

Work in Batches

Cut and sew multiple blocks at once to save time. Batch working is a great habit in quilting, helping you stay efficient and maintain momentum throughout your project.

More Tips from a Baby Lock Educator

As someone who teaches sewing and quilting regularly, I always recommend slowing down when placing your guide strip and taking the time to press each seam properly. These small steps make a huge difference in how your String Quilt Block turns out and will elevate the quality of your quilting overall.


Creative Ideas for Your String Quilt Block

This Quilt Block can be used for:

  • Full-size quilts
  • Baby quilts
  • Table runners
  • Cushion covers
  • Wall hangings

The possibilities are endless, making the String Quilt Block a must-learn quilting technique.


Final Thoughts on the String Quilt Block

Final Thoughts on the String Quilt Block

Learning how to create this Quilt Block opens up endless creative opportunities in quilting.

This technique is:

  • Beginner-friendly
  • Scrap-efficient
  • Visually stunning

As long as you:

  • Keep your guide strip aligned
  • Use a 45-degree cut
  • Press your seams

Youโ€™ll end up with a beautiful, professional-looking quilt.

The String Quilt Block is not just easy itโ€™s one of the most enjoyable ways to explore quilting while building confidence with your sewing machine. Whether you’re brand new to quilting or looking for a relaxing project, this method allows you to focus on creativity rather than perfection.

One of the biggest advantages of this style of quilting is how forgiving it is. You donโ€™t need perfectly matched seams or identical fabric pieces. In fact, the charm of this Quilt Block comes from its slightly imperfect, scrappy look. This makes quilting feel less intimidating and far more fun, especially for beginners who are still learning the basics.

Another reason quilters love this technique is because it makes excellent use of fabric scraps. Instead of letting leftover pieces pile up, you can turn them into something meaningful. This kind of resourceful quilting not only saves money but also adds a personal touch to every project you create.

As you continue quilting with this method, youโ€™ll start to notice improvements in your cutting, sewing, and pressing skills. Each Quilt Block you complete builds your confidence and helps you develop consistency. Over time, your quilting projects will look more polished and professional.

The more you practice quilting with these Quilt Blocks, the more creative you can become with layouts, colors, and designs. From bold, modern patterns to soft, traditional looks, quilting with this technique gives you endless ways to express your style.

If you like this tutorial you may like this one too : Chain Quilt Block Tutorial https://faodailcreation.ca/2026/04/08/chain-quilt-block/

Frankenstein Monster Applique : Easy & Fun Halloween Sewing Tutorial
This YouTube tutorial by Cassie Cartmell guides you through creating a Frankenstein …
How to Sew a Cord Keeper | Sewing Machine Tutorials & Tips for Beginners
This YouTube tutorial by Cassie Cartmell demonstrates how to sew a cord …
DIY Sewing Projects, How to sew quilt Blocks, Quilting

Chain Quilt Block Tutorial | How to sew quilt Blocks

Cassie Cartmell – Faodail Creation

This is the link to the you tube video : https://youtu.be/d3g307yAMXM

Chain Quilt Block Tutorial : Powerful & Easy Beginner Guide to Stunning Quilt Design

Chain Quilt Block โ€“ The Perfect Beginner-Friendly Quilt Pattern

Chain Quilt Block โ€“ The Perfect Beginner-Friendly Quilt Pattern

If you’re looking for a simple yet powerful quilting design, learning how to make a Chain Quilt Block is one of the best places to start.

The Chain Quilt Block is incredibly versatile. With just one block design, you can create multiple quilt layouts, giving you endless creative possibilities. Whether you’re a beginner or experienced quilter, this block is a must-know technique.

In this tutorial, youโ€™ll learn step-by-step how to sew a Chain Quilt Block, along with helpful tips to improve accuracy and achieve professional-looking results.

One of the reasons the Chain Quilt Block stands out is because it helps build strong foundational quilting skills without feeling overwhelming. The design is repetitive enough to help you gain confidence, but still interesting enough to keep you engaged throughout the process. As you continue working with this block, youโ€™ll naturally improve your cutting accuracy, seam consistency, and overall precision three essential skills in quilting.

Another benefit of the Chain Quilt Block is how forgiving it can be for beginners. Even if your seams are slightly off at first, the overall design still comes together beautifully. This makes it an excellent practice block for anyone new to quilting, allowing you to learn and improve without the pressure of perfection. Over time, youโ€™ll notice your blocks becoming more uniform and your confidence growing with each piece you complete.

The Chain Quilt Block also encourages creativity. By simply changing your fabric choices such as using bold prints, soft neutrals, or high-contrast colors you can completely transform the look of your quilt. This flexibility is what makes quilting such an enjoyable and personal craft. No two quilts will ever look exactly the same, even when using the same block pattern.

As you become more comfortable with this design, you can start experimenting with layout variations. Rotating blocks, alternating colors, or adding sashing and borders can all dramatically change the final appearance of your quilt. These small design decisions are where your personal style begins to shine, making your quilting projects feel truly unique and customized.

Taking the time to master the Chain Quilt Block will set you up for success in more advanced patterns later on. It teaches essential techniques like seam matching, accurate piecing, and pressing all of which are critical in quilting. By practicing these skills with a simple block, you create a strong foundation that will make future projects easier and more enjoyable.

Ultimately, the Chain Quilt Block is more than just a beginner project itโ€™s a timeless design that you can return to again and again. Whether you’re making a quick crib quilt, a full-sized bed quilt, or experimenting with new layouts, this block offers endless opportunities to grow your skills and enjoy the art of quilting.


Why the Chain Quilt Block Is So Popular

This Quilt Block is loved by quilters for several reasons:

  • Beginner-friendly construction
  • Repetitive and relaxing piecing process
  • Endless layout variations
  • Perfect for scrap fabric projects
  • Ideal for crib quilts and larger quilts

Because of its structured layout, this Quilt Block creates a beautiful โ€œchainโ€ effect across your quilt when blocks are joined together.


Materials Needed for a Chain Quilt Block

Before starting your Quilt Block, gather the following fabric pieces:

Fabric Requirements

  • 2 pieces: 4ยฝ” x 4ยฝ” squares
  • 4 pieces: 2ยฝ” x 2ยฝ” squares (Fabric A)
  • 4 pieces: 2ยฝ” x 2ยฝ” squares (Fabric B)

Tools & Supplies

  • Sewing machine
  • Quarter-inch presser foot
  • Thread (cotton recommended)
  • Rotary cutter & ruler
  • Iron and pressing surface
  • Pins (optional)

Using accurate measurements is critical when making a Chain Quilt Block, as even small inconsistencies can affect your final quilt.


Step-by-Step Chain Quilt Block Instructions

Step-by-Step Chain Quilt Block Instructions

Step 1 โ€“ Prepare Your Fabric Pieces for the Chain Quilt Block

Start by organizing your fabric pieces for your Quilt Block.

Check that all your squares are cut accurately. If you notice any uneven edges or overhanging fabric, trim them now. This ensures your Quilt Block stays precise as you sew.


Chain Quilt Block - Sew the Small Squares Together

Step 2 โ€“ Sew the Small Squares Together

Take your 2ยฝ” squares and pair them:

  • Place two squares right sides together (pretty sides facing)
  • Sew using a ยผ inch seam allowance
  • Repeat for all small squares

This step forms the smaller units that make up your Quilt Block.


Pro Tip for a Perfect Chain Quilt Block

Always remove thread tails and trim excess fabric after sewing.

Even tiny inaccuracies can add up and distort your Quilt Block, especially when making multiple blocks for a quilt.


Step 3 โ€“ Press Your Seams Properly

Press your seams:

  • Open seams flat for better accuracy
  • Or press to one side if preferred

Pressing seams open can help when matching seams later in your Quilt Block, making alignment easier.


Chain Quilt Block - Join Small Units to Form Mini Blocks

Step 4 โ€“ Join Small Units to Form Mini Blocks

Now take your sewn pairs:

  • Place them right sides together
  • Match the center seams carefully
  • Sew with a ยผ inch seam

These units will become the mini blocks within your Quilt Block.


Nesting Seams in a Chain Quilt Block

For clean intersections:

  • Ensure seams line up perfectly
  • Use pins if needed

Accurate seam nesting is key to a polished Quilt Block.


Step 5 โ€“ Add the Larger Squares

Now bring in your 4ยฝ” squares:

  • Place mini blocks and large squares right sides together
  • Sew using a ยผ inch seam

This step starts forming the recognizable structure of the Quilt Block.


Layout Tip for Chain Quilt Block Design

Before sewing, lay out your pieces to match the final design.

The orientation of your blocks determines how the โ€œchainโ€ effect appears in your Quilt Block quilt.


Step 6 โ€“ Assemble the Final Chain Quilt Block

To complete your Chain Quilt Block:

  • Join all sections together
  • Match seams carefully
  • Sew with consistent seam allowance

Once sewn, press the entire block flat.


Final Size of Your Chain Quilt Block

Your completed Quilt Block should measure approximately:

๐Ÿ‘‰ 8ยผ inches (unfinished)

Before moving on, ensure all your blocks are the same size. Trim if necessary to maintain consistency across your quilt.


Common Mistakes to Avoid When Making a Chain Quilt Block

Common Mistakes to Avoid When Making a Chain Quilt Block

When sewing a Chain Quilt Block, avoid these common issues:

  • Inaccurate cutting
  • Skipping seam pressing
  • Not matching seams properly
  • Inconsistent seam allowances

Taking the time to address these common mistakes will make a noticeable difference in your finished blocks. In quilting, accuracy is everything. Even being off by a small amount when cutting fabric can lead to blocks that donโ€™t line up properly, especially when you begin joining multiple pieces together. This is why careful measuring and precise cutting are essential skills in quilting.


Pressing seams is another step that should never be skipped. Proper pressing helps your fabric lay flat and keeps your blocks looking crisp and professional. In quilting, pressing is just as important as stitching because it directly affects how well your pieces fit together. A well-pressed seam makes it easier to match points and maintain clean lines throughout your project.


Matching seams correctly is also key to achieving a polished result. When seams donโ€™t align, the overall design can look uneven. Taking a few extra seconds to pin and check alignment can save you frustration later. Quilting is all about attention to detail, and these small adjustments go a long way.


Finally, maintaining consistent seam allowances especially the standard quarter inch is crucial in quilting. If your seam allowance varies, your blocks may end up different sizes, making assembly difficult. By focusing on consistency and correcting these issues early, your quilting projects will come together smoothly and look far more professional.


Chain Quilt Block Layout Ideas

One of the best things about the Quilt Block is how many layouts you can create:

  • Straight grid layout
  • Diagonal chain effect
  • Alternating color chains
  • Scrappy quilt designs

Experimenting with layout transforms your Chain Quilt Block into completely different quilt styles.


Free Chain Quilt Block Pattern

Free Chain Quilt Block Pattern

If you want to turn your Block into a full quilt, you can create a beautiful crib quilt layout often called:

๐Ÿ‘‰ โ€œKisses and Hugsโ€ quilt pattern

This includes:

  • Fabric yardage requirements
  • Sashing instructions
  • Border designs
  • Layout guidance

Join my facebook group – https://www.facebook.com/groups/405258636506758


Why Beginners Love the Chain Quilt Block

Th is Quilt Block is perfect for beginners because:

  • It teaches basic piecing skills
  • It builds confidence with quilting accuracy
  • Itโ€™s repetitive and easy to master
  • It produces beautiful results quickly

Because of its structured layout, the Chain Quilt Block creates a beautiful โ€œchainโ€ effect across your quilt when blocks are joined together.

Another reason this design stands out is how approachable it is for anyone starting their quilting journey. The simple shapes and straightforward construction make it easy to follow along, even if youโ€™re new to quilting. You donโ€™t need advanced techniques to achieve a polished look, which helps build confidence right from the beginning.

The repetitive nature of this block also makes it incredibly relaxing. Many quilters find that quilting becomes a calming, almost meditative activity, and the Chain Quilt Block is perfect for that. Once youโ€™ve made a few blocks, the process becomes second nature, allowing you to enjoy the rhythm of sewing without constantly needing to check instructions.

This block is also ideal for using up fabric scraps. If you have leftover pieces from previous quilting projects, you can easily incorporate them into your Chain Quilt Block design. This not only reduces waste but also adds a unique and personal touch to your quilt.

Finally, the versatility of this block means it grows with you as your quilting skills improve. You can keep it simple for quick projects or experiment with more complex layouts as your confidence increases, making it a long-lasting favorite in your quilting collection.


Final Thoughts on the Chain Quilt Block

Final Thoughts on the Chain Quilt Block

Learning how to make a Chain Quilt Block opens the door to endless quilting possibilities.

With simple shapes, clear construction steps, and stunning layout options, the Chain Quilt Block is a timeless design every quilter should know.

Take your time, focus on accuracy, and enjoy the process because quilting is just as much about the journey as the finished piece.

As you spend more time working on this block, youโ€™ll begin to appreciate how each step contributes to the final result. From careful cutting to precise stitching, every part of the process plays a role in successful quilting. The more attention you give to these details, the more polished and professional your quilt will look.

This block also provides an excellent opportunity to build consistency in your work. In quilting, repeating the same steps helps you develop muscle memory, making future projects faster and easier. Over time, youโ€™ll notice that your seams are straighter, your points line up more accurately, and your overall confidence continues to grow.

Another rewarding aspect of this process is the creative freedom it offers. You can experiment with different fabrics, color combinations, and layouts to create something that truly reflects your personal style. Quilting allows you to turn simple pieces of fabric into something meaningful, whether itโ€™s a gift for a loved one or a project for your home.

Itโ€™s also important to remember that mistakes are part of learning. Every quilter, no matter their experience level, has moments where things donโ€™t go exactly as planned. In quilting, these moments are valuable opportunities to improve your skills and refine your techniques. Donโ€™t be discouraged each block you make is a step forward.

As you continue your quilting journey, the Chain Quilt Block can become a go-to pattern that you return to again and again. Its simplicity, versatility, and timeless design make it a staple in quilting projects of all sizes. Whether youโ€™re making a quick project or a detailed quilt, this block will always be a reliable and enjoyable choice.

You may also like this tutorial : Monkey Wrench Quilt Block https://faodailcreation.ca/2026/04/01/monkey-wrench-quilt-block-tutorial/

Frankenstein Monster Applique : Easy & Fun Halloween Sewing Tutorial
This YouTube tutorial by Cassie Cartmell guides you through creating a Frankenstein …
How to Sew a Cord Keeper | Sewing Machine Tutorials & Tips for Beginners
This YouTube tutorial by Cassie Cartmell demonstrates how to sew a cord …
How to sew quilt Blocks, Quilting

Monkey Wrench Quilt Block | How to sew quilt Blocks

Cassie Cartmell – Faodail Creation

This is the link to the You Tube Tutorial : https://www.youtube.com/watch?v=ESNWjHf9Sd8

Monkey Wrench Quilt Block : Amazing & Easy Quilting Tutorial for Beginners

If youโ€™ve been searching for a monkey wrench quilt block tutorial that is simple, clear, and beginner-friendly, youโ€™re in the right place. This step-by-step guide will walk you through how to create a beautiful quilt block from start to finish, including cutting, piecing, and assembling your block into a full quilt. Whether youโ€™re brand new to quilting or looking to refine your skills, this guide will help you confidently master the monkey wrench quilt block.

As you continue your quilting journey, this monkey wrench quilt block is a fantastic project to build confidence and improve accuracy. Quilting techniques like precise cutting, careful seam alignment, and proper pressing all come together in this design, making it an excellent learning experience. Youโ€™ll also gain a better understanding of how different units work together in quilting to create stunning patterns. With practice, quilting this block will become second nature, allowing you to experiment with colors, layouts, and even larger quilting projects with ease.

What Is a Monkey Wrench Quilt Block

What Is a Monkey Wrench Quilt Block?

This quilt block is a classic design in quilting that combines half-square triangles and square units to create a bold, geometric pattern. This traditional block stands out best when you use high-contrast fabrics, making it perfect for scrap quilting or planned color palettes.

Many quilters love this quilt block because it looks complex but is actually very manageable once broken down into steps. With the right cutting and sewing techniques, you can quickly build this block and use it in larger quilting projects.


Quilting with this quilt block offers several benefits:

  • Itโ€™s beginner-friendly yet visually striking
  • Perfect for practicing accurate cutting and piecing
  • Great for scrap fabric projects
  • Works beautifully in full quilt layouts

When it comes to quilting, mastering blocks like the monkey wrench quilt block builds your confidence and improves your overall sewing accuracy.


Fabric Selection for Your Monkey Wrench Quilt Block

Fabric Selection for Your Monkey Wrench Quilt Block

Choosing the right fabrics is key to making your quilt block stand out.

Use High Contrast Fabrics

For the best results in quilting:

  • Choose one light fabric (like yellow)
  • Choose one dark fabric (like gray or patterned fabric)

This contrast helps define the shapes in your monkey wrench quilt block and makes the design pop.

Tips for Quilting Success

  • Avoid fabrics that are too similar in tone
  • Patterns can help add visual interest
  • Scraps work great but may require extra care

Quilting with contrasting fabrics ensures your quilt block looks clean and professional.


Tools You Need for a Monkey Wrench Quilt Block

Before starting your quilt block, gather these essentials:

Below are my amazon links, if you decide to purchase from these links I may receive a small commission at no extra cost to you

Basic Quilting Tools

Having the right setup makes quilting your quilt block much easier and more accurate.


Cutting Fabric for the Monkey Wrench Quilt Block

Cutting Fabric for the Monkey Wrench Quilt Block

Accurate cutting is critical when making a monkey wrench quilt block.

Understanding Measurements

Many quilting mats show only quarter-inch markings, but this block requires 1/8-inch precision.

For example:

  • 7/8″ is just before the next full inch
  • Count carefully using your ruler markings

Cutting the Units

You will have four main units:

  • A units
  • B units
  • C units
  • D units

Label each piece using masking tape to stay organized while quilting your quilt block.


Cutting and Preparing A Units

Step 1: Cutting and Preparing A Units – Monkey Wrench Quilt Block

The A units are essential to your quilt block.

  1. Cut fabric strips to the required size
  2. Align corners carefully
  3. Cut diagonally from corner to corner

Important Quilting Tip

Always hold your ruler firmly when cutting. Slipping can ruin your fabric and affect your quilt block accuracy.

Repeat for both fabric colors.


Step 2: Cutting B Units for the Quilt Block – Monkey Wrench Quilt Block

The B units are smaller and require extra care.

  1. Measure precisely (including 1/8″ marks)
  2. Align corners
  3. Cut diagonally

Because these pieces are small, quilting accuracy matters even more when making the monkey wrench quilt block.


Step 3: Preparing D Units – Monkey Wrench Quilt Block

The D units are the simplest part of the quilt block.

  • Cut squares to size
  • No diagonal cutting required

These will form the center of your block during quilting assembly.


Step 4: Cutting and Shaping C Units – Monkey Wrench Quilt Block

The C units add structure to your quilt block.

  1. Cut squares
  2. Cut diagonally once
  3. Stack and cut again using a 45ยฐ angle

Why This Matters in Quilting – Monkey Wrench Quilt Block

Accurate triangle cuts ensure your quilt block aligns properly when sewn.


Sewing the Center of the Monkey Wrench Quilt Block

Step 5: Sewing the Center of the Monkey Wrench Quilt Block

Start assembling your quilt block with the D units.

  1. Place right sides together
  2. Sew using a quarter-inch seam
  3. Press seams open

Why Pressing Matters in Quilting

Pressing seams open reduces bulk, making your monkey wrench quilt block easier to quilt later.


Step 6: Adding B Units to the Monkey Wrench Quilt Block

Next, attach the B units.

Find the Center

  • Fold triangles in half
  • Mark the center

Align and Sew

  • Match the center to the seam
  • Sew with a quarter-inch seam

This step is crucial for maintaining symmetry in your quilt block.


Step 7: Attaching C Units

Now itโ€™s time to build out your monkey wrench quilt block further.

  1. Mark centers on all pieces
  2. Align carefully
  3. Sew and press

Quilting Tip

Do not stretch fabric while pressing this can distort your quilt block.


Step 8: Finishing with A Units

The final step in completing your monkey wrench quilt block is adding the A units.

  1. Fold and mark centers
  2. Match seams precisely
  3. Sew and press

At this stage, your quilt block should fully come together.


Squaring Up Your Monkey Wrench Quilt Block

After assembling your monkey wrench quilt block, itโ€™s important to square it up.

Target Size

  • 6″ x 6″ finished block

How to Square

  • Use a ruler
  • Trim excess fabric
  • Align edges carefully

Squaring ensures your quilting project stays accurate when joining blocks.


Turning the Monkey Wrench Quilt Block Into a Quilt

Turning the Monkey Wrench Quilt Block Into a Quilt

Once youโ€™ve made your quilt block, you can turn it into a full quilt.

Quilt Layout Idea

  • Alternate monkey wrench quilt block with plain squares
  • Use contrasting colors for visual impact

Fabric Requirements

  • 32 monkey wrench quilt block units
  • 31 plain squares

This layout creates a balanced and eye-catching quilting design.


Quilting Tips for Best Results

When working on your quilt block, keep these tips in mind:

Stay Focused

This block requires precision, so choose a day when you can concentrate fully on quilting.

Use Pins or Clips

Prevent fabric shifting while sewing your monkey wrench quilt block.

Trim as You Go

Remove thread tails and dog ears to keep your quilting clean.

Press, Donโ€™t Iron

Pressing avoids stretching fabric and keeps your quilt block accurate.


Why Youโ€™ll Love Quilting This Block

Why Youโ€™ll Love Quilting This Block

The monkey wrench quilt block is:

  • Fun to make
  • Great for skill-building
  • Perfect for scrap quilting
  • Visually striking

Many quilters find that once they make one quilt block, they want to keep going and create an entire quilt.


Final Thoughts on the Monkey Wrench Quilt Block

Learning how to create this quilt block is a fantastic step in your quilting journey. It teaches precision, improves your cutting skills, and helps you understand how quilt blocks come together.

With practice, your monkey wrench quilt block will become faster and more accurate, making quilting even more enjoyable.

If youโ€™re ready to take your quilting to the next level, start making multiple quilt block units and turn them into a stunning quilt you can use or gift.