
Machine Embroidery for Beginners

How to Embroider on Ribbon : 7 Easy Steps for Beautiful Personalized Christmas Ribbon

This is the link to the full you tube tutorial How to Embroider on Ribbon | Machine Embroidery for Beginners https://youtu.be/VvPxOMzyDTw

Cassie Cartmell – Faodail Creation

Table of Contents

Introduction: How to Embroider on Ribbon Using a Sewing and Embroidery Machine

How to Embroider on Ribbon

Learning How to Embroider on Ribbon is a wonderful way to personalize Christmas decorations, handmade gifts, gift wrapping and festive sewing projects. With an embroidery machine, you can add names, special messages and decorative lettering to ribbon to create something unique

In this tutorial, I’ll show you How to Embroider on Ribbon using my Baby Lock Altair 2 sewing and embroidery machine. As a Baby Lock Educator, I love sharing sewing, quilting and embroidery techniques to help you build your skills and explore new creative possibilities.

Learning How to Embroider on Ribbon is particularly useful when you want to make personalised Christmas ribbon featuring a message such as Merry Christmas, followed by your name or the name of someone special.

You don’t need to hoop the ribbon itself. Instead, we’ll use sticky-back stabiliser to hold the ribbon securely in place while the embroidery machine stitches the lettering.

I’ll also demonstrate how to use the IQ positioning feature on the Baby Lock Altair 2 to photograph your embroidery hoop and position the design accurately.

Whether you’re making ribbon for Christmas gifts, decorations or other creative projects, this step-by-step guide to How to Embroider on Ribbon will help you understand the process. Follow along with me, Cassie Cartmell, Baby Lock Educator at Faodail Creation, and let’s get stitching!

What You Need to Embroider on Ribbon

Before learning how to embroider on ribbon, gather your supplies so everything is ready beside your embroidery machine.

Below I have included my Amazon Affiliate Links, If you decide to purchase from any of the links I may receive a small commission at no extra cost to you

My Amazon Store : https://www.amazon.com/shop/faodailcreation

Materials and Equipment

Choose ribbon that is wide enough to accommodate your lettering. The design must fit within the usable embroidery area of your hoop, taking into account the ribbon’s width and the space available for the message.

Grosgrain ribbon is a useful option because its ribbed texture gives it structure. However, always consider the ribbon’s thickness and how easily it can be held flat during stitching.

Step 1: How to Embroider on Ribbon – Prepare Your Embroidery Machine and Hoop

How to Embroider on Ribbon

The first step in learning How to Embroider on Ribbon is preparing your machine and stabilizer.

For this project, I’m using the Baby Lock Altair 2. As a Baby Lock Educator, I enjoy sharing techniques that help you get creative with your sewing and embroidery machine. The Baby Lock Altair 2 is both a sewing machine and an embroidery machine, so I begin by switching the machine over to embroidery mode.

Prepare the Sticky-Back Stabilizer

I’ve already hooped my sticky-back stabilizer, making sure it is secure and smooth in the embroidery frame.

Sticky-back stabilizer is particularly useful when learning How to Embroider on Ribbon because it holds the ribbon in position without requiring you to stretch or hoop the ribbon itself. This makes embroidery on ribbon easier to manage, especially when working with narrow materials.

Start by checking that the stabilizer is firmly attached to the hoop. The surface should be smooth, with no loose sections or wrinkles that could interfere with the embroidery.

Reveal the Adhesive Surface

Take a pin and carefully score the release paper on the stabilizer.

I score along one side and then the other, making it easier to lift the paper without damaging the adhesive underneath.

Gently lift away the release paper to reveal the sticky surface. This preparation is an important part of How to Embroider on Ribbon, as the adhesive will help keep your ribbon securely in place during stitching.

Be careful not to cut through the stabilizer itself. You only need to score the paper covering the adhesive.

Once the paper is removed, your embroidery hoop is ready for the ribbon. Taking your time with this step will help you achieve better results when practicing embroidery on ribbon.

With the stabilizer prepared and the machine ready, you’re one step closer to creating beautiful personalised ribbon. Continue following my How to Embroider on Ribbon tutorial to learn how to position your ribbon for embroidery on ribbon projects.

Step 2: How to Embroider on Ribbon – Position and Secure the Ribbon

How to Embroider on Ribbon

Now that the stabiliser is ready, it’s time to prepare the ribbon.

Cut a piece of grosgrain ribbon to the length you need for your finished project. Consider where you intend to use it, whether that’s wrapping a present, decorating a Christmas tree or adding a personalised touch to a handmade gift.

When learning how to embroider on ribbon, accurate positioning is important because the ribbon is narrow and even a small angle can make the finished lettering look uneven.

Make Sure the Ribbon Is Straight

Place the ribbon onto the exposed adhesive surface of the stabiliser.

Position it carefully and press it down gently so that it sticks securely. Smooth the ribbon with your fingers, ensuring it lies flat without twists or wrinkles.

You want the ribbon to be as straight as possible before you begin designing your lettering.

Use a Ruler to Create a Straight Guide

One helpful technique is to draw a straight line on the stabiliser using a ruler.

In my tutorial, I use the crosshatch markings on the embroidery hoop as reference points. I place the ruler from one crosshatch to the corresponding crosshatch on the opposite side and draw a straight line.

You can then line up the edge of your ribbon with this guide.

This makes it much easier to position the ribbon accurately and helps prevent your lettering from appearing crooked.

Check that the ribbon is securely attached to the stabiliser and that the area you intend to embroider is flat.

Tip: Take a moment to check the ribbon from both ends of the hoop. If it appears straight from one side but angled from the other, adjust it before moving on.

Step 3: How to Embroider on Ribbon – Create Your Lettering Design
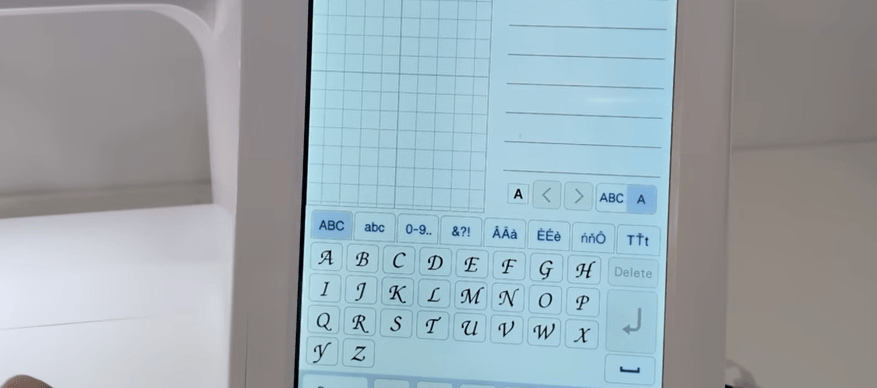
How to Embroider on Ribbon - Create Your Lettering Design

With the ribbon secured, the next step in How to Embroider on Ribbon is creating the wording for your embroidery.

For this Christmas project, I’m using the message Merry Christmas and adding my name to personalize the design. As a Baby Lock Educator, I enjoy sharing creative ways to use embroidery lettering to make sewing projects special.

The exact lettering options will depend on your embroidery machine, but the general process is similar on many machines with built-in lettering functions.

Enter Your Christmas Message

Use the lettering feature on your embroidery machine to enter the words you want to stitch.

For my project, I enter:

  • Merry
  • Christmas
  • My name

Leave appropriate spaces between the words so that the lettering is easy to read.

Adding your name makes the ribbon more personal. You could also use a family name, a recipient’s name or another short message that suits your project. Personalized lettering is one of the lovely possibilities you’ll discover when learning How to Embroider on Ribbon.

Keep the Design Within the Embroidery Area

Before finalizing the lettering, check the dimensions of your design.

In my demonstration, I need to make sure the lettering fits within the seven-inch area available in the direction I’m using for the design.

Your usable embroidery area may differ depending on the hoop and machine settings, so always check the measurements shown on your own machine.

The design must also fit comfortably within the width of your ribbon. A design that fits the hoop may still be too wide for a narrow ribbon.

When learning How to Embroider on Ribbon, consider the overall proportions of your message. Lettering that is too large may run close to the edges, while lettering that is too small may be difficult to read.

Tips for Creating Your Lettering

Before moving to the next stage, review your message carefully. Check the spelling, spacing and order of the words.

If you’re making Christmas ribbon, choose lettering that suits the festive design and remains easy to read once stitched.

You can experiment with different names and short greetings to create personalized ribbon for family members, friends or handmade gifts.

Planning your lettering before stitching is an important part of How to Embroider on Ribbon because it helps you make the most of the available space.

Once your wording is entered and the dimensions look correct, you’re ready to rotate and resize the design if necessary. These adjustments will help you achieve a neat, balanced result as you continue learning How to Embroider on Ribbon.

Taking a few extra moments to check the layout now can help you avoid positioning problems later. With your message ready, you’re one step closer to creating beautiful embroidered Christmas ribbon using your Baby Lock Altair 2.

Step 4: How to Embroider on Ribbon – Rotate, Resize and Arrange the Lettering

How to Embroider on Ribbon - Rotate, Resize and Arrange the Lettering

After entering the message, you may discover that the design is too large or positioned in the wrong direction.

Don’t worry. This is the time to edit it.

Rotate the Design

Use the machine’s editing functions to rotate the lettering into the direction you need.

For this project, I rotate the design so the message will stitch in the correct orientation on the ribbon.

Once rotated, check the dimensions again. Rotating a design can change how it fits within the available embroidery area.

Resize the Lettering

My first attempt is still too large for the embroidery frame, so I return to the editing menu and select the size function.

I reduce the lettering until it fits comfortably.

Then I make a small adjustment to increase the size slightly, creating a design that uses the available space without becoming too large.

This is a useful reminder that you don’t need to get the size perfect on your first attempt.

Make small adjustments and review the result on the machine’s screen.

Check the Spacing and Layout

Look at the complete message before proceeding.

Make sure the words are arranged correctly and that your name is included where you want it.

Check that the lettering fits within the embroidery area and that the design is suitable for the ribbon’s width.

Tip: If you’re new to machine embroidery, take your time during this stage. Correcting the layout before stitching is much easier than discovering a positioning problem after the lettering is embroidered.

Step 5: How to Embroider on Ribbon – Use IQ Positioning to Align the Design

How to Embroider on Ribbon

One of the helpful features I use when learning How to Embroider on Ribbon with the Baby Lock Altair 2 is IQ positioning.

This feature helps you see where your design will sit in relation to the ribbon inside the hoop.

Because ribbon is narrow, accurate placement makes a real difference to the finished result. As a Baby Lock Educator, I recommend taking the time to check your design’s position before starting the embroidery.

Photograph the Embroidery Hoop

First, I take a photograph of the hoop with my iPad.

I then select IQ positioning on the machine and open the easy positioning function.

After pressing OK, the machine prompts me to hold the frame still while it takes a photograph.

Follow the instructions displayed on your machine. Keep the hoop steady during the positioning process so the machine can capture the image correctly.

The photograph provides a visual reference for the position of the ribbon and the available stitching area. This is an important part of How to Embroider on Ribbon because it helps you see where your lettering will appear before you begin stitching.

Check Where the Lettering Will Stitch

Once the photograph has been taken, the machine displays the lettering in relation to the hoop.

You can now see where the design is expected to stitch on the ribbon.

This is particularly useful when working with a narrow material because it allows you to identify positioning problems before the embroidery begins.

Look carefully at the relationship between the text and the ribbon’s edges.

If the lettering is too close to one edge, or if the design is not centered where you want it, you can make adjustments. Checking the layout at this stage helps you achieve a neater finish when practicing How to Embroider on Ribbon.

Move the Design Into Position

In my demonstration, I can see that the lettering isn’t quite where I want it.

I select the move function and adjust the position of the design.

Keep checking the preview until the lettering is positioned correctly over the ribbon.

Once you’re happy with the placement, press OK to confirm the position.

Remember that the exact menu names and positioning functions may vary between embroidery machine models. If you’re using another machine, consult its manual for the equivalent feature.

Final Positioning Tips

Before moving on to stitching, double-check that the lettering fits within the ribbon’s width and sits where you want it.

Make sure the ribbon remains flat and securely attached to the sticky-back stabilizer.

Taking a moment to review the design is a simple but valuable step in How to Embroider on Ribbon, particularly when creating personalized Christmas messages.

With the lettering positioned correctly, you’re ready to prepare your threads and begin stitching. Careful placement will help you get the best possible results from your How to Embroider on Ribbon project.

Step 6: How to Embroider on Ribbon – Prepare the Threads and Begin Embroidering

How to Embroider on Ribbon

You’re nearly ready to stitch!

Before attaching the embroidery frame, prepare the threads required for your project.

Insert the Bobbin and Upper Thread

In my tutorial, I add the bobbin thread and thread the machine before attaching the hoop.

Follow your machine’s threading instructions, ensuring the upper thread is correctly positioned and the bobbin is inserted properly.

Choose an embroidery thread colour that contrasts with the ribbon if you want the message to stand out.

For a traditional Christmas look, you might choose red, green, gold or white thread, depending on the ribbon colour.

Before starting, check that the thread is suitable for your machine and that the bobbin is ready for the embroidery design.

Attach the Embroidery Frame

Carefully attach the prepared hoop to the embroidery machine.

Make sure the ribbon remains securely attached to the sticky-back stabiliser and has not lifted or shifted while you were working.

Follow the machine’s prompts. On my Baby Lock Altair 2, I press OK when instructed to confirm the setup.

Confirm the Position One Last Time

Before stitching, check the design position on the screen.

Make sure the lettering is within the available embroidery area and that the ribbon is lying flat.

Move any loose ribbon out of the way of the embroidery mechanism. The free end should not become trapped or interfere with the movement of the frame.

If your machine provides a positioning check or trace function, use it according to the manufacturer’s instructions to confirm that the design will fit the intended area.

Once you’re satisfied, press the embroidery button and start stitching.

Stay with your machine while it embroiders. Watch for thread breaks, ribbon movement or any sign that the stabiliser is lifting.

Step 7: How to Embroider on Ribbon – Finish Your Personalized Embroidered Ribbon

How to Embroider on Ribbon

This is the exciting part of How to Embroider on Ribbon: watching your lettering appear on the ribbon!

As the embroidery machine stitches the design, the words gradually form on the fabric. In my project, the finished message includes Merry Christmas and my name, making the ribbon a personalized addition to my Christmas sewing.

Check the Finished Embroidery

Once you’ve completed How to Embroider on Ribbon, follow the manufacturer’s instructions to remove the hoop safely.

Inspect the lettering carefully.

Check that the words are readable, the stitches look secure and the design is positioned as intended.

If any stabilizer is visible around the embroidered area, follow the stabilizer manufacturer’s instructions for removing or trimming it. Avoid pulling at the stitches, as this could damage your finished embroidery.

Remove the Ribbon Carefully

Gently lift the ribbon from the sticky-back stabilizer.

Work slowly to avoid stretching the ribbon or disturbing the embroidery. Taking care at this stage helps preserve the neat finish you’ve created.

Trim any loose threads neatly with small scissors.

If you plan to use the ribbon for gift wrapping or decoration, cut the ends to the length you need. You can leave them straight or finish them with angled ends, depending on the look you prefer.

Ideas for Using Your Embroidered Ribbon

Now that you’ve learned How to Embroider on Ribbon, you can adapt the technique for many different occasions.

Try personalizing ribbon for:

  • Christmas presents with the recipient’s name.
  • Handmade gift baskets.
  • Christmas tree decorations.
  • Special occasion gift wrapping.
  • Wedding favors and celebration decorations.
  • Birthday gifts with a short personalized message.
  • Handmade sewing projects that need a decorative finishing touch.

You can experiment with different ribbon colors, lettering styles and thread combinations to create designs that suit your projects.

As a Baby Lock Educator, I love encouraging sewists to experiment with their embroidery machines and discover new ways to personalize handmade creations.

Tips for a Professional Finish

For the best results, keep the ribbon straight, choose lettering that fits comfortably within its width and check the design positioning before stitching.

Using suitable stabilizer and removing the ribbon carefully will also help you achieve a neat finish.

With a little practice, How to Embroider on Ribbon becomes a fun technique for creating personalized gifts and beautiful Christmas decorations.

Troubleshooting: Common Problems When Embroidering on Ribbon

Even a straightforward embroidery project can require a little adjustment. Here are some things to check if your first attempt doesn’t go as planned.

Why Is My Ribbon Crooked?

Ribbon can shift or sit at an angle if it isn’t secured properly.

Return to the preparation stage and use the hoop’s crosshatch markings and a ruler to create a straight guide.

Press the ribbon firmly onto the sticky-back stabiliser and check the alignment before positioning the design.

Why Doesn’t My Lettering Fit?

The lettering may be too large for the embroidery area or the width of the ribbon.

Return to the machine’s editing menu and resize the design. Check the dimensions again after rotating or rearranging the lettering.

Remember that the usable stitching area depends on the hoop and machine settings.

Why Is My Design in the Wrong Position?

Use the IQ positioning feature, if available, to view the ribbon and lettering together.

Adjust the design with the move function and check the preview again before starting the embroidery.

What If the Ribbon Moves During Stitching?

Stop the machine if you notice that the ribbon has shifted or the stabilizer is lifting.

Check that the ribbon is flat and securely attached. Do not continue stitching if the material is moving into an unsafe position near the needle or embroidery mechanism.

If necessary, reprepare the stabilizer and reposition the ribbon before restarting.

Conclusion: How to Embroider on Ribbon for Beautiful Personalized Gifts

How to Embroider on Ribbon

Learning how to embroider on ribbon opens up plenty of creative possibilities for Christmas gifts, decorations and personalized sewing projects.

Using my Baby Lock Altair 2, I prepared the hoop with sticky-back stabilizer, positioned the grosgrain ribbon, created the lettering, resized and rotated the design, and used IQ positioning to check the placement before stitching.

The most important things to remember are to keep the ribbon straight, make sure your design fits within the embroidery area, and check the positioning before you begin stitching.

Once you understand these steps, you can experiment with different messages, names, ribbon colors and thread combinations.

How cute is personalized Christmas ribbon? It is a lovely way to add an extra special touch to handmade gifts.

If you try this technique, please leave a comment below and tell me what you would like to embroider on your ribbon.

Don’t forget to subscribe to my YouTube channel, Faodail Creation, for more sewing, quilting and embroidery tutorials.

Happy stitching, and I’ll see you in the next tutorial!

Bye-bye for now.


Frequently Asked Questions About How to Embroider on Ribbon

Can you embroider directly onto ribbon with an embroidery machine?

Yes! How to Embroider on Ribbon starts with securing the ribbon to an appropriate stabilizer and positioning the design within the ribbon’s width. Sticky-back stabilizer is a useful option because it holds the ribbon in place without requiring you to hoop the ribbon itself.

What stabilizer should I use to embroider on ribbon?

When learning How to Embroider on Ribbon, sticky-back embroidery stabilizer is a helpful choice for narrow materials. Choose a stabilizer suitable for your ribbon and embroidery project, and follow the manufacturer’s instructions for the best results.

Can I personalize Christmas ribbon with names?

Absolutely! How to Embroider on Ribbon is a great technique for creating personalized Christmas decorations and gifts. Machine embroidery allows you to add names, greetings and short messages. Make sure your lettering fits within the ribbon’s width and the available embroidery area.

Can I use IQ positioning for ribbon embroidery?

Yes, if your embroidery machine supports this feature. When learning How to Embroider on Ribbon with the Baby Lock Altair 2, IQ positioning can help you photograph the hoop and check where your design will stitch. Follow the instructions for your specific machine to position the lettering accurately.

Is grosgrain ribbon suitable for machine embroidery?

Grosgrain ribbon can be suitable for machine embroidery because its ribbed texture gives it structure. When exploring How to Embroider on Ribbon, remember that results depend on the ribbon’s width, thickness, stabiliser and embroidery design. Check that your materials are appropriate before beginning your project.

Join my FACEBOOK GROUP

Faodail Creation Facebook Group Link

SUBSCRIBE! So you don’t miss my next blog post where I have all my free patterns

READ NEXT

How to Embroider on Ribbon : 7 Easy Steps for Beautiful Personalized Christmas Ribbon

How to Embroider on Ribbon : 7 Easy Steps for Beautiful Personalized Christmas Ribbon is a fun way to explore Machine Embroidery.

If you enjoyed How to Embroider on Ribbon : 7 Easy Steps for Beautiful Personalized Christmas Ribbon, you might also like Embroider a Towel you can also try How to Embroider a Baby Onesie to learn more Machine Embroidery.

The above links lead to Faodail Creation You Tube Channel

Use the Search below so you can find your next sewing project

Latest Blog Posts

This Blogs Category

Blog Categories

More Blog Posts

Christmas Stocking Applique : Create a Beautiful Festive Sewing Project
This tutorial explains how to create a festive Christmas stocking appliquรฉ using …
Thread Painting with Derwent Inktense : Amazing Free-Motion Quilting Tutorial
This tutorial explains how to transform Derwent Inktense fabric artwork into textile …

Blog Tags

Machine Embroidery for Beginners

How to Embroider a Beanie Hat | Machine Embroidery for Beginners

This is the link to the full you tube tutorial : How to Embroider a Beanie Hat | Machine Embroidery for Beginners https://youtu.be/vMOI7-6EhP4

Cassie Cartmell – Faodail Creation

Table of Contents

How to Embroider a Beanie Hat

Learning how to embroider a beanie hat is a fun way to personalize a plain beanie and turn it into something unique. A beanie hat for winter is also a practical project when you want to create something warm and personal for the colder months. Embroidering on stretchy fabric can seem a little intimidating at first, but with the right stabilizer, needle, hooping technique, and careful placement, you can create a beautiful embroidered beanie.

In this tutorial, Iโ€™m going to show you how to embroider a beanie hat using an embroidery machine. Iโ€™ll walk you through checking the beanie for seams, finding the center, preparing your embroidery hoop, securing the beanie, positioning your design, and stitching the embroidery. Whether you’re making a personalized beanie hat for winter or creating a handmade gift, these steps will help you achieve a neat embroidered finish.

Iโ€™m using a Baby Lock Altair 2 embroidery machine and its positioning features, but the general techniques can be used with many embroidery machines.

What You Need to Embroider a Beanie Hat

How to Embroider a Beanie Hat

Before you start learning how to embroider a beanie hat, gather everything you need.

Supplies – How to Embroider a Beanie Hat

Below is a list of my Amazon Affiliate links, if you purchase from any of these links I may receive a small commission at no cost to you.

This is the link to my Amazon Store https://www.amazon.com/shop/faodailcreation

The exact supplies may vary depending on your beanie fabric and embroidery machine.

Step 1: Check the Beanie for Seams – How to Embroider a Beanie Hat

The first thing to do when learning how to embroider a beanie hat is to check the area where you want your embroidery design to go.

Turn the beanie over and feel the fabric carefully.

You want to make sure there isn’t a bulky seam directly underneath the area where you plan to embroider.

A seam can interfere with your embroidery and make hooping more difficult. It can also affect how evenly your design stitches onto the fabric.

Find a Smooth Area – How to Embroider a Beanie Hat

Place your hand inside the beanie and feel for any seams.

If you find a seam on one side, turn the beanie around and look for a smoother area.

Choose the section that gives you a nice, flat area for your embroidery design.

This is an important part of how to embroider a beanie hat successfully because good placement starts before you even put the beanie on the hoop.

Step 2: How to Embroider a Beanie Hat – Mark Which Way Is Up

How to Embroider a Beanie Hat

Before turning your beanie inside out, mark which direction your embroidery design needs to face.

I like to use a small sticker with an arrow pointing upward.

This simple trick can prevent a very frustrating mistake later.

When you’re working with a beanie, it can be surprisingly easy to lose track of which way is up once the fabric is turned inside out and placed in the hoop.

Find the Center of the Beanie – How to Embroider a Beanie Hat

Next, find the center of the brim.

Fold the beanie carefully to locate the center point.

Don’t pull or stretch the fabric while you’re doing this. You want the beanie to remain relaxed and unstretched.

Once you’ve found the center, decide exactly where you want the embroidery to sit.

You don’t want the design too close to the top of the beanie, but you also don’t want it sitting too close to the bottom brim.

A position around the center area of the front of the beanie usually gives you a good starting point.

Step 3: How to Embroider a Beanie Hat – Prepare Your Embroidery Machine

Before starting the embroidery, change to an appropriate needle.

For this project, I’m using an 80/12 jersey needle.

A jersey needle is designed for knit fabrics and is a good choice when embroidering a stretchy beanie.

Always check your embroidery machine manufacturer’s recommendations for the fabric and needle combination you’re using.

Step 4: Prepare the Embroidery Hoop – How to Embroider a Beanie Hat

How to Embroider a Beanie Hat

Now it’s time to prepare the hoop.

For the back of the beanie, I’m using a sticky-back stabilizer.

Place the stabilizer in the hoop with the sticky side facing upward.

Score the Stabilizer

Use a pin to gently score the paper covering the sticky stabilizer.

You only need to score the paper enough to make it easy to remove.

Peel away the paper to expose the sticky surface.

I also like to trim away some of the excess paper because it makes handling the hoop easier.

Be careful not to damage the stabilizer underneath.

Step 5: How to Embroider a Beanie Hat – Mark the Bottom of the Beanie

Remember the center point you found earlier?

Place a pin at the fold where you identified the bottom or center reference point of the beanie.

This gives you another visual reference when positioning the fabric.

Now open the beanie back out and turn it inside out.

Your beanie should now be ready to position on the hoop.

Step 6: Position the Beanie on the Hoop – How to Embroider a Beanie Hat

How to Embroider a Beanie Hat

Place the beanie over the sticky-back stabilizer.

Use the center reference you marked earlier to help position the beanie accurately.

If your embroidery machine has good positioning features, you can use those to help with placement.

If it doesn’t, you can mark a center line on the hoop.

Create a Center Reference – How to Embroider a Beanie Hat

Use the center markings or reference points on your hoop to establish a central line.

Line the center of the beanie up with this reference.

Take your time with this step.

When learning how to embroider a beanie hat, accurate positioning is one of the most important parts of getting a professional-looking result.

Step 7: How to Embroider a Beanie Hat – Secure the Beanie

Once the beanie is positioned correctly, secure it to the stabilizer.

I’m using sewing pins to help grip the fabric in place.

Be very careful with your pins.

You don’t want anything to interfere with the embroidery area or the movement of the embroidery machine.

Keep Excess Fabric Out of the Way

This is particularly important when embroidering a beanie.

You don’t want the opposite side of the hat getting caught underneath the embroidery area.

Use a hair grip or clip to hold excess fabric away from the back of the hoop.

The beanie should also remain relaxed.

Do not stretch the beanie while securing it.

If you stretch the fabric onto the hoop, it can change shape when you remove it from the hoop, which can affect your finished embroidery.

Step 8: Add Wash-Away Stabilizer – How to Embroider a Beanie Hat

How to Embroider a Beanie Hat

Now it’s time to add the wash-away stabilizer over the top of the beanie.

This is an important part of learning how to embroider a beanie hat, particularly when working with fleece, terry cloth, knitted fabric, or other materials with a nap.

The wash-away stabilizer sits on top of the fabric.

Why Use Wash-Away Stabilizer?

The top stabilizer helps hold the fabric fibers down while the embroidery stitches are being created.

Without it, the embroidery thread can sink into a fluffy or textured fabric.

This can make the embroidery look less defined.

The wash-away stabilizer helps the stitches sit neatly on top of the fabric.

Don’t be too stingy with the stabilizer.

It needs to be large enough to cover the entire embroidery area, and it can move or pull slightly while you’re working.

Step 9: How to Embroider a Beanie Hat – Understand the Different Types of Wash-Away Stabilizer

There are different types of wash-away stabilizers, and they don’t all serve exactly the same purpose.

The lightweight film-type stabilizer used on top of a beanie is designed to help control the fabric surface while you’re embroidering.

Another type of wash-away stabilizer can be placed directly in an embroidery hoop.

That type can be useful for projects such as freestanding lace, patches, and key fobs because the stabilizer can eventually be washed away.

For a beanie, you’re using the wash-away stabilizer as a topper.

Its job is to help prevent the embroidery stitches from disappearing into the fabric.

Step 10: Position the Embroidery Design

How to Embroider a Beanie Hat

Now that the beanie is secured and the topper is in place, it’s time to position your embroidery design.

I’m using the positioning app with my Baby Lock Altair 2.

The app allows me to take a photograph of the hooped fabric and use that photograph to help position the design.

Take a Placement Photograph

Take a photo of the hooped beanie using the positioning system.

The photograph can then be transferred to the embroidery machine.

This gives you a visual representation of where your embroidery design will stitch.

It’s particularly helpful when you’re working with a small area like a beanie.

Step 11: Rotate and Resize the Design – How to Embroider a Beanie Hat

Bring your embroidery design onto the machine.

Look carefully at the design’s orientation.

You can rotate the design if necessary.

For this project, the design needs to be rotated 90 degrees.

I also move the design slightly upward so that it isn’t too close to the bottom of the beanie.

Check the Size – How to Embroider a Beanie Hat

Make sure the design is an appropriate size for your beanie.

A design that is too large can be difficult to stitch on a curved or stretchy surface.

A design that is too small may not have the visual impact you’re looking for.

Always consider the size and shape of the area you’re embroidering before starting the stitch-out.

Step 12: Always Double-Check the Design – How to Embroider a Beanie Hat

How to Embroider a Beanie Hat

Before pressing the final embroidery button, stop and check everything one more time.

This is one of the most important tips in how to embroider a beanie hat.

Look at:

  • The direction of the design
  • The center position
  • The height
  • The design size
  • The needle
  • The thread
  • The stabilizer
  • The fabric placement

In this project, I actually caught an important mistake during my final check.

The design was upside down!

Thankfully, I checked before starting the embroidery.

I rotated the design and positioned it correctly.

Always double-check your work before you start stitching.

Step 13: Select Your Embroidery Thread – How to Embroider a Beanie Hat

Once you’re happy with the design placement, select your embroidery thread colors.

I’m starting with green thread for the first color.

If you’re unsure about which colors work well together, you can follow the suggested colors included with your embroidery design.

However, don’t feel restricted to those colors.

One of the fun parts of learning how to embroider a beanie hat is choosing colors that match your own style.

You can coordinate the embroidery thread with the beanie or choose contrasting colors to make the design stand out.

Step 14: Start Embroidering the Beanie

Now you’re ready to stitch the design.

Start the embroidery machine and allow it to stitch each section of the design.

Keep an eye on the embroidery while the machine is running.

You don’t need to stand over the machine every second, but it’s important to monitor the project, especially when you’re working with a stretchy garment.

Make sure the fabric remains secure and that nothing is getting caught underneath the hoop.

Step 15: Remove the Finished Beanie – How to Embroider a Beanie Hat

How to Embroider a Beanie Hat

Once the embroidery design has completely finished stitching, remove the hoop from the embroidery machine.

Carefully remove any pins.

Take your time with this step because you don’t want to accidentally pull the embroidery stitches.

Next, gently remove the sticky-back stabilizer from the back of the embroidery.

It should pull away from the stitches fairly easily.

Don’t rush.

If an area feels resistant, gently work the stabilizer away rather than pulling aggressively.

Step 16: How to Embroider a Beanie Hat – Turn the Beanie Right Side Out

Once the stabilizer has been removed, turn the beanie right side out.

This is when you finally get to see your finished embroidery.

Gently arrange the fabric around the design.

If there is a little excess wash-away stabilizer remaining around the embroidery, you can use a small spritz bottle of water to help remove it.

The stabilizer will begin to dissolve, leaving your embroidered design beautifully visible.

Admire Your Finished Embroidery – How to Embroider a Beanie Hat

And that’s it!

You’ve successfully learned how to embroider a beanie hat using an embroidery machine.

The finished beanie has a cute embroidered design that makes it completely personal.

Tips for Successful Beanie Embroidery

If you’re trying how to embroider a beanie hat for the first time, keep these tips in mind.

Check for Seams

Always feel the inside of the beanie before deciding where to place your design.

Avoid bulky seams whenever possible.

Don’t Stretch the Fabric – How to Embroider a Beanie Hat

A stretchy beanie should remain relaxed while you’re positioning it.

Stretching the fabric can cause distortion when the beanie is removed from the hoop.

Use the Correct Stabilizer

Sticky-back stabilizer helps secure the beanie from underneath.

A wash-away topper helps keep embroidery stitches sitting neatly on top of textured or fluffy fabric.

Keep Excess Fabric Away – How to Embroider a Beanie Hat

Make sure the opposite side of the beanie isn’t underneath the embroidery area.

Secure excess fabric with a clip if necessary.

Check Your Design Twice

Before stitching, check the design orientation, size, and placement.

A few seconds of checking can save you from having to unpick an entire embroidery design.

Final Thoughts on How to Embroider a Beanie Hat

How to Embroider a Beanie Hat

Learning how to embroider a beanie hat is a great embroidery project when you want to personalize a plain hat with your own design.

The most important things to remember are to check for seams, find the center, use the correct needle and stabilizers, avoid stretching the fabric, secure the excess fabric, and carefully check your design orientation before stitching.

Using a positioning system can make the process even easier, especially when you want precise placement.

And don’t forget the most important tip: always double-check that your design is facing the correct direction before you press start!

Once you’ve embroidered one beanie, you’ll have a better understanding of how stretchy fabrics behave and how stabilizers help create clean, professional-looking embroidery.

I hope you’ve enjoyed this tutorial on how to embroider a beanie hat and that it inspires you to try embroidering your own beanies.

Join my FACEBOOK GROUP

Faodail Creation Facebook Group Link where I have all my free patterns

READ NEXT

How to Embroider a Beanie Hat | Machine Embroidery for Beginners

How to Embroider a Beanie Hat | Machine Embroidery for Beginners is a fun way to explore Machine Embroidery.

If you enjoyed How to Embroider a Beanie Hat | Machine Embroidery for Beginners, you might also like How to Embroider a Christmas Towel you can also try How to Embroider a Baby Onesie to learn more Machine Embroidery.

The above links lead to Faodail Creation You Tube Channel

SUBSCRIBE! So you don’t miss my next blog post

Use the below search to find your next sewing tutorial

This Blogs Category

Latest Blog Posts

More Blog Posts

Christmas Stocking Applique : Create a Beautiful Festive Sewing Project
This tutorial explains how to create a festive Christmas stocking appliquรฉ using …
Thread Painting with Derwent Inktense : Amazing Free-Motion Quilting Tutorial
This tutorial explains how to transform Derwent Inktense fabric artwork into textile …

Blog Tags

Machine Embroidery for Beginners

How to Embroider a Baby Onesie – Easy Step-by-Step Tutorial for Beautiful Results

This is the full you tube tutorial How to Embroider a Baby Onesie https://youtu.be/815G_P65WS0

Cassie Cartmell – Faodail Creation

Table of Contents

How to Embroider a Baby Onesie

How to Embroider a Baby Onesie is one of the easiest ways to create a personalized baby gift that will be treasured for years. Whether you’re making a custom outfit for your own little one, a baby shower gift, or a keepsake for a special occasion, embroidery adds a professional touch that’s surprisingly simple to achieve. Machine embroidery on onesies is also a wonderful way to create custom baby clothing that is both unique and long-lasting.

In this beginner-friendly tutorial from Faodail Creation, you’ll learn How to Embroider a Baby Onesie using a home embroidery machine, sticky-back stabilizer, and a 4×4 embroidery hoop. I’ll walk you through every step, from preparing the onesie to applying a soft backing for comfort, so you can confidently complete your project. Whether you’re new to embroidery or looking to improve your skills, machine embroidery on onesies is easier than you might think when you follow the proper techniques. Along the way, I’ll also share tips for machine embroidery that will help you achieve cleaner stitches, better placement, and more professional-looking results.

If you’ve been wondering How to Embroider a Baby Onesie, this guide will help you avoid common mistakes and achieve beautiful results every time.

This tutorial is designed for both beginners and experienced embroiderers who want to create beautiful, professional-looking baby clothing at home. Even if you’ve never embroidered on knit fabric before, you’ll discover that the process is much easier when you use the proper stabilizer, accurate placement techniques, and the right embroidery supplies. Taking a few extra minutes to prepare your project correctly will help prevent puckering, crooked designs, and other common embroidery problems. These same techniques are the foundation of successful machine embroidery on onesies, helping you achieve crisp, centered designs every time.

Throughout this tutorial, you’ll learn practical tips that make embroidering a baby onesie easier, including how to find the perfect placement, hoop sticky-back stabilizer, secure the excess fabric, and finish the inside of the garment with Tender Touch backing for maximum comfort. These small details make a big difference in the final appearance and durability of your embroidery. You’ll also pick up additional tips for machine embroidery, including ways to avoid stitching through both layers of the onesie and how to create a soft, comfortable finish for baby’s delicate skin.

By the end of this tutorial, you’ll have the knowledge and confidence to embroider personalized baby onesies for birthdays, baby showers, holidays, newborn photo sessions, and thoughtful handmade gifts. Once you’ve completed this tutorial, you’ll be ready to experiment with names, monograms, cute animals, seasonal designs, and many other embroidery patterns to create unique keepsakes that families will treasure for years. As your confidence grows, you’ll find that machine embroidery on onesies is a fun and rewarding way to create personalized gifts that parents will cherish for years to come.


Why You’ll Love Embroidering Baby Onesies

How to Embroider a Baby Onesie

Personalized baby onesies make thoughtful gifts and adorable keepsakes. They’re perfect for:

  • Baby showers
  • Birth announcements
  • First birthdays
  • Holiday outfits
  • Personalized baby gifts
  • Handmade items to sell at craft fairs

Once you learn How to Embroider a Baby Onesie, you’ll be able to customize almost any infant garment with names, animals, monograms, or cute embroidery designs.


Supplies Needed for How to Embroider a Baby Onesie

How to Embroider a Baby Onesie

Below I have included my Amazon links, if you decide to purchase from one of these links I may receive a small commission at on extra cost to you.

Before you begin, gather the following supplies:

Fabric & Stabilizer

Embroidery Supplies

Helpful Tools

Having everything prepared before you begin makes the embroidery process much smoother.


Step 1 โ€“ Prepare the Baby Onesie – How to Embroider a Baby Onesie

The first step in How to Embroider a Baby Onesie is preparing the fabric correctly.

Use a lint roller to remove lint, loose fibers, and dust from the fabric. This gives the embroidery a cleaner finish and helps prevent debris from becoming trapped beneath your stitches.

Next, press the onesie with a warm iron until it is completely wrinkle-free. Never embroider wrinkled fabric because the finished design may become distorted.

A smooth, flat surface is the foundation of professional embroidery.


Step 2 โ€“ Find the Center of the Design Area – How to Embroider a Baby Onesie

How to Embroider a Baby Onesie

Accurate placement is one of the most important parts of How to Embroider a Baby Onesie.

Using a centering ruler, locate the middle of the embroidery area.

Measure approximately 2 inches down from the neckline.

Using a friction pen, place three small dots about half an inch apart.

These markings help you:

  • Find the exact center
  • Keep the design straight
  • Align the embroidery perfectly

Since friction pen marks disappear with heat, they’ll easily iron away after the project is complete.


Step 3 โ€“ Hoop the Sticky-Back Stabilizer – How to Embroider a Baby Onesie

How to Embroider a Baby Onesie

Instead of hooping the garment itself, hoop the sticky-back stabilizer.

How to Hoop

  1. Loosen the embroidery hoop.
  2. Hoop only the stabilizer.
  3. Tighten the hoop securely.
  4. Score the paper backing with a pin.
  5. Peel away the paper to expose the adhesive.

Trimming away excess paper also helps reduce bulk around the hoop.


Why Sticky-Back Stabilizer Works So Well – How to Embroider a Baby Onesie

Baby onesies are difficult to hoop because they’re small and stretchy.

Using sticky-back stabilizer allows you to simply stick the garment onto the stabilizer without stretching the fabric.

This helps prevent puckering while keeping the embroidery centered.


Step 4 โ€“ Use the Hoop Guides – How to Embroider a Baby Onesie

How to Embroider a Baby Onesie

Most embroidery hoops include center alignment marks.

You can use:

  • Hoop notches
  • Drawn center lines
  • Grid guide

These tools make it much easier to line up your placement dots accurately.

If your embroidery machine doesn’t include advanced positioning features, drawing temporary center lines on the hoop can make alignment much easier.


Step 5 โ€“ Position the Baby Onesie – How to Embroider a Baby Onesie

How to Embroider a Baby Onesie

Carefully place the onesie onto the exposed adhesive.

Line the center dots up with the center marks on the hoop.

Hold the hoop toward the light if necessary to verify the placement.

The fabric should be:

  • Smooth
  • Flat
  • Not stretched
  • Not pulled tight

Stretching knit fabric can cause puckering after the embroidery is complete.


Step 6 โ€“ Keep the Back of the Onesie Out of the Hoop – How to Embroider a Baby Onesie

How to Embroider a Baby Onesie

One of the biggest mistakes beginners make is accidentally embroidering through both layers.

Pull the entire back of the onesie up and over the hoop so only the front layer remains inside the embroidery field.

Secure the excess fabric using spool savers or clips.

Double-check before stitching to ensure the back is completely clear.


Step 7 โ€“ Position Your Design on the Embroidery Machine – How to Embroider a Baby Onesie

If your embroidery machine includes a camera positioning system, now is the time to use it.

On the Baby Lock Altair 2:

  • Open the embroidery app.
  • Select Photo Frame positioning.
  • Ensure the registration marks are visible.
  • Transfer the positioning information to the machine.

This feature allows extremely accurate embroidery placement.


Step 8 โ€“ Select Your Embroidery Design – How to Embroider a Baby Onesie

How to Embroider a Baby Onesie

Choose an embroidery design that fits comfortably inside the 4×4 hoop.

In this tutorial, a children’s design measuring approximately:

  • 3.77″ ร— 3.23″

was selected.

If needed:

  • Resize using stitch recalculation.
  • Rotate 90 degrees if necessary.
  • Center the design.
  • Confirm the collar direction before stitching.

Taking a moment to verify orientation helps prevent expensive mistakes.


Step 9 โ€“ Stitch the Design – How to Embroider a Baby Onesie

How to Embroider a Baby Onesie

Now it’s finally time to embroider.

Before starting:

  • Install an embroidery needle.
  • Check thread colors.
  • Verify placement.
  • Confirm only one layer of fabric is inside the hoop.

Start the embroidery and allow the machine to complete each color change.

Avoid pulling or moving the hoop while stitching.


Step 10 โ€“ Remove the Stabilizer – How to Embroider a Baby Onesie

After embroidery finishes:

Remove the hoop from the machine.

Carefully peel the onesie away from the sticky stabilizer.

Use a pin to lift remaining stabilizer paper if needed.

Take your time to avoid damaging the stitches.


Step 11 โ€“ Trim Jump Threads – How to Embroider a Baby Onesie

How to Embroider a Baby Onesie

Professional-looking embroidery always includes clean thread trimming.

Remove:

  • Jump stitches
  • Loose threads
  • Excess thread tails

Although this takes a few extra minutes, it greatly improves the finished appearance.


Step 12 โ€“ Apply Tender Touch Backing – How to Embroider a Baby Onesie

The final step in How to Embroider a Baby Onesie is protecting baby’s delicate skin.

Cut a piece of Tender Touch slightly larger than the embroidery.

Place the fusible side against the back of the design.

Press with a warm iron according to the manufacturer’s instructions.

The backing:

  • Covers scratchy stitches
  • Makes embroidery softer
  • Improves comfort
  • Gives a professional finish

This is especially important for newborn clothing.


Tips for Success – How to Embroider a Baby Onesie

How to Embroider a Baby Onesie

Use a Fresh Embroidery Needle

A sharp embroidery needle reduces skipped stitches and protects knit fabrics.

Don’t Stretch the Fabric

Keep the onesie smooth rather than tight.

Always Check the Back

Verify the back layer is safely outside the embroidery field before stitching.

Use Quality Stabilizer

Good stabilizer makes a noticeable difference in stitch quality.

Test First

If you’re using a new design, stitch it on scrap fabric before embroidering the final garment.


Common Mistakes to Avoid – How to Embroider a Baby Onesie

  • Hooping the fabric too tightly
  • Forgetting to change to an embroidery needle
  • Embroidering through both layers
  • Skipping the Tender Touch backing
  • Not checking placement before stitching
  • Using a design that’s too large for the hoop

Avoiding these mistakes will produce cleaner, more professional embroidery.


Frequently Asked Questions – How to Embroider a Baby Onesie

How to Embroider a Baby Onesie

Can beginners embroider baby onesies?

Yes! Baby onesies are an excellent beginner embroidery project when you use sticky-back stabilizer.

What size hoop works best?

A 4×4 embroidery hoop works perfectly for most baby embroidery designs.

Why should I use Tender Touch?

Tender Touch prevents rough embroidery stitches from rubbing against a baby’s skin.

Can I wash embroidered baby onesies?

Yes. Wash on a gentle cycle and avoid high heat drying to help preserve the embroidery.


Final Thoughts on How to Embroider a Baby Onesie – How to Embroider a Baby Onesie

Learning How to Embroider a Baby Onesie is a wonderful way to create meaningful handmade gifts that parents will cherish. With careful preparation, accurate placement, quality stabilizer, and a soft Tender Touch backing, you can achieve beautiful, professional-looking embroidery right from your home sewing room. This tutorial has shown you each step, making it easy to embroider with confidence.

Whether you’re making gifts, sewing for your own family, or creating products to sell, mastering How to Embroider a Baby Onesie is a valuable embroidery skill that you’ll use again and again. By following this tutorial, you’ll gain the confidence to personalize baby clothing with beautiful embroidery designs that look professionally made.

If you enjoyed this tutorial, be sure to explore more sewing and embroidery projects here on Faodail Creation. Every tutorial is designed to help beginners and experienced makers build their skills while creating beautiful handmade projects.

Join my FACEBOOK GROUP

Faodail Creation Facebook Group Link where I have all my free patterns

READ NEXT

How to Embroider a Baby Onesie – Easy Step-by-Step Tutorial for Beautiful Results

How to Embroider a Baby Onesie – Easy Step-by-Step Tutorial for Beautiful Results is a fun way to explore Embroidery.

How to Embroider a Baby Onesie – Easy Step-by-Step Tutorial for Beautiful Results, you might also like How to Embroider a Beanie Hat you can also try How to Embroider a Christmas Towel to learn more about Embroidery.

The above links lead to Faodail Creation You Tube Channel

SUBSCRIBE, So you don’t miss my next blog post

Use the search below to find your next sewing project

Latest Blog Post

Blog Categories

Categories List

More Blog Posts

Christmas Stocking Applique : Create a Beautiful Festive Sewing Project
This tutorial explains how to create a festive Christmas stocking appliquรฉ using …
Thread Painting with Derwent Inktense : Amazing Free-Motion Quilting Tutorial
This tutorial explains how to transform Derwent Inktense fabric artwork into textile …

Blog Tags